Install on Kubernetes
Learn how to install RDI on Kubernetes
This guide explains how to use the RDI Helm chart to install on Kubernetes (K8s). You can also Install RDI on VMs.
The installation creates the following K8s objects:
- A K8s namespace named
rdi. You can also use a different namespace name if you prefer. - Deployments and services for the RDI operator, metrics exporter, and API server.
- A service account and RBAC resources for the RDI operator.
- A ConfigMap with RDI database details.
- Secrets with the RDI database credentials and TLS certificates.
- Other optional K8s resources such as ingresses that can be enabled depending on your K8s environment and needs.
You can use this installation on OpenShift and other K8s distributions including cloud providers' K8s managed clusters.
You can configure the RDI Helm chart to pull the RDI images from dockerhub or from your own private image registry.
Before you install
Complete the following steps before installing the RDI Helm chart:
-
Create the RDI database on your Redis Enterprise cluster.
-
Create a user for the RDI database if you prefer not to use the default password (see Access control for more information).
-
Download the RDI Helm chart tar file from the Redis download center (in the Modules, Tools & Integration category) .
export RDI_VERSION=1.18.1 wget https://redis-enterprise-software-downloads.s3.amazonaws.com/redis-di/rdi-$RDI_VERSION.tgz -
If you want to use a private image registry, prepare it with the RDI images.
-
Download the RDI CLI, which you use to deploy and manage pipelines.
Create the RDI database
RDI uses a database on your Redis Enterprise cluster to store its state information. Use the Redis Enterprise Cluster Manager UI to create the RDI database with the following requirements:
-
Redis Enterprise v6.4 or greater for the cluster.
-
For production, 250MB RAM with one primary and one replica is recommended, but for the quickstart or for development, 125MB and a single shard is sufficient.
-
If you are deploying RDI for a production environment then secure this database with a password and TLS.
-
Set the database's eviction policy to
noeviction. Note that you can't set this usingrladmin, so you must either do it using the admin UI or with the following REST API command:curl -v -k -d '{"eviction_policy": "noeviction"}' \ -u '<USERNAME>:<PASSWORD>' \ -H "Content-Type: application/json" \ -X PUT https://<CLUSTER_FQDN>:9443/v1/bdbs/<BDB_UID> -
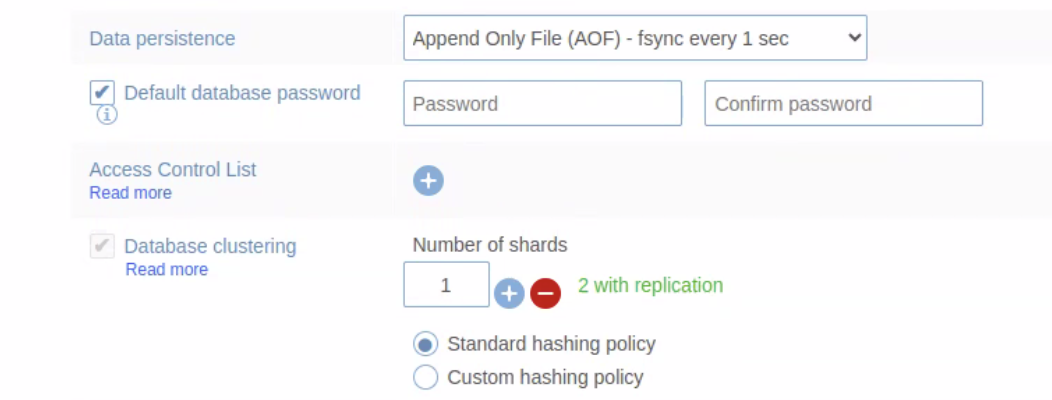
Set the database's data persistence to AOF - fsync every 1 sec. Note that you can't set this using
rladmin, so you must either do it using the admin UI or with the following REST API commands:curl -v -k -d '{"data_persistence":"aof"}' \ -u '<USERNAME>:<PASSWORD>' \ -H "Content-Type: application/json" -X PUT https://<CLUSTER_FQDN>:9443/v1/bdbs/<BDB_UID> curl -v -k -d '{"aof_policy":"appendfsync-every-sec"}' \ -u '<USERNAME>:<PASSWORD>' \ -H "Content-Type: application/json" \ -X PUT https://<CLUSTER_FQDN>:9443/v1/bdbs/<BDB_UID>
If you don't have permissions to use AOF persistence, please check the Using RDI without persistence section in the FAQ.
-
Ensure that the RDI database is not clustered. RDI will not work correctly if the RDI database is clustered (but note that the target database can be clustered without any problems).
If the Database clustering option is checked when you create the RDI database (as shown below), you must uncheck it before proceeding.
You can check if your RDI database is clustered from its Configuration tab in the Redis Enterprise console. The Database clustering option should be set to None, as shown in the following screenshot:
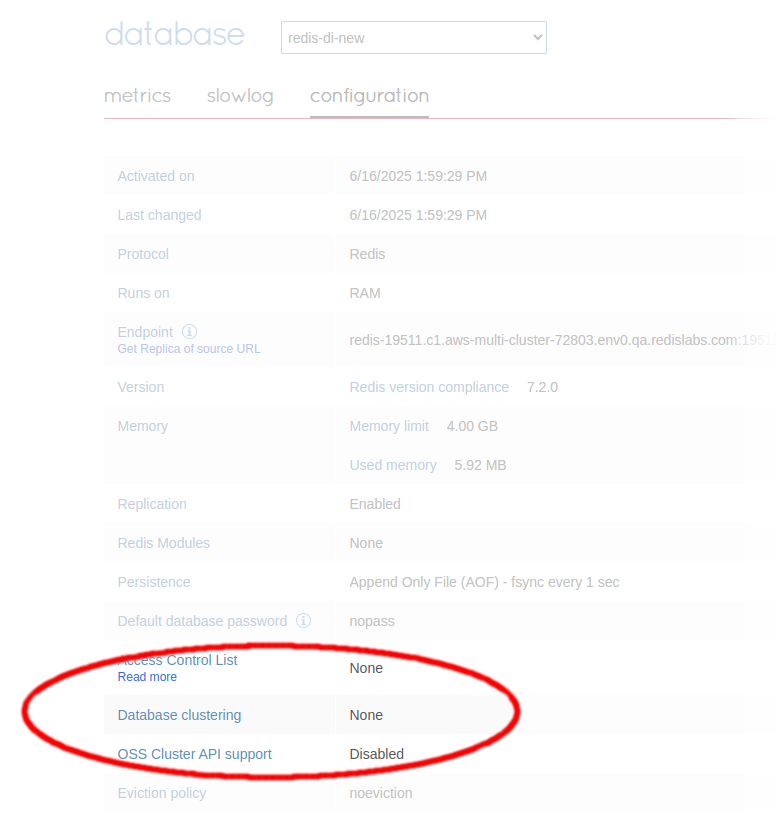
If you find the database has been clustered by mistake, you must create a new database with clustering disabled before continuing with the RDI installation.
You should then provide the details of this database in the values.yaml
file as described below.
Using a private image registry
Add the RDI images from dockerhub to your local registry. You need the following RDI images with tags matching the RDI version you want to install:
- redis/rdi-api
- redis/rdi-operator
- redis/rdi-monitor
- redis/rdi-processor
- redis/rdi-collector-api
- redis/rdi-collector-initializer
If you plan to use the Flink processor for any of your pipelines, you'll also need:
If you plan to use the Flink processor exclusively, the redis/rdi-processor
and redis/rdi-monitor images are not required.
If you plan to use Spanner as a source for your pipeline, you'll also need redis/rdi-flink-collector.
If you plan to use Snowflake as a source for any of your pipelines, you'll also need riotx/riotx:v1.8.0: RIOT-X, a data ingestion and replication tool for Redis.
In addition, the RDI Helm chart uses the following 3rd party images:
- redislabs/debezium-server:3.5.0.Final-rdi.1,
based on
quay.io/debezium/server/3.5.0.Finalwith minor modifications: Debezium, an open source distributed platform for change data capture. - redis/reloader:v1.4.13, originally
ghcr.io/stakater/reloader:v1.4.13: Reloader, a K8s controller to watch changes to ConfigMaps and Secrets and do rolling upgrades.
The example below shows how to specify the registry and image pull secret in your
rdi-values.yaml file for the Helm chart:
global:
  # Global image settings.
  # If using a private image registry, update the default values accordingly.
  image:
    registry: your-registry
    repository: your-repository # If different from "redis"

  # Image pull secrets to be used when using a private image registry.
  imagePullSecrets:
    - name: your-secret-name

# ...

# Configuration of the reloader.
reloader:
  reloader:
    # ...
    deployment:
      image:
        name: my-registry.com/my-repo/reloader
        #...
To pull images from a private image registry, you must provide the image pull secret and in some cases also set the permissions. Follow the links below to learn how to use a private registry with:
- Rancher
- OpenShift
- Amazon Elastic Kubernetes Service (EKS)
- Google Kubernetes Engine (GKE)
- Azure Kubernetes Service (AKS)
Download the RDI CLI
You manage RDI with the redis-di CLI,
which you use to deploy pipelines, set secrets, and inspect status. Unlike the VM installation, which
bundles the CLI, a Kubernetes installation requires you to download it separately from the Redis
download center.
The CLI is currently built for the following platforms. Download the binary that matches the operating
system and architecture of the machine you will run it from. On Linux and macOS, if you are not sure
which to choose, run uname -sm: Linux x86_64 is Linux amd64, Linux aarch64 is Linux arm64,
Darwin x86_64 is macOS on Intel, and Darwin arm64 is macOS on Apple silicon.
| Platform | Download |
|---|---|
| Linux, x86-64 (amd64) | redis-di |
| Linux, ARM64 (aarch64) | redis-di |
| macOS, Intel (amd64) | redis-di |
| macOS, Apple silicon (arm64) | redis-di |
| Windows, x86-64 (amd64) | redis-di.exe |
For example, to download the CLI for Linux amd64, make it executable, and put it on your PATH:
export RDI_VERSION=1.18.1
wget https://redis-enterprise-software-downloads.s3.amazonaws.com/redis-di/cli/$RDI_VERSION/bin/linux-amd64/redis-di
chmod +x redis-di
sudo mv redis-di /usr/local/bin/
xattr -d com.apple.quarantine ./redis-di, and then run it again. On Windows, if Microsoft Defender
SmartScreen blocks it, choose More info > Run anyway.Supported versions of Kubernetes and OpenShift
RDI only supports versions of Kubernetes and OpenShift that have not yet reached end-of-life (EOL). See the Kubernetes and OpenShift lifecycle pages for the latest updates.
Install the RDI Helm chart
-
Scaffold the default
values.yamlfile from the chart into a localrdi-values.yamlfile:helm show values rdi-<tag>.tgz > rdi-values.yaml -
Open the
rdi-values.yamlfile you just created, change or add the appropriate values for your installation, and delete the values you have not changed to use their default values. See Thevalues.yamlfile for more details. -
Run the
helm upgrade --installcommand:helm upgrade --install rdi rdi-<tag>.tgz -f rdi-values.yaml -n rdi --create-namespaceNote:The above command will install RDI in a namespace calledrdi. If you want to use a different namespace, pass the option-n <custom-namespace>to thehelm installcommand instead.Warning:Only one RDI installation is supported per Kubernetes cluster. Installing RDI into multiple namespaces in the same cluster is not supported and will fail. If you need more than one RDI deployment, use separate Kubernetes clusters.
The values.yaml file
The values.yaml file inside the
Helm chart contains the values you can set for the RDI Helm installation.
See the comments by each value for more information about the values you may need to add or change
depending on your use case.
At a minimum, you must set the values of connection.host, connection.port, and connection.password
to enable the basic connection to the RDI database.
You must also set api.jwtKey, RDI uses this value to encrypt the
JSON web token (JWT) token used by RDI API. Best practice is
to generate a value containing 32 random bytes of data (equivalent to 256
bits) and then encode this value as ASCII characters. Use the following
command to generate the random key from the
urandom special file:
head -c 32 /dev/urandom | base64
If you use TLS to connect to the RDI database, you must set the
CA certificate content in connection.ssl.cacert (for TLS). In addition, if you
also use mTLS, you must set the client certificate and private key contents in
connection.ssl.cert, and connection.ssl.key.
-
You can add the certificate content directly in the
rdi-values.yamlfile as follows:connection: ssl: enabled: true cacert: | -----BEGIN CERTIFICATE----- ... -----END CERTIFICATE----- cert: | -----BEGIN CERTIFICATE----- ... -----END CERTIFICATE----- key: | -----BEGIN PRIVATE KEY----- ... -----END PRIVATE KEY----- -
Alternatively, you can use the
--set-fileargument to set these values to the content of your certificate files as follows:helm upgrade --install rdi rdi-<tag>.tar.gz -f rdi-values.yaml -n rdi --create-namespace \ --set connection.ssl.enabled=true \ --set-file connection.ssl.cacert=<path-to-CA-certificate> \ --set-file connection.ssl.cert=<path-to-client-certificate> \ --set-file connection.ssl.key=<path-to-client-key>
If you are deploying to OpenShift, you must
set global.openshift to true:
global:
  # Indicates whether the deployment is intended for an OpenShift environment.
  openShift: true
Set global.securityContext.runAsUser and
global.securityContext.runAsGroup to the appropriate values for your
OpenShift environment.
global:
  # Container default security context.
  # ref: https://kubernetes.io/docs/tasks/configure-pod-container/security-context/#set-the-security-context-for-a-container
  securityContext:
    runAsNonRoot: true
    # On OpenShift, user and group 1000 are usually not allowed.
    # If using OpenShift, set runAsUser and runAsGroup to values in your project's user and group ranges.
    # You can examine the latter via `oc get projects <rid-project-name> -o yaml | grep "openshift.io/sa.scc"`
    runAsUser: 1000701234
    runAsGroup: 1000701234
    allowPrivilegeEscalation: false
The default OpenShift Security Context Constraints (SCCs)
will not allow RDI to run if global.securityContext.runAsUser
and global.securityContext.runAsGroup have their default values of 1000.
You must edit your rdi-values.yaml file to ensure these values are
in the valid range for your OpenShift environment.
Use the following OpenShift CLI command to find the user and group ranges for your project:
oc get projects <rid-project-name> -o yaml | grep "openshift.io/sa.scc"
Configure the Flink processor
RDI ships with two stream processor implementations: the default classic processor and the Apache Flink-based Flink processor. See Stream processor implementations for an overview of the differences.
To configure the Flink processor at the Helm chart level, add the
operator.dataPlane.flinkProcessor block to your rdi-values.yaml file. The
snippet below shows a few of the most commonly adjusted values. See the
flinkProcessor block in the Helm chart's values.yaml for the full set of
supported values.
operator:
  dataPlane:
    flinkProcessor:
      jobManager:
        # JobManager pod resources.
        cpu: 0.1
        memory: 1024
      taskManager:
        # TaskManager pod resources.
        cpu: 1
        memory: 2048
        # Number of parallel task slots per TaskManager pod.
        # Total parallelism is `replicas * numberOfTaskSlots`.
        numberOfTaskSlots: 1
Configuring the Flink processor at the Helm chart level only sets the values
that the operator will use when deploying the JobManager and TaskManager workloads.
To run a specific pipeline on the Flink processor, set
processors.type
to flink in that pipeline's config.yaml. Pipelines without this setting
continue to use the classic processor.
For migrating existing pipelines to the Flink processor, see Migrate from the classic processor to the Flink processor.
Check the installation
To verify the status of the K8s deployment, run the following command:
helm list -n rdi
The output looks like the following. Check that the rdi release is listed.
With RDI 1.8.0 or later, check that the default release is also listed.
NAME   	NAMESPACE	REVISION	UPDATED         STATUS  	CHART         	APP VERSION
default	rdi      	1       	2025-05-08 ... 	deployed	pipeline-0.1.0	<tag>
rdi    	rdi      	3       	2025-05-08 ...	deployed	rdi-1.0.0
Also, check that all pods have Running status:
kubectl get pod -n rdi

NAME                      READY  STATUS  	RESTARTS  AGE
collector-api-<id>        1/1    Running  0         29m
rdi-api-<id>              1/1 	 Running 	0      	  29m
rdi-operator-<id>         1/1 	 Running 	0      	  29m
rdi-reloader-<id>         1/1 	 Running 	0      	  29m
You can verify that the RDI API works by running
redis-di info
against it, or by adding a connection to the RDI API server to
Redis Insight.
Using ingress controllers
You must ensure that an appropriate
ingress controller
is available in your K8s cluster to expose the RDI API service via the K8s
Ingress
resource. Follow the documentation of your cloud provider or of
the ingress controller to install the controller correctly.
Using the nginx ingress controller on AKS
On AKS, if you want to use the open source
nginx
ingress controller
rather than the
AKS application routing add-on,
follow the AKS documentation for
creating an unmanaged ingress controller.
Specifically, ensure that one or both of the following Helm chart values is set:
controller.service.annotations."service\.beta\.kubernetes\.io/azure-load-balancer-health-probe-request-path"=/healthzcontroller.service.externalTrafficPolicy=Local
Prepare your source database
Before deploying a pipeline, you must configure your source database to enable CDC. See the Prepare source databases section to learn how to do this.
Deploy a pipeline
When the Helm installation is complete and you have prepared the source database for CDC, you are ready to start using RDI. See the guides on how to configure and deploy RDI pipelines for more information. You can also configure and deploy a pipeline using Redis Insight. See RDI in Redis Insight for full details on how to connect to RDI and deploy pipelines.
Uninstall RDI
If you want to remove your RDI K8s installation, first run
the following commands. (If you installed RDI into a custom namespace then
replace rdi with the name of your namespace.)
kubectl delete pipeline default -n rdi
helm uninstall rdi -n rdi
kubectl delete namespace rdi
kubectl delete pipeline default -n rdi is only needed for RDI 1.8.0 or above.If you also want to delete the keys from your RDI database, connect to it with
redis-cli and run a
FLUSHALL command.