Video

Learn more
Giving blood is an easy and safe way to save a life. Yet, complications still exist in matching donors and patients with the right blood type. Time is a limited commodity when it comes to blood donations, making it absolutely fundamental to align donors with the right patients.
The more efficient this process is, the more lives are saved. Taking on this challenge was Bhanu Korthiwada, who created a phenomenal application, Zindagi, that speeds up the entire blood donation process by matching blood donors with the ideal patients.
At the heart of this application was a fundamental need for data to be transmitted with maximum efficiency to provide users with updates in real-time. A lag or a delay would hamper the user’s experience and not keep up to speed with the fast-paced demands for blood donations.
Due to these demands, Redis was used as the application’s main database, which had a dramatic impact on performance. Data was transmitted with maximum efficiency. Users received real-time updates. And blood donations became seamless.
Let’s take a look at how Bhanu created this application. But before we examine the ins and outs of this app, we’d like to point out that we have an exciting range of other apps for you to check out on the Redis Launchpad.
So make sure to have a browse after this post!

You’ll build an application that will match blood donors with patients who have the same blood type. This will promote a more seamless and efficient blood donation process that saves time to save lives.
Below we’ll go through the A-Z of what’s required to bring this application to life, as well as highlight what components you’ll need. From start to finish, we’ll break everything down into bite-sized steps to make building this application as easy as possible.
Ready to get started?
Ok, let’s dive straight in.
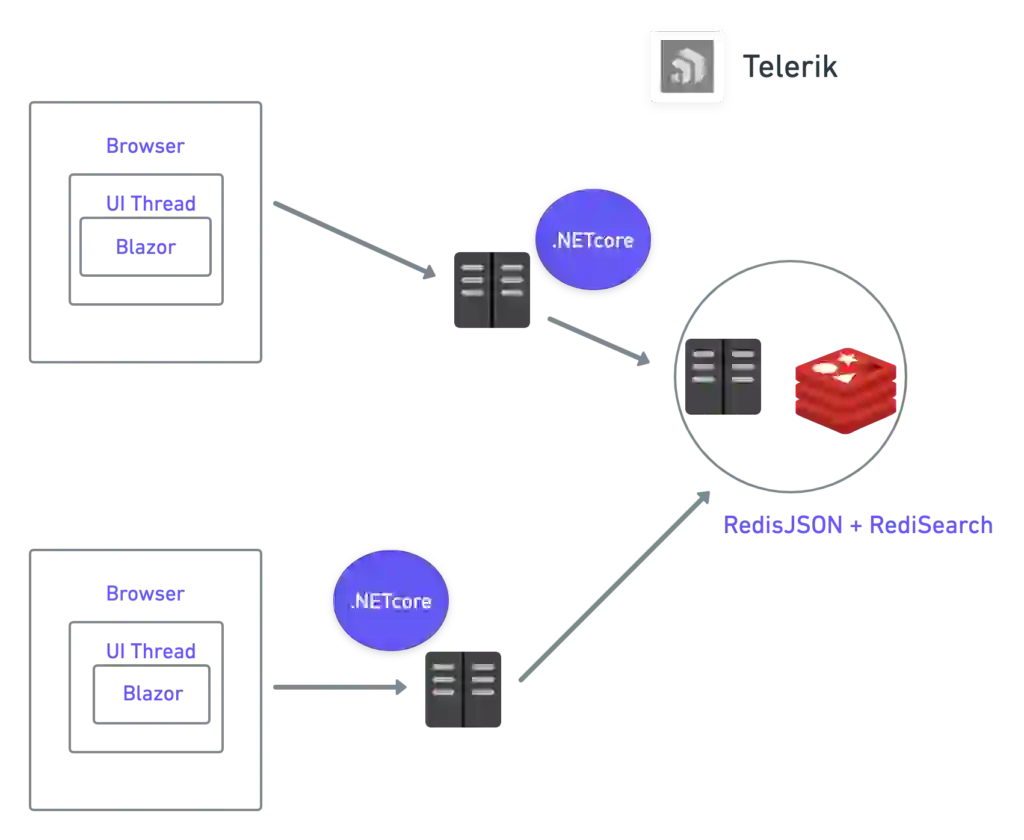
RedisJSON: Implements ECMA-404, the JSON Data Interchange Standard, as a native data type.
RediSearch: Provides advanced querying, secondary indexing, and full-text search for Redis.
Redis Pub/Sub: Used for event messaging and can provide messages to any number of subscribers on a channel.
Telerik: Provides an array of software tools for web, mobile, desktop application, development, and much more.
Blazor: Used as a free open source web framework that allows developers to build web apps using C# and HTML.
.NET Core Runtime – Provides basic services for internet-connected apps

Prerequisite
git clone https://github.com/redis-developer/rediszindagiUpdate .env file with Auth0 and SMTP details
version: '3.7'

services:
  redismod:
    image: redis/redis-stack:latest
    container_name: redis
    restart: unless-stopped
    environment:
      EMAIL: zindagi@bhanu.dev
    volumes:
      - ./persistence/redismod/data:/data
    networks:
      - default
    ports:
      - 6379:6379

  rediszindagi:
    image: ghcr.io/bhanukorthiwada/rediszindagi:latest
    container_name: zindagi
    restart: unless-stopped
    environment:
      ASPNETCORE_ENVIRONMENT: ${APP_ENV}
      AUTH0__DOMAIN: ${APP_AUTH0_DOMAIN}
      AUTH0__CLIENTID: ${APP_AUTH0_CLIENTID}
      AUTH0__CLIENTSECRET: ${APP_AUTH0_CLIENTSECRET}
      SMTP__DISABLE: ${APP_SMTP_DISABLE}
      SMTP__FROM: ${APP_SMTP_FROM}
      SMTP__HOST: ${APP_SMTP_HOST}
      SMTP__PORT: ${APP_SMTP_PORT}
      SMTP__USERNAME: ${APP_SMTP_USERNAME}
      SMTP__PASSWORD: ${APP_SMTP_PASSWORD}
      SMTP__USESSL: ${APP_SMTP_USESSL}
      CONNECTIONSTRINGS__REDIS: ${APP_REDIS_CONNECTIONSTRING}
    volumes:
      - ./persistence/zindagi/logs:/app/logs
    networks:
      - default
    ports:
      - 80:80
    depends_on:
      - redismod

networks:
  default:
    name: network_default
    driver: bridge
The above Compose file defines two basic services:
Redismod has in-built modules like RedisJSON and RediSearch that are used for this project. You’ll need to pass a number of auth0 environmental variables. SMTP remains optional. For persistence, Docker volumes mount has been added and the app is exposed to port 80.
From terminal/command prompt run docker-compose up -d
The application can be accessed using localhost.
To get the full benefits of the application, blood donors have to create an account. You can do this on the main dashboard by clicking on ‘Register Now.’
Click on the blood donation button at the top of the navigation bar. You’ll then have a number of fields to fill in that will inform the database about your blood type and the quantity you want to donate.
Once you’ve created an account, patients who are the right fit for your blood donation will be notified of your availability. They’ll then be able to send you a request for your blood donation. To access your full list of requests, click on the ‘Requests’ tab at the top of the navigation bar. Here you’ll have a complete overview of all the requests patients have sent for your donation.
Fast access to blood is the difference between life and death for many patients. Matching donors with the right patients is often a time-consuming process, where every second jeopardizes the patient. Bhanu’s application helps to remove this obstacle through Redis’ ability to send data between components at lightning-fast speed.
Having data transmitted with such efficiency allows Zindagi to quickly match blood donors with the right patients based on the given criteria. This accelerates the entire blood donation process, enabling donors and patients to interact with each other in real-time and arrange a possible blood donation.
At the heart of this application is an ability to pull all parties together, providing the optimum direction for progress. This means more donations, less time wasted, and a totally seamless experience for everyone involved.
To get more of a visual insight into how this application works, check out this YouTube video. If you enjoyed this post, make sure to check out the Redis Launchpad where you’ll have access to a wide variety of innovative applications that are having an impact on everyday life.
We have applications that track buses in real-time on a map. We have applications that prevent supply shortages in hospitals in developing nations. And we have so much more for you to discover.
So make sure to check them out!
Bhanu Korthiwada

Bhanu is an experienced software engineer who’s currently working as a senior consultant for ADP. If you want to keep up to date with all of his latest projects, make sure to follow him on GitHub.