Create an Agent Memory service on Redis Cloud
Create an Agent Memory service in Redis Cloud to store working and long-term memory for AI agents.
Redis Agent Memory provides a persistent, structured memory layer that AI agents can use to store, retrieve, and manage contextual data across interactions. This guide walks you through creating and configuring an Agent Memory service in Redis Cloud.
Prerequisites and limitations
To create a Redis Agent Memory service, you will need a Redis Cloud database. If you don't have one, see Create a database.
Redis Agent Memory doesn't support Redis Flex databases, databases using AWS PrivateLink connectivity, Active-Active databases, or databases with the default user turned off. The console lists only the databases you can use.
If the database you select has a Classless Inter-Domain Routing (CIDR) allow list, the console lists the Internet Protocol (IP) addresses to add to it so Agent Memory can reach the database. Add them under Security in the database's settings. The console also warns you if the database has Transport Layer Security (TLS) turned off.
Create an Agent Memory service
To create a service:
-
From the Redis Cloud console, select Agent Memory under Iris in the menu.
-
Select Create Agent Memory service on the Agent Memory introduction page, or New service in your list of services.
-
In the Create Agent Memory service dialog, enter a Service name, up to 128 characters.
-
Select a Database. The console selects your free database by default. If you don't have one yet, Free Redis database creates it for you. You can select another eligible database instead.
-
Review the Default settings: 1 day of short-term memory, 365 days of long-term memory, and session summary on.
-
Select Create to create the service with these defaults. To change the defaults first, select Customize settings instead and continue with General settings.
After Redis Cloud creates the service, the Connect to Agent Memory dialog opens so you can connect your agent and create an API key.
Customize settings opens the Create Agent Memory service page, which has these sections:
- The General settings section defines basic properties of your service.
- The Memory configuration section allows you to define the time-to-live (TTL) of your agent's memories, set how often memories are extracted, and control automatic summarization of session memory.
- The AI model and credentials section allows you to use your own model provider key and select the models used by the service.
- The Memory types & extraction section allows you to define custom memory types with their own extraction strategies.
- The Sensitive-data exclusions section allows you to keep sensitive content out of long-term memory.
General settings
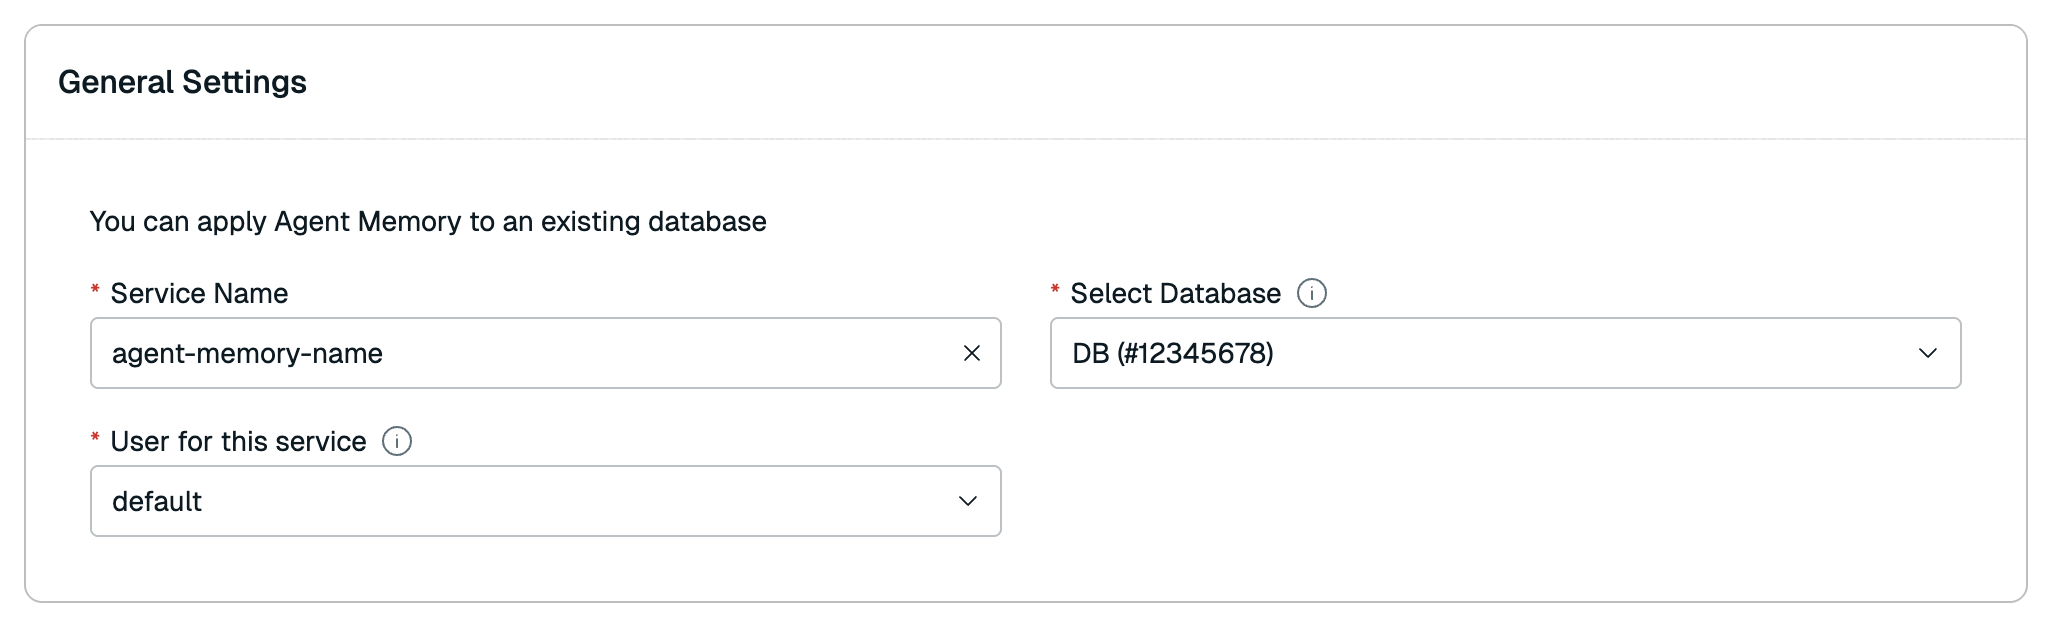
The General settings section defines basic properties of your service.
| Setting name | Description |
|---|---|
| Service Name | Enter a name for your Agent Memory service, up to 128 characters. We recommend you use a name that describes your service's purpose. |
| Select Database | Select the Redis Cloud database to use for this service from the list. |
| User for this service | The database access user to use for this service. Agent Memory only supports the default user. |
Memory configuration
The Memory configuration section allows you to define the time-to-live (TTL) of your agent's memories, set how often memories are extracted, and control automatic summarization of session memory.

| Setting name | Description |
|---|---|
| Short-term TTL | Defines the time-to-live (TTL) of your agent's short-term memory (also known as session memory). You can define this TTL in seconds, minutes, hours, or days, up to 365 days. Default: 24 hours |
| Long-term TTL | Defines the time-to-live (TTL) of your agent's long-term memory. You can define this TTL in seconds, minutes, hours, or days, up to 365 days. Default: 365 days |
| Extraction cadence | How often the extraction pipeline runs while a session is active. Leave this blank to use the default of 5 minutes, or set a value between 60 and 600 seconds to override it. |
Automatic summarization
Automatic summarization keeps your agent sharp during long conversations by compressing older messages in a session into a summary, while keeping the most recent messages in full. This helps control the size of session memory without losing important context.
Use the Automatic summarization toggle to enable or disable this behavior. It's enabled by default. When it is enabled, you can configure the following settings:
| Setting name | Description |
|---|---|
| Summarize after (messages) | The number of messages a session can hold before older messages are summarized, from 1 to 500. It must be greater than Keep most recent. When a session exceeds this threshold, the oldest messages beyond the Keep most recent count are compressed into a summary. Default: 20 |
| Keep most recent (messages) | The number of most recent messages that are always kept in full and never summarized. Default: 10 |
For example, with Summarize after set to 20 and Keep most recent set to 10, once a session reaches 20 messages, the oldest 10 messages are summarized automatically and the 10 most recent are kept in full.
AI model and credentials
The AI model and credentials (optional) section controls the credentials and models that Agent Memory uses for memory extraction, session summarization, and long-term-memory search.
Select Use Redis in-built keys to use Redis-managed model credentials. This is the default and requires no additional configuration. To use your provider account, select Bring my own key, then select the provider, LLM model, embedding model, and add your API key.
LLM model options can change. Use the console to see the current choices; values shown in the screenshot are examples.
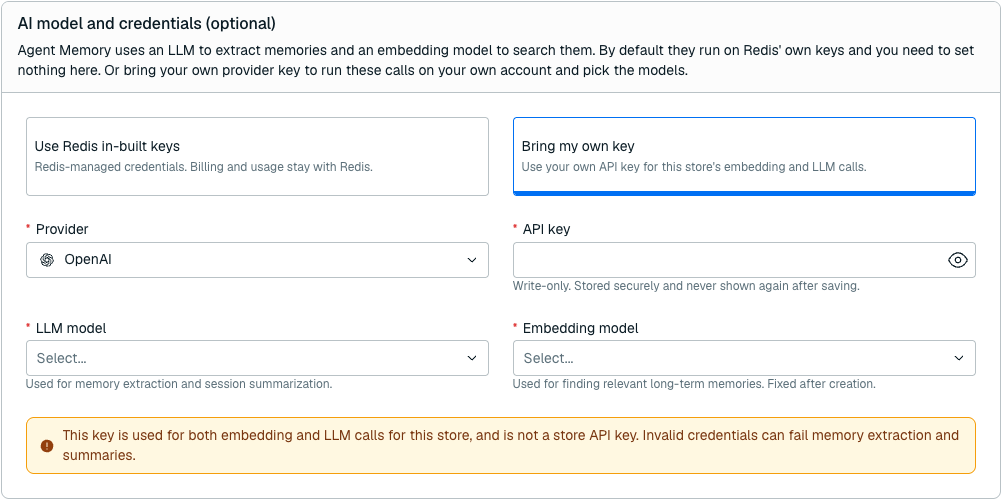
The same provider key is used for both model types. The credential source, provider, and embedding model are fixed after you create the service. For configuration, key rotation, security, and troubleshooting guidance, see Configure AI models for Agent Memory.
Memory types & extraction
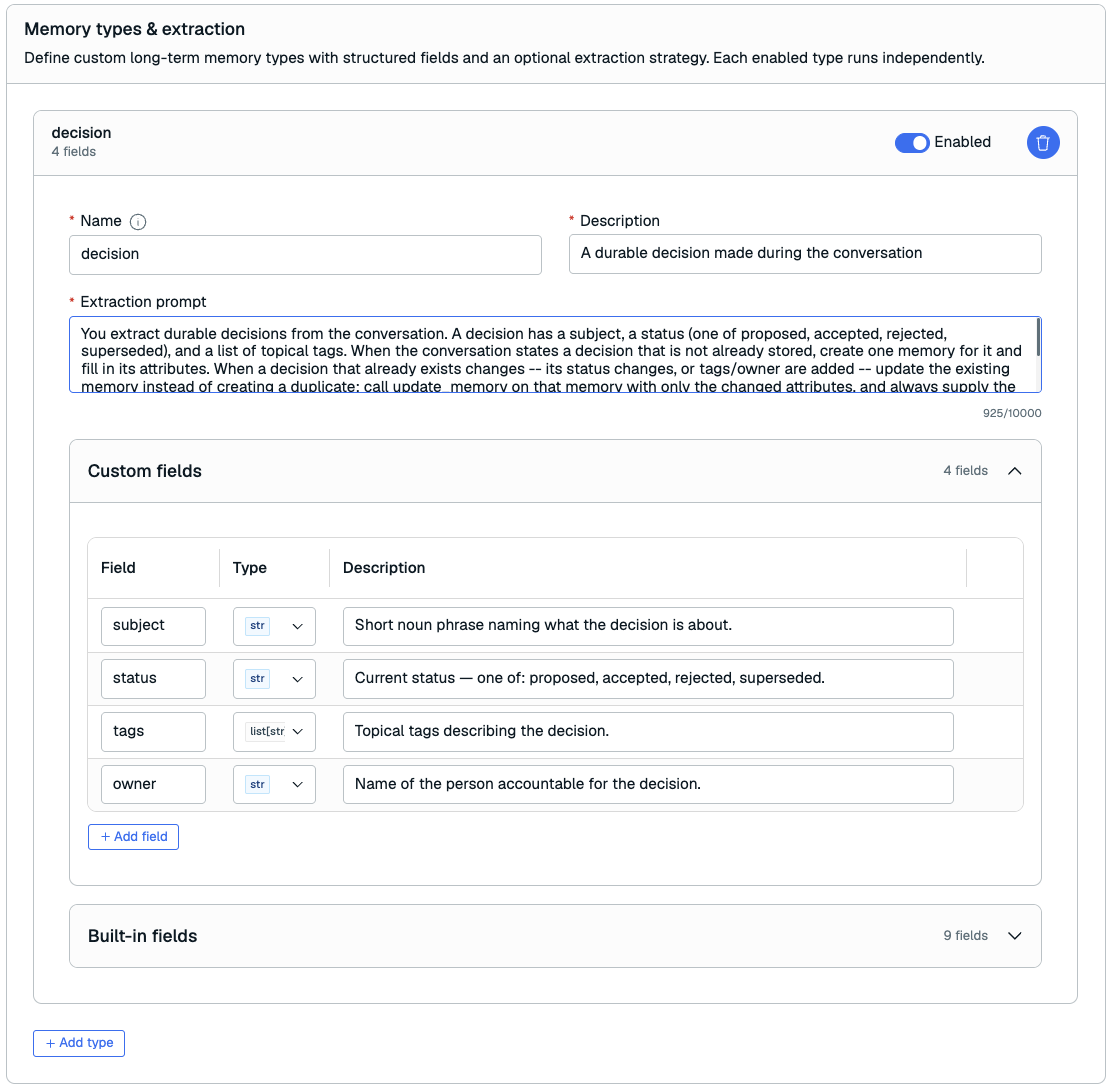
The Memory types & extraction section allows you to define custom long-term memory types with structured fields and an optional extraction strategy. Each enabled type runs independently.
Custom memory types
In addition to the built-in memory types, you can define custom memory types to capture structured, domain-specific information from your agent's conversations. Each custom type describes a category of information you want to extract, the fields that make up that information, and an optional extraction strategy that tells the extraction pipeline how to populate it.
You can define up to 3 custom memory types. Once you reach this limit, the Add type button is disabled.
To add a custom memory type, select Add type and configure the following settings:
| Setting name | Description |
|---|---|
| Name | A unique name for the custom memory type. Must start with a letter and contain only letters, numbers, hyphens, or underscores (1–64 characters). The name must be unique within the service and cannot match a built-in memory type. |
| Description | A short description of what the memory type represents (1–200 characters). |
| Fields | The structured fields that make up the memory type. See Fields below. |
Fields
Each custom memory type can have one or more fields that define its structured attributes. For each field, configure the following:
| Setting name | Description |
|---|---|
| Name | The field name. Follows the same rules as the memory type name: must start with a letter and contain only letters, numbers, hyphens, or underscores. |
| Type | The field's data type. Choose from str, int, float, bool, list[str], list[float], or object. |
| Description | A description of the field (1–200 characters). This description is used to guide extraction, so make it clear and specific. |
Extraction strategy
Each custom memory type can have an extraction strategy that controls how the extraction pipeline populates it from session messages.
| Setting name | Description |
|---|---|
| Extraction prompt | A natural-language prompt (up to 10,000 characters) that instructs the extraction pipeline how to identify and extract this memory type from a conversation. |
| Enabled | Whether the extraction strategy is active. Enabled by default. Disable it to keep the type defined without extracting new memories for it. |
Sensitive-data exclusions
The Sensitive-data exclusions section lets you define information that should not be kept in long-term memory. It offers three mechanisms that you enable independently:
- Built-in detectors match common identifiers, such as payment card numbers, using patterns Redis maintains.
- Custom detectors match patterns you write yourself, such as internal reference numbers.
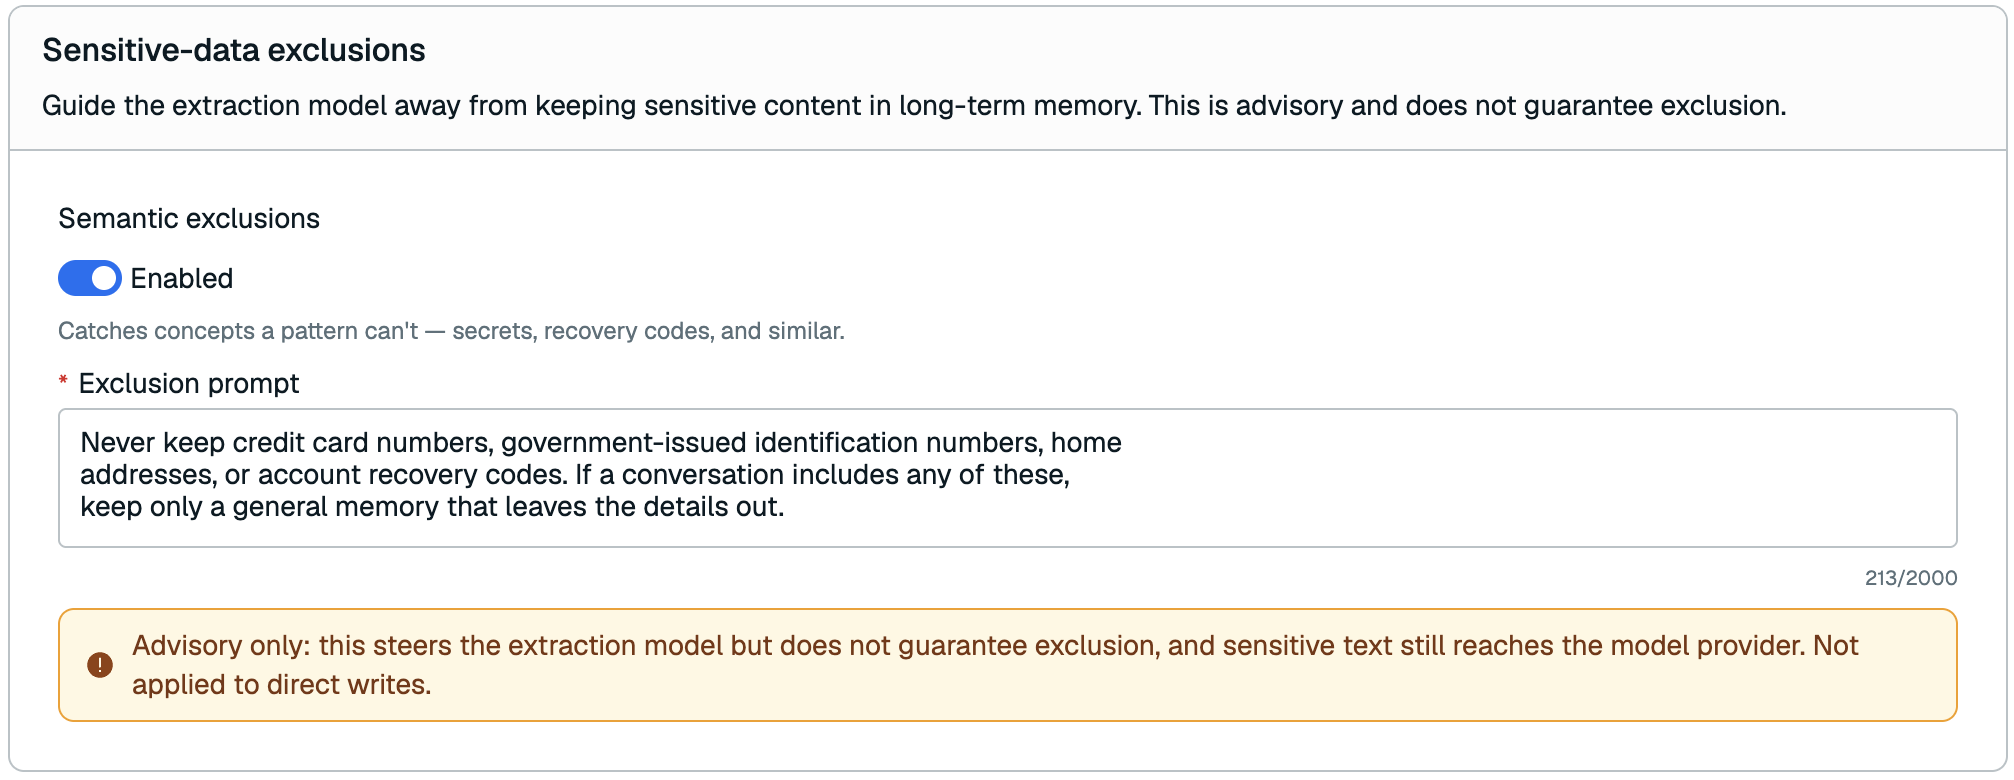
- Semantic exclusions describe what to exclude in plain language, catching concepts that a pattern cannot.
Detector matches are applied deterministically. Semantic exclusions only steer the extraction model, so they are advisory.
Built-in and custom detectors apply during automatic extraction and to direct creates and content updates through the API or an SDK. Semantic exclusions apply only during automatic extraction. Session memory is unaffected: events and their summaries are kept as sent. See direct-write exclusions for rejection responses and screening limits.
Built-in detectors
Built-in detectors match common identifiers using patterns Redis maintains and validates. They are disabled by default. Use the Built-in detectors toggle to enable them, then select the detectors this service should exclude and choose what happens on match.
| Detector | Matches |
|---|---|
| Credit card number | Payment card numbers, covering Visa, Mastercard, American Express, Discover, JCB, Diners Club and UnionPay. Maestro is not covered. Digits may be separated by spaces or hyphens. |
| Email address | Email addresses. Addresses containing non-ASCII characters are not matched. |
| IP address | IPv4 and IPv6 addresses. Loopback addresses and CIDR network ranges are not matched, and some abbreviated IPv6 forms are missed. |
| Phone number | Phone numbers for the US, Canada, the UK, Germany, Israel, India, and Brazil. Numbers written with a country code, parentheses, or separators are matched on their own. A plain run of digits is matched only when the surrounding text mentions a phone number. |
| US Social Security number | US Social Security numbers. Written in the usual 123-45-6789 form they are matched on their own. Other layouts are matched only when the surrounding text mentions a Social Security number. |
Each description states what the detector gives up, because selecting one is a choice about false positives: a false match redacts or discards a memory you wanted to keep.
Custom detectors
Custom detectors match patterns you write yourself, such as tenant IDs, internal account numbers, or tokens. They are disabled by default. Use the Custom detectors toggle to enable them, then select Add detector and configure the following settings:
| Setting name | Description |
|---|---|
| Name | A name for the detector, unique within the service. Must start with a letter and contain only letters, digits, underscores, or dashes (1-64 characters). A match is reported under this name. |
| Pattern | A regular expression, up to 512 characters. Patterns use RE2 syntax, which does not support backreferences or lookaround. |
| On match | What happens to a memory the pattern matches. See On match. |
| Status | Whether the detector is applied. Turn it off to keep the pattern without applying it. |
You can define up to 32 custom detectors.
Direct API writes reject enabled patterns that expand to more than 1,024 compiled RE2 instructions. Repeated groups can exceed this limit even within the pattern's character limit. See direct-write exclusions before enabling complex patterns.
On match
Every detector, built-in or custom, decides what happens to a memory it matches:
| Action | Description |
|---|---|
| Redact match | Replaces the matched text with [REDACTED] and keeps the rest of the memory. This is the default. |
| Drop memory | Discards the whole memory. |
Built-in and custom detectors are evaluated together. When a memory matches several detectors that choose different actions, the memory is dropped.
Semantic exclusions
Semantic exclusions let you describe, in plain language, what should not be kept. They catch concepts that a fixed pattern cannot, such as secrets or account recovery codes. They are disabled by default. Use the Semantic exclusions toggle to enable them, then describe what to exclude.
| Setting name | Description |
|---|---|
| Semantic exclusions | Whether semantic exclusions are applied when memories are extracted. Disabled by default. |
| Exclusion prompt | A plain-language description, up to 2,000 characters, of what should never be kept in long-term memory. Required when semantic exclusions are enabled. |
For example, a prompt might tell the pipeline never to keep passwords, access tokens, recovery codes, payment card information, or booking confirmation codes, and to keep only a general memory when a conversation includes them.
Where useful context remains, the extraction model prefers a generalized memory that omits the excluded details rather than dropping the memory entirely. For example, "The user's card ending 4242 was declined" can become "The user had a payment failure".
Semantic exclusions are advisory. They steer the extraction model, but they do not guarantee that sensitive content is excluded, and sensitive session content still reaches the extraction model provider. Do not rely on semantic exclusions as your only control for regulated or highly sensitive data.
Create service
When you are done setting the details of your Agent Memory service, select Create to create it.

Redis Cloud creates the service and opens its page. To connect an agent, use the connect banner on the Configuration tab.
If an error occurs, verify that your database is active. For help, contact support.
Connect and create an API key
The Connect to Agent Memory dialog shows the service's endpoint and store ID, and Quick connect samples for each software development kit (SDK). Your agent needs an API key with access to the service.
-
Select Create an API key.
-
Enter a name for the key.
-
Under What can this key do?, select the actions the key allows on this service.
-
Set when the key expires.
-
Select Create API key.
-
Copy the key and save it to a secure location.
Warning:The console shows the key only once. If you lose it, create a new key.
-
Select Done to open the service's page.
To connect later, select Skip for now. You can create a key from the service's page or in Access & Identity.
Next steps
After Redis Cloud creates your service, continue with the quickstart.
To generate a conversational agent that connects to your service, open the AI agent builder and select Redis Iris Conversational Assistant.
You can also view and edit the service.