Blog
How to Migrate Your Dynomite Database to a Redis Enterprise Active-Active Database
In Part I of this article, “Why Migrate a Dynomite Database to a Redis Enterprise Active-Active Database?,” we compared Dynomite and Redis Enterprise’s architectures and features. We’ve shown how Redis Enterprise can help you geo-distribute Redis Enterprise in a feature-rich, easily manageable way, and not worry about conflicts between concurrent writes.
Part II will describe the migration options available to move from Dynomite to Redis Enterprise.
Note that hereafter Redis Enterprise’s self-managed offering will be referred to as “Redis Enterprise Software” and the managed offering will be noted as “Redis Enterprise Cloud” or “Cloud subscription.”
Migrating your Dynomite database
Let’s get practical and see how we can run two types of migration:
- Migration using Redis Enterprise’s Import/Export feature
- Migration using Redis Enterprise’s ReplicaOf feature, also called Active-Passive
For the purposes of illustration, let’s assume that we have a Dynomite cluster spanning two datacenters: dc-a and dc-b. Each datacenter has one rack, and each rack is composed of two nodes, between which the dataset is distributed.
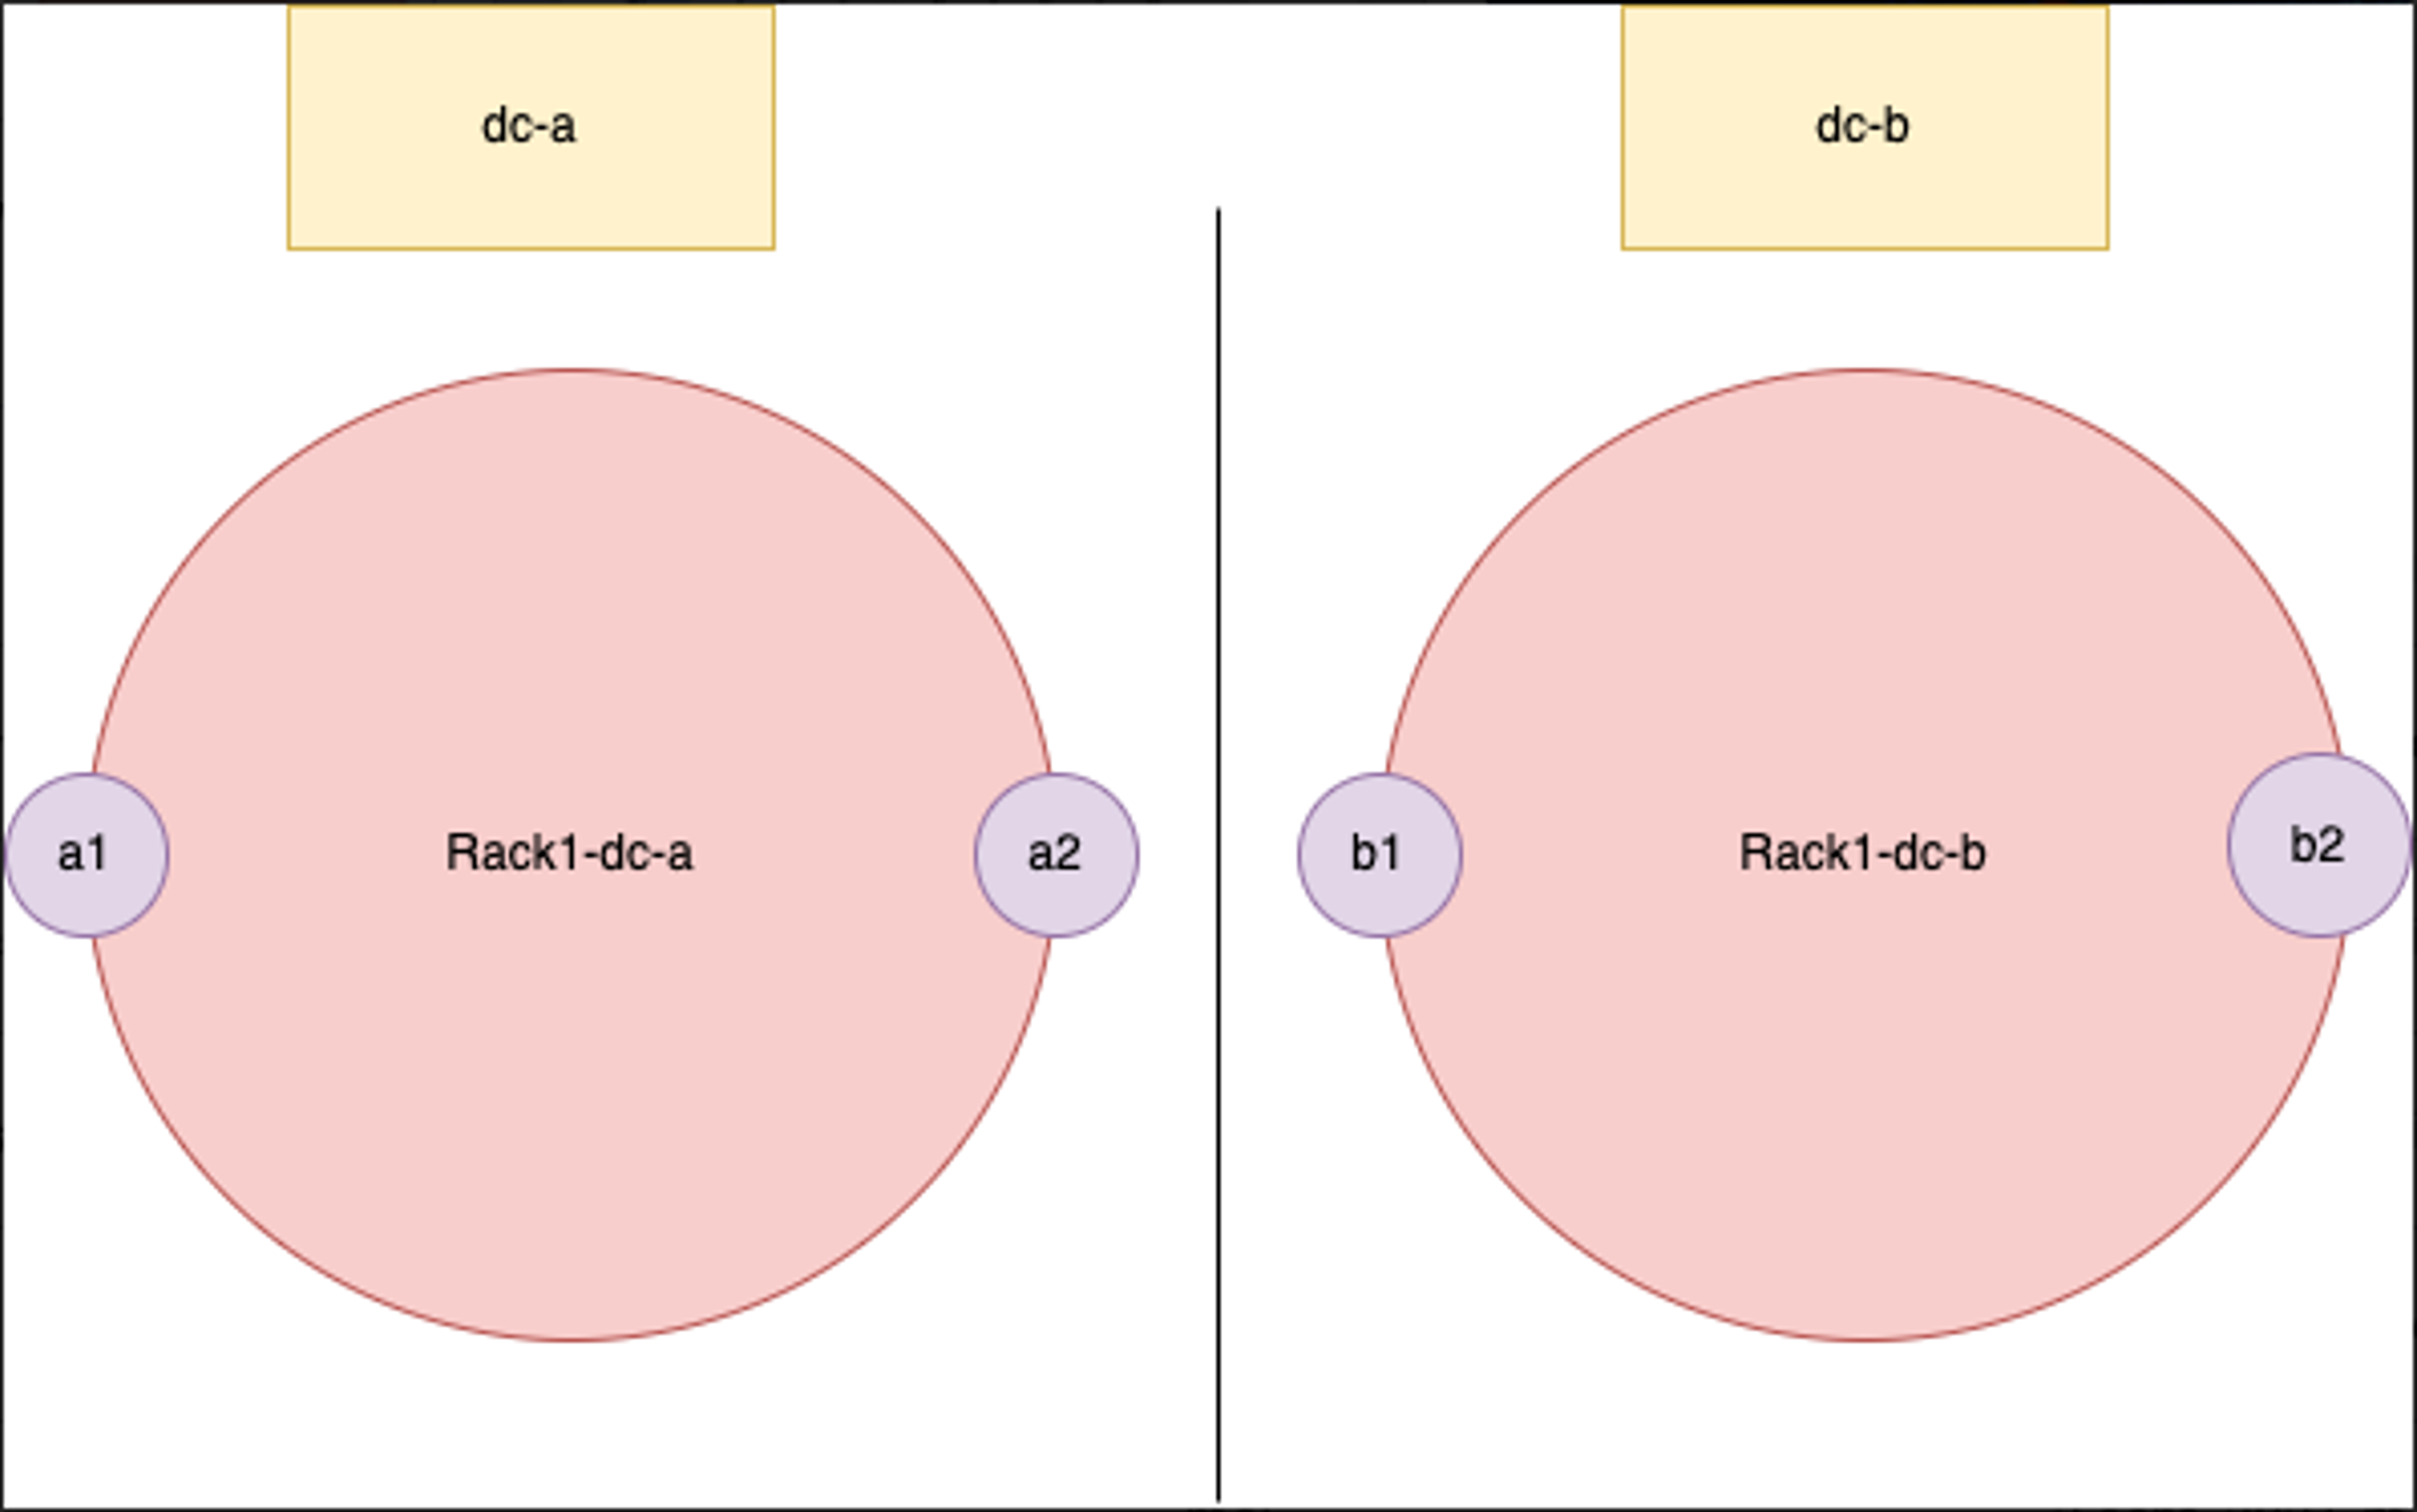
If we remember our description of Dynomite’s architecture, we know that each Dynomite rack contains the full dataset.
Therefore, we can limit the scope of our migration, whether it be Import/Export or Active-Passive, to a single rack within our Dynomite setup.
Let’s pick rack-1-dc-a and assume that the IPs of its two nodes are as follows:
- a1: 10.0.0.1
- a2: 10.0.0.2
For clarity purposes, here is the yaml configuration for our Dynomite setup:
A few observations on this configuration and the setup used for testing this tutorial:
- Four GCP VMs running Ubuntu 18.04.
- The VMs reside in the same VPC spanning multiple regions.
- Opened ports 7379 and 7380, as Dynomite uses those ports for replicating data – “dyn_port” in the yaml configuration.
- Redis OSS is running on each node on port 6379 – see “servers” in the yaml configuration.
- Dynomite listens for clients’ requests on port 8379 (e.g redis-cli -h 10.0.0.1 -p 8379) – see “listen” in the yaml configuration.
Now that we understand our setup and have decided which rack we will use for our migration, let’s create a Redis Enterprise database.
Create your Redis Enterprise Active-Active Database
As the purpose of this article is not to explain how to set up your cluster or create your database, please refer to the documentation below to get your Active-Active database up and running:
- Redis Enterprise Software cluster
- Cloud subscription
- Software database creation
- Software Active-Active Database creation
- Cloud database creation
To test our two migration scenarios, I have created an Active-Active database spanning two Redis Enterprise Software clusters – one in Europe and one in the U.S. Each cluster is composed of three VMs running Ubuntu 18.04. Know that if you create a database without Active-Active, the migration steps will be the same, unless specified otherwise in this article.
Let’s go ahead with our first type of migration.
Migration using Import/Export feature
Redis OSS provides a persistence option called Redis Database Backup Files, or RDB, which performs point-in-time snapshots of your dataset, either at specified intervals or when triggered by the SAVE or BGSAVE commands.
Those snapshots are saved in .rdb files, hereafter referred to as RDB files. We will export them out of our Dynomite servers and import them into our Redis Enterprise database. With this solution, note that a delta migration isn’t possible and that the import might take a while, depending on the size of the data.
IMPORTANT: There is a big difference between Redis Enterprise’s non-geo distributed databases and Active-Active databases:
- Non geo-distributed databases: When importing RDB files, all existing database content will be erased.
- Active-Active databases: You can import RDB files and merge them into your existing dataset. This means that you could start sending writing traffic to your Active-Active database before and during the import. Pay attention – if you’re writing keys to your Active-Active database which already exists in Dynomite, the subsequent import might overwrite newer values with older values! This requires careful planning.
The way to migrate data from Dynomite to Redis Enterprise with RDB files is as follows:
- Stop the traffic on the Dynomite database and, if you’ve planned your migration carefully, and are using an Active-Active database, cutover to the Redis Enterprise database.
- Export each node’s data (a1 and a2 in our case) as RDB files.
- Upload the RDB files to a location that is accessible to the Redis Enterprise cluster (e.g., a Google Cloud Storage bucket, AWS S3 bucket, FTP server, etc.)
- Import the RDB files to the Redis Enterprise database.
- Cutover to the Redis Enterprise database.
Let’s see the above steps in more detail.
Optional: Edit Redis OSS configuration files on each node
Redis OSS instances running on your Dynomite nodes have their configuration files located by default in /etc/redis if you’ve installed it with “apt-get”, or in your Redis folder if you have built Redis OSS yourself. This file is called “redis.conf”.
Open this file with your favorite text editor and search for the “dbfilename” directive. Change the name of the file on each node, such as
- “dump1.rdb” on node1,
- “dump2.rdb” on node2.
This ensures that when we export our RDB files to external storage, they don’t have the same name. You can skip this and change their names after taking the snapshot if you prefer.
Optionally, you can also:
- Change the directory in which the RDB files will be stored with the “dir” directive.
- Change the snapshotting interval or disable automatic snapshotting. In this tutorial, we’ll use the SAVE Redis command to trigger snapshotting, so that we can be sure to dump the full dataset once we’ve stopped the traffic.
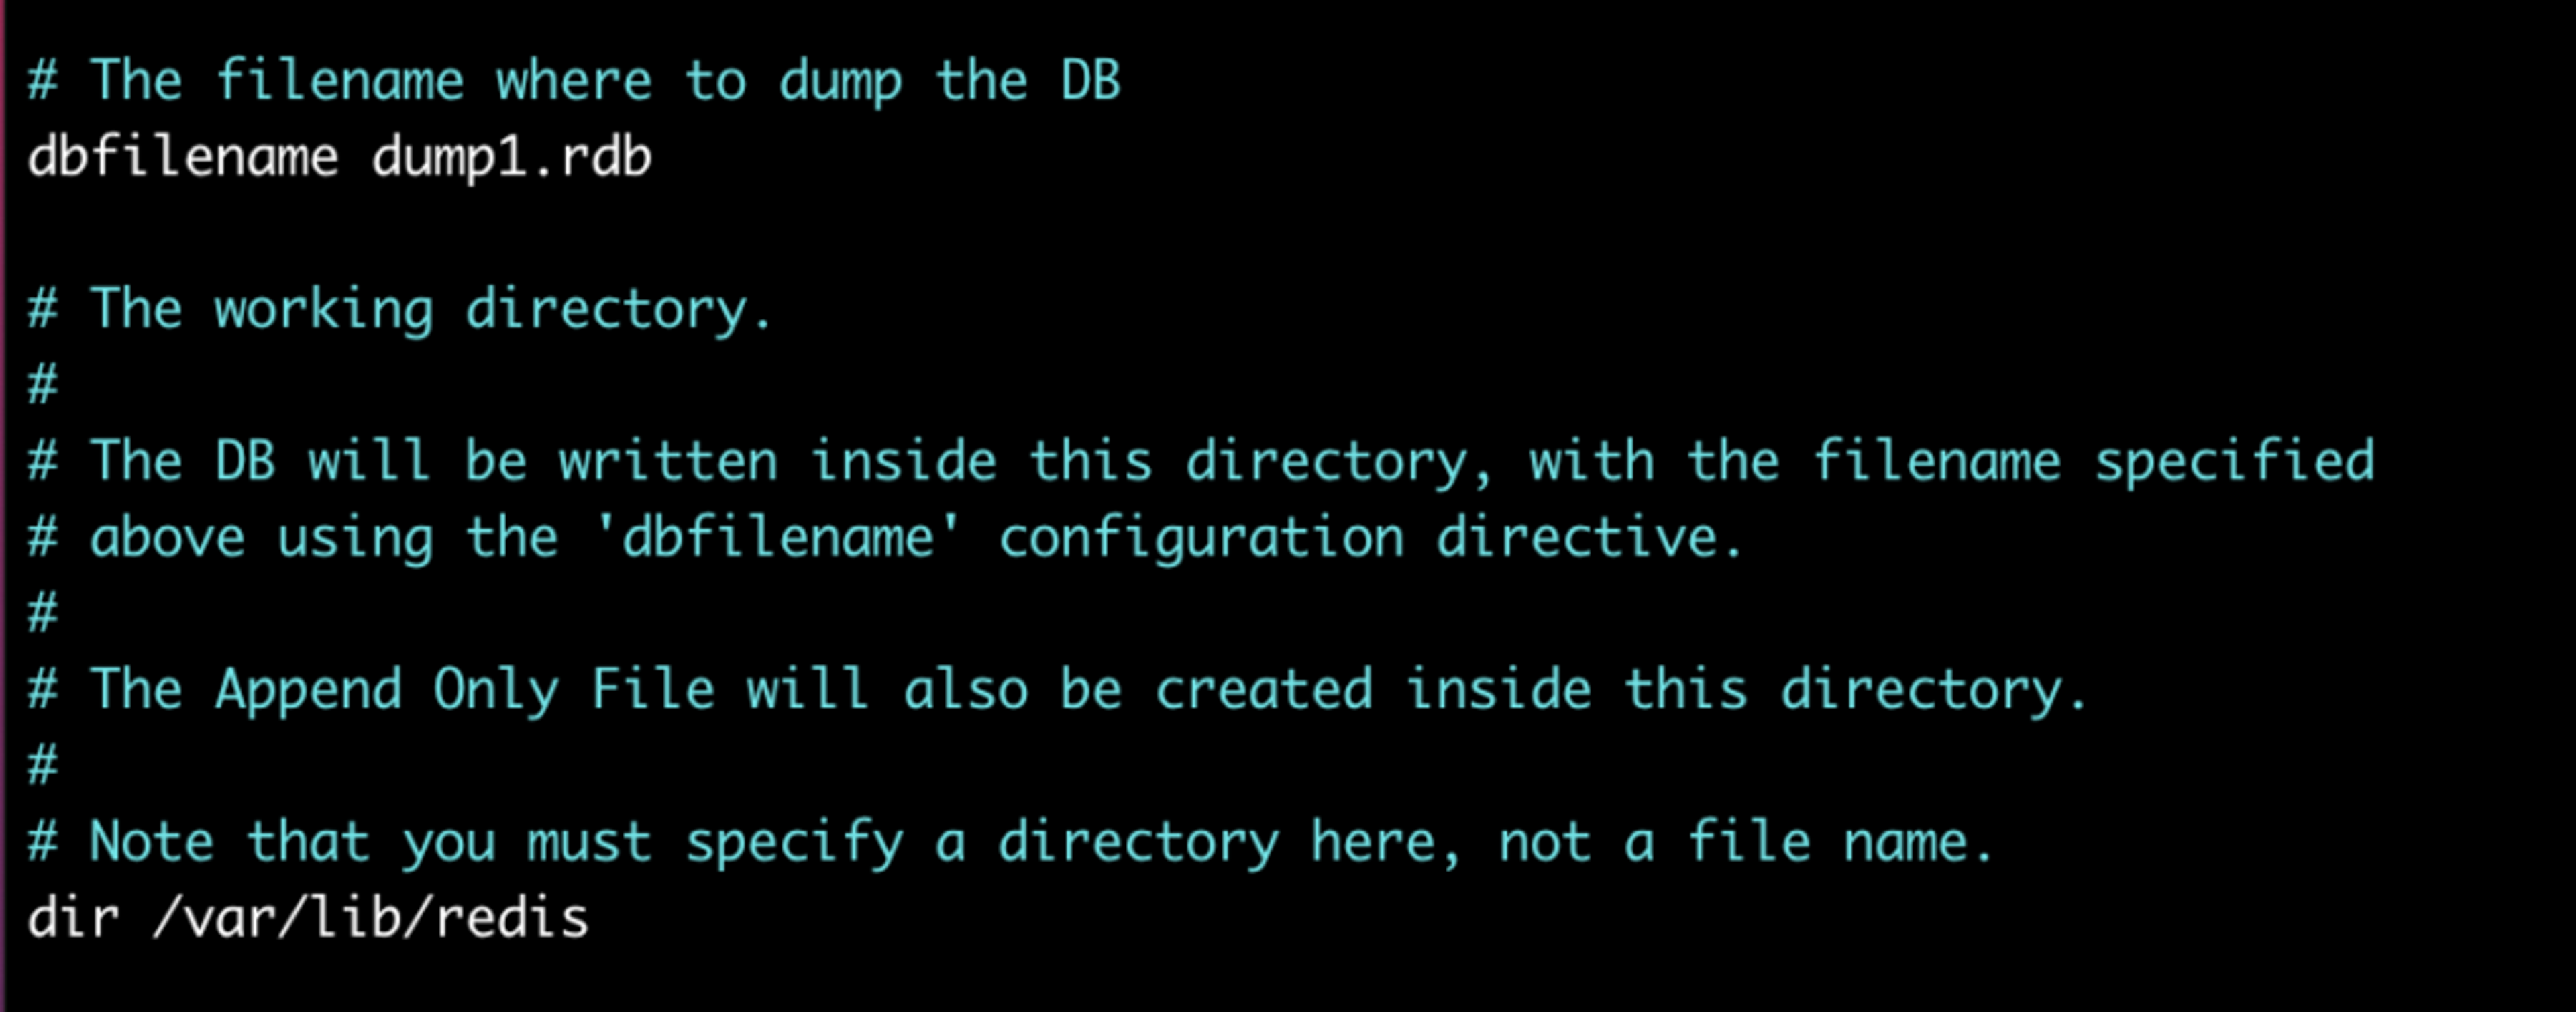
Note that after editing the Redis OSS configuration files, you need to restart the Redis OSS server so that your changes are taken into account.
Dump the data
Now stop the traffic coming into your Dynomite database through port 8379. Again, if you are importing to an Active-Active database and have planned your migration carefully so as not to risk any accidental overwrites during the import, you can cut over the traffic to your Active-Active database.
Launch redis-cli. Don’t use port 8379, Dynomite’s listening port. Instead use port 6379. This is because we need to connect to the Redis OSS instance running on our node and not to our Dynomite cluster, which doesn’t support the SAVE command. You can just run redis-cli without any command-line argument.
On each node, run the DBSIZE command. You will get the number of keys stored on each instance of Redis OSS. The total should be the number of keys in our Dynomite database.
Run the SAVE command and check that your RDB files have been created in /var/lib/redis – or any directory you have specified.
Export the two dump files to external storage
We are now ready to export our two RDB files to external storage.
For this tutorial, I’ll export the files to Google Cloud’s Cloud Storage, but you can also use other external storage options such as an FTP Server, another Cloud Service Provider storage solution, or an external disk accessible from your Redis Enterprise cluster. You can find more information about those options below:
In Google Cloud, I have created the following:
- A service account for which I have created a JSON key.
- A cloud storage bucket for which I have assigned a Storage Legacy Object Reader permission to my service account.
Now for each node, we’ll run the following command:
We can now see our two RDB files in our Google Cloud bucket:

We are now ready to import them to our Active-Active database.
Import dump files to the Redis Enterprise database
Log into the Redis Enterprise UI and select your Active-Active database. If like in this tutorial, you have created a Redis Enterprise Active-Active database spanning several clusters, you can connect to the UI through whichever cluster you like. In this tutorial, we’ll use our Europe (EU) cluster.
If you’re using a Cloud Active-Active database, simply connect to the Cloud UI and select your database.
Let’s navigate to our database’s configuration page and click the Import button. Select the appropriate Storage Type. In our case, this will be Google Cloud Storage.
We can now add the Cloud Storage path of our two RDB files such as:
- /helene-test/dump1.rdb
- /helene-test/dump2.rdb
We also need to add the following information:
- client ID
- client email
- private key ID
- private key
This information can be found in the JSON key file you downloaded when creating a key for your Google Cloud Service Account.
Note that the private key is weirdly formatted in the JSON file; it has quotation marks and newlines. To quickly format it in a way that the Redis Enterprise UI will accept, just launch a python interpreter and print it:
We now have the following import configuration:
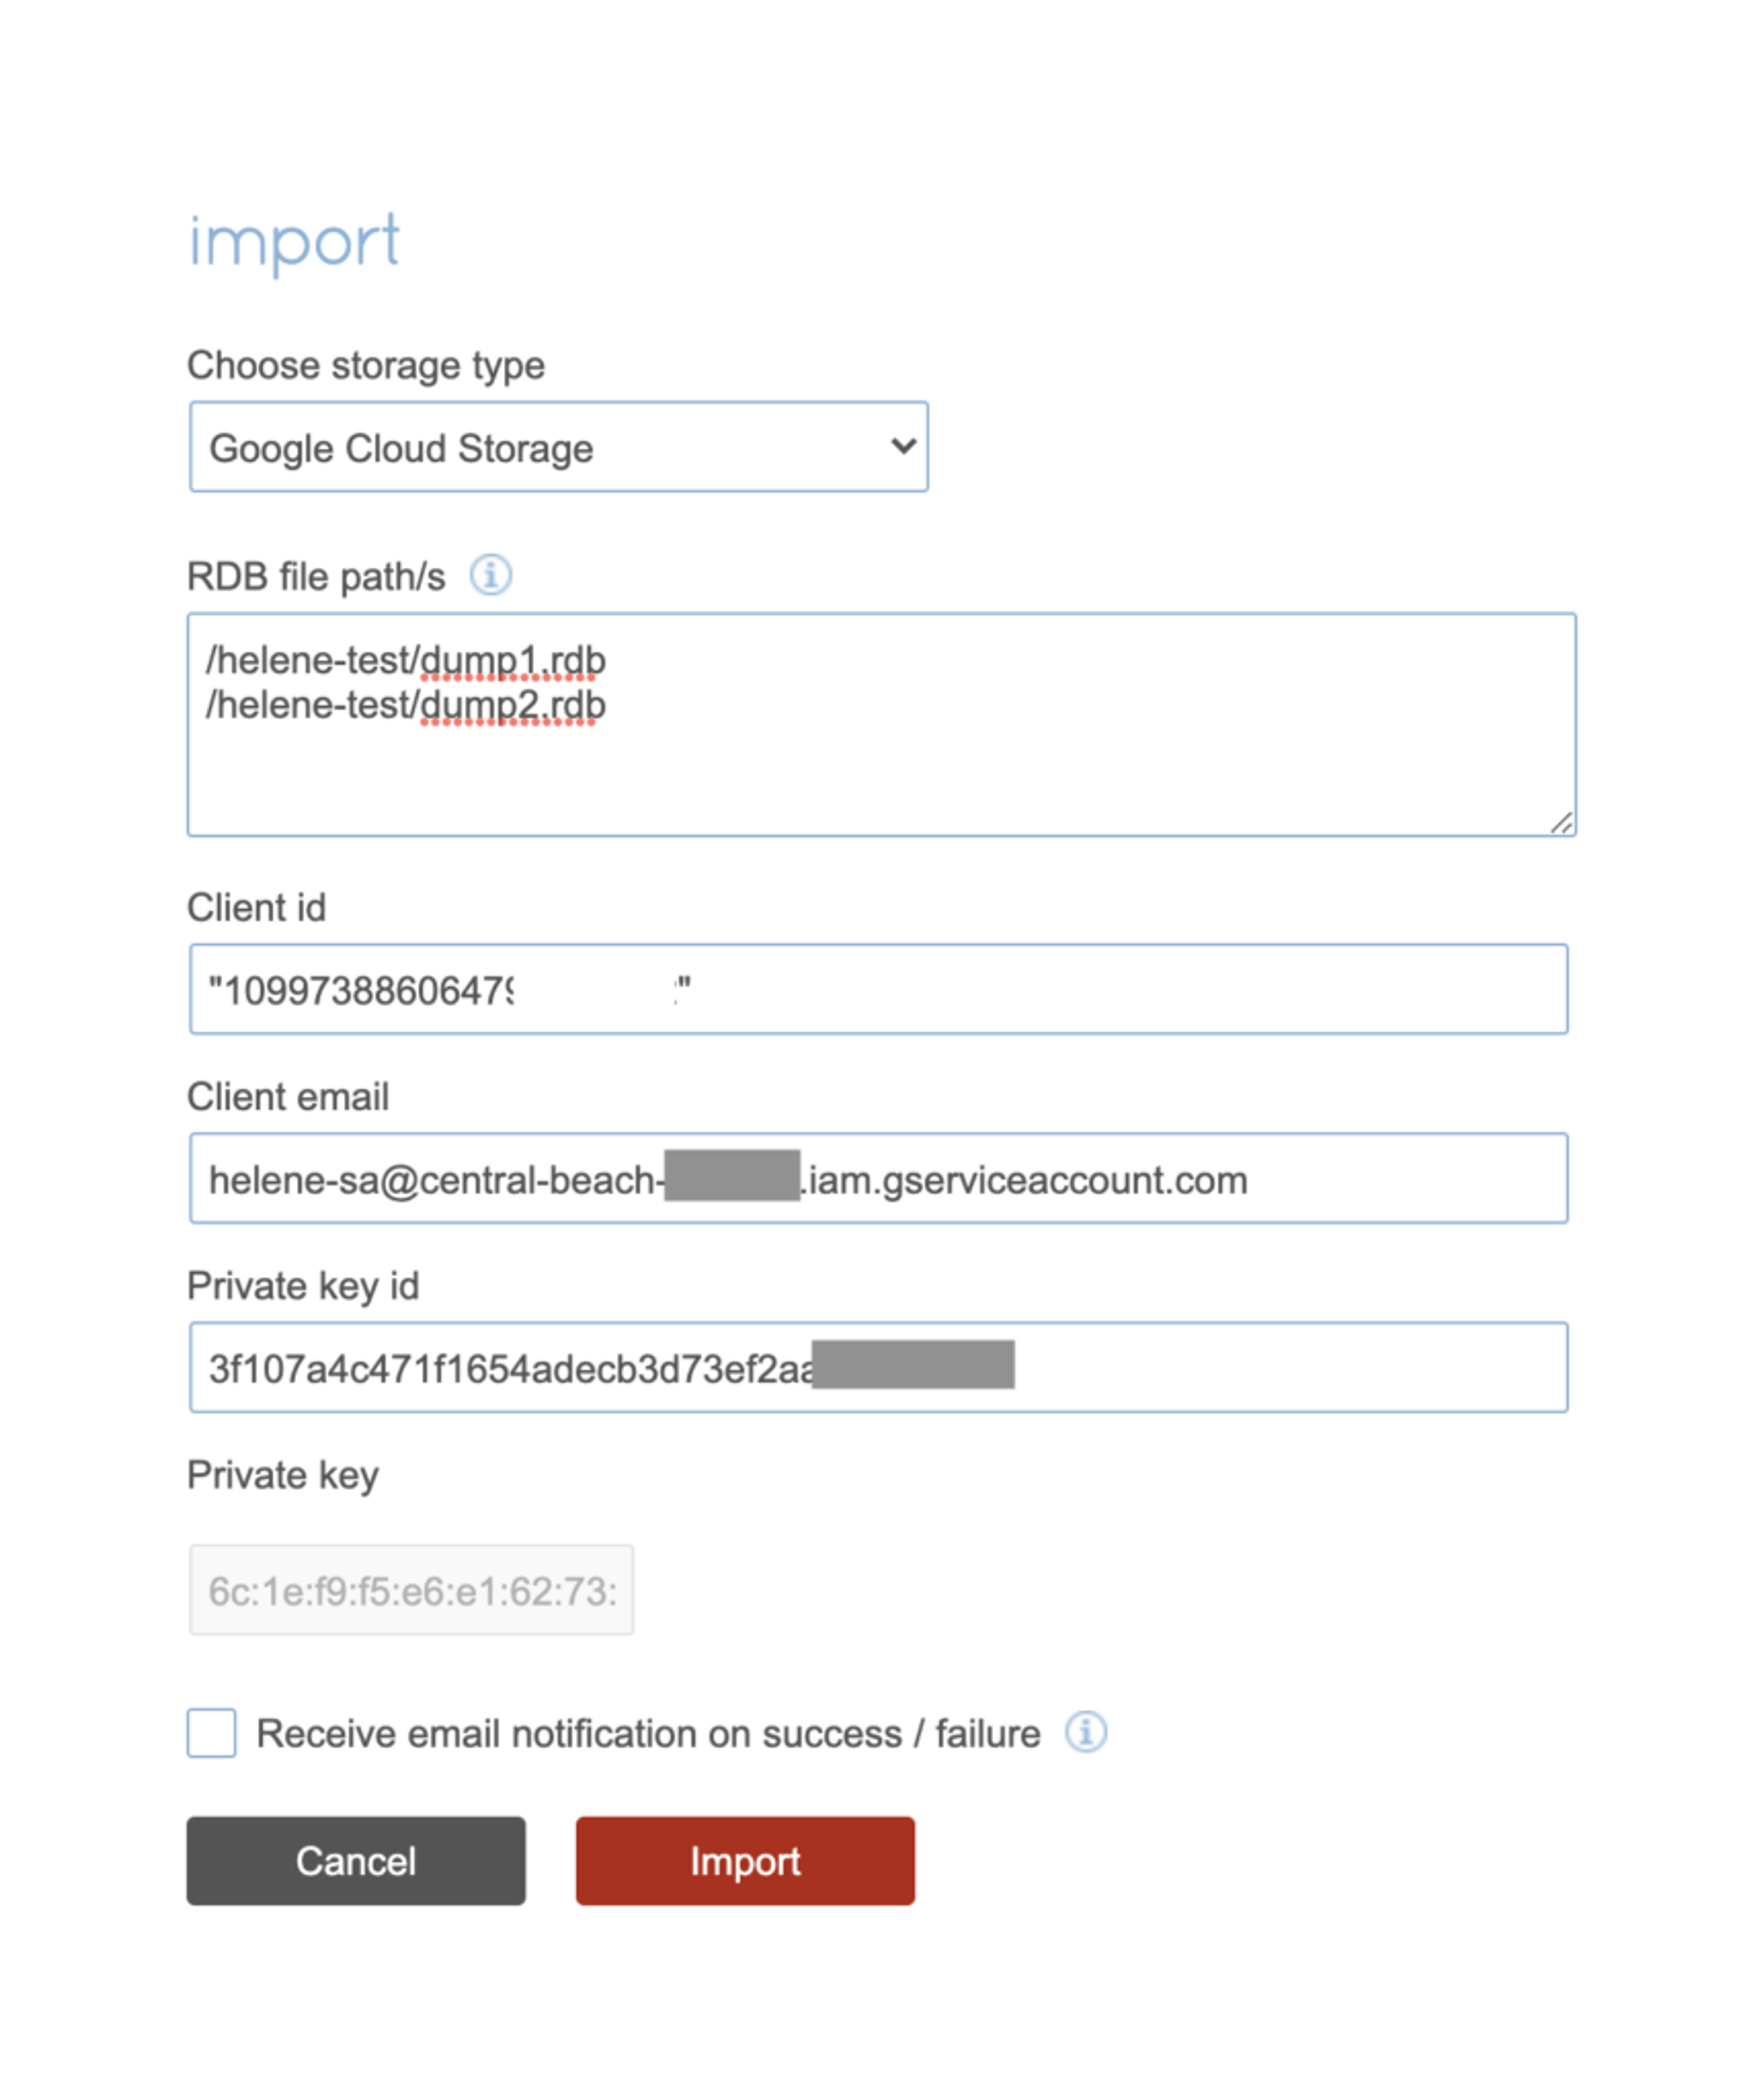
Click Import and wait for the import to be finished which will be dependent on the size of the database.
Check the database and cutover
With redis-cli, connect to the endpoint of your Redis Enterprise database. Try to read some keys and run the DBSIZE command to check that you have the correct total number of keys.
Don’t forget to check the Active-Active Geo-Duplication as well! Just connect to the other cluster’s database endpoint, in our case here, the U.S. one, and check the number of keys that you get.
Your migration is now over. You can cut over the traffic to your database if you have not done so already.
Migration using ReplicaOf feature
Now let’s run a continuous migration.
The Redis Enterprise feature ‘ReplicaOf’ (also called Active-Passive in the Redis Cloud UI) allows us to continuously replicate data between two Redis databases. The main advantage is that it replicates the deltas after the initial synchronization is done, which means nearly no observed application-side downtime.
The steps are:
- Establish a ReplicaOf link between the Dynomite database and the Active-Active database
- Wait until the initial synchronization is completed
- Stop the traffic on the Dynomite database
- Wait until the delta is replicated over
- Delete the ReplicaOf link between the databases
- Cutover to the Active-Active database
ReplicaOf is intended to be used in an Active-Passive way. That means the target is assumed to be passive, and it needs to be tolerated so that the target gets fully re-synchronized (flush of the target database + sync from the source database).
Before starting the migration, let’s discuss a few security aspects.
Security configuration for Redis OSS in your Dynomite setup
First of all, you need to add an inbound rule for custom TCP with 6379 port for the network in which your Dynomite rack lives.
Secondly, Redis OSS configuration files on both Dynomite nodes need to be updated. By default, Redis listens only on the IPv4 and IPv6 (if available) loopback interface addresses. This means Redis OSS will only be able to accept client connections from the same host that it is running on. We need to update Redis OSS’ “bind” directive so that Redis OSS can listen to connections from our Redis Enterprise cluster host.
There are two ways of doing this:
- Have Redis OSS listen only to the connections coming from a machine in a peered VPC – recommended and more secure
- Allow Redis OSS to be accessed by all hosts – not secure, especially since Dynomite does not support database passwords
Let’s discuss those two options in detail.
Option 1 – With VPC Peering
The first option is to peer the VPC in which your Dynomite rack lives with the VPC in which your Redis Enterprise cluster lives. Please note that, if like us, you’ve created an Active-Active database, it can live in any cluster. As before, we’ll use our Europe (EU) cluster for demonstration.
Once you have peered your networks, you just need to edit the “bind” directive in the redis.conf file: Add the private IP of your Dynomite machine after the default loopback interface addresses.
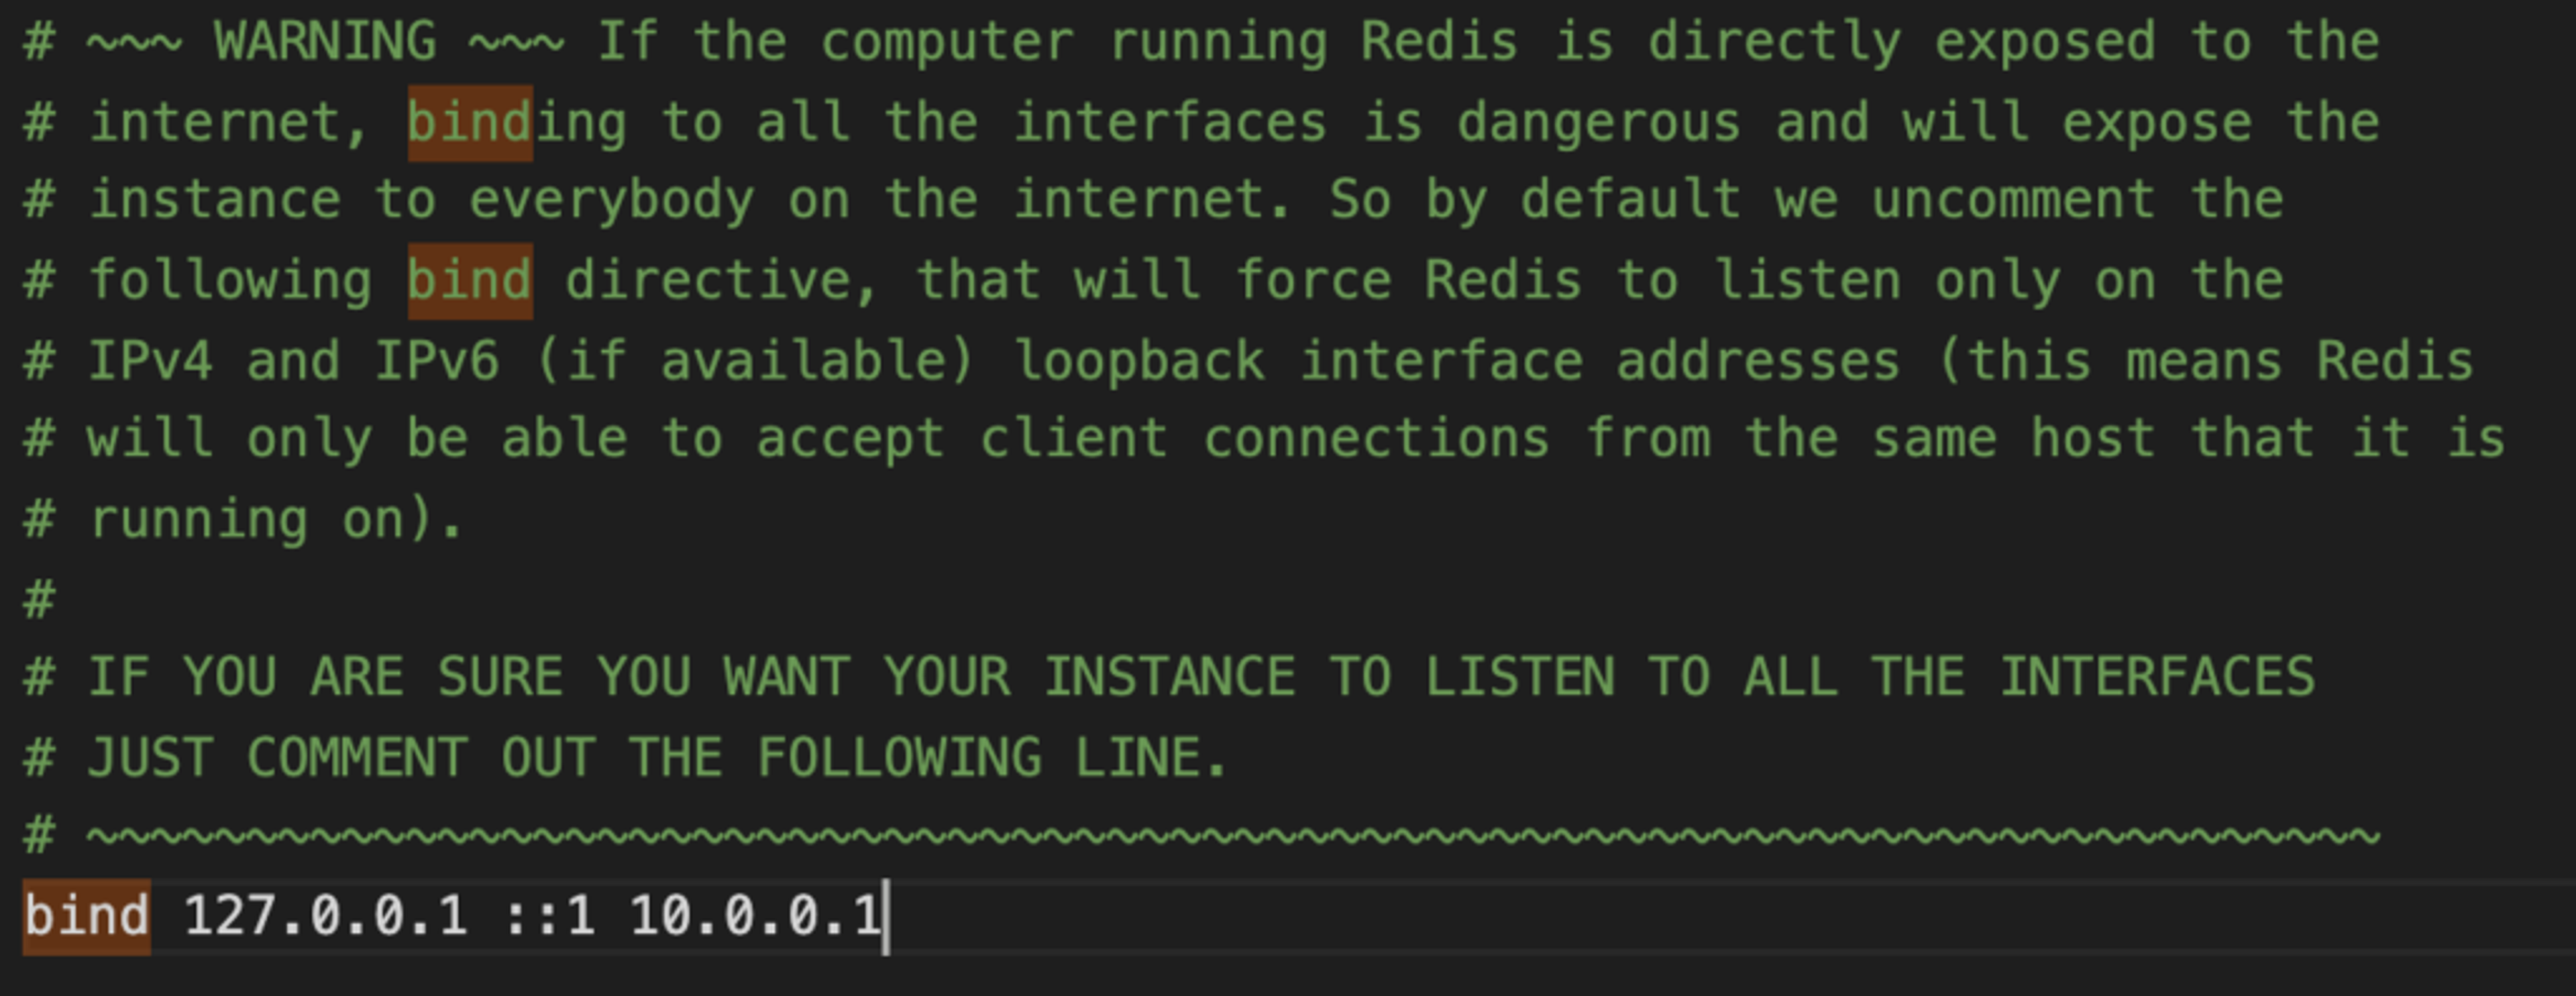
Do this for all nodes in the rack and that’s it! Don’t forget to restart your Redis OSS instances.
Option 2 – Without VPC Peering
If you can’t or don’t want to peer your networks, then you need to update the Redis OSS configuration file in the following way, on each node:
- Comment the “bind” directive, which will expose your Redis OSS instance to everyone on the internet
- Set “protected-mode” to “no”, so that clients from other hosts can connect to Redis even if no authentication is configured, nor a specific set of interfaces are explicitly listed using the “bind” directive.
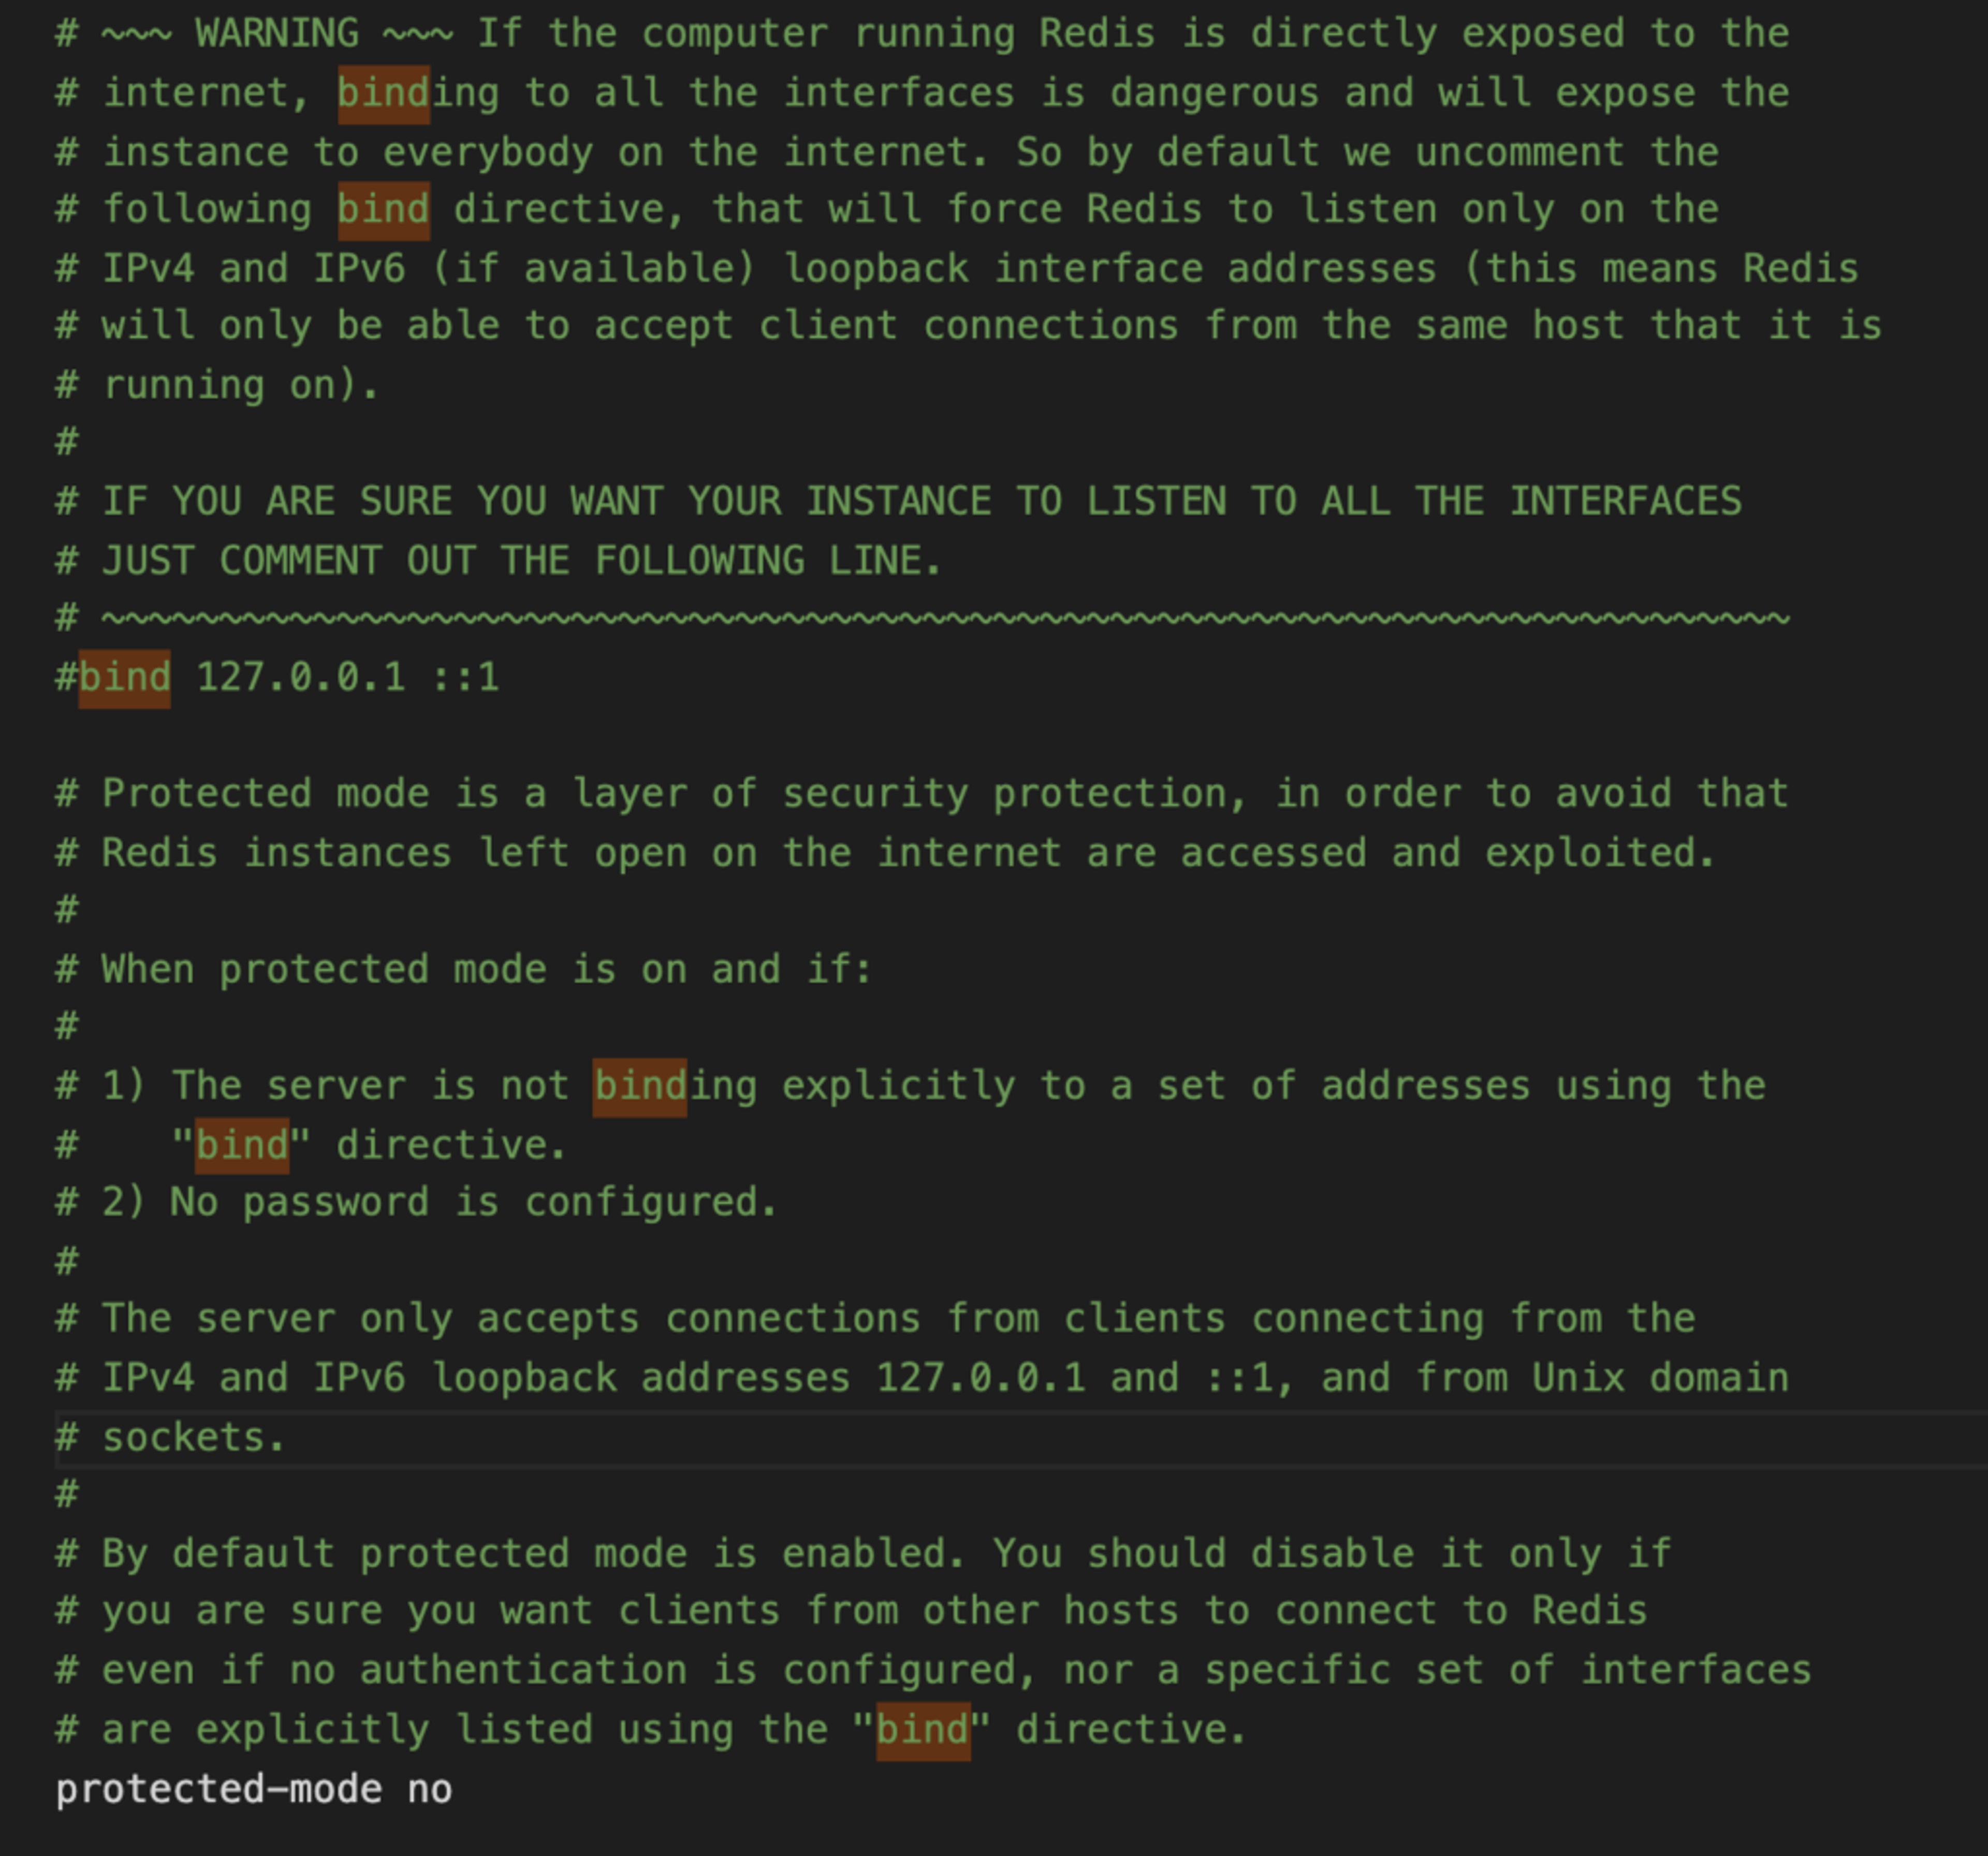
IMPORTANT: This last step is required as Dynomite does not support Redis’ OSS AUTH command, which prevents us from setting a database password. Therefore, if you don’t use a firewall to control who connects to the ports in use, anyone can connect to the Redis OSS instance and access/change/delete its data. Open port 6379 only to the host of your Redis Enterprise cluster.
If you really wanted to use a password, you could. But it would make it impossible to run a continuous migration, as you’d need to do the following:
- Stop the traffic to the Dynomite database
- Edit the “requirepass” directive to set a password for the database. From this point on, you would not be able to send any write traffic to your Dynomite database using port 8379, as the AUTH command would be required to access the database
- Carry out the migration using ReplicaOf as described below
- Cutover the traffic to Redis Enterprise database
One more security consideration and we’re ready to start our migration!
Optional – enable TLS
To prevent unauthorized access to your data, Redis Enterprise supports the TLS protocol.
If you’re using Redis Enterprise Software, you can specifically configure it for ReplicaOf communication. If you’re using Redis Enterprise Cloud, you can enable TLS in general.
Set the ReplicaOf links between the databases
In the Redis Enterprise UI, let’s navigate to our Active-Active database configuration page and click Edit.
We have the option to enable Active-Passive/ReplicaOf. Once we do, we can add sources in the following format :
Please note:
- ReplicaOf allows a maximum of 32 sources. That means that if you have distributed your dataset across more than 32 nodes in a Dynomite rack, you won’t be able to use this option
- If you have used VPC Peering, you should use your machines’ private IPs
- If you haven’t used VPC Peering:
- You should use your machines’ public IPs
- If you decided to set a password to your database (and to run a one-time migration), the password should be provided as follows: redis://:password@IP:port.
In our case, with VPC Peering, this is what our sources look like:

Start the migration
Now let’s take the following steps:
- Click Update in the Redis Enterprise UI,
- Wait for the initial synchronization to be over,
- Stop the traffic to the Dynomite database,
- Wait for the delta to be synchronized,
- Update the Active-Active database again to disable ReplicaOf,
- Start traffic on the Active-Active database.
Check your data
Like before, connect to your database with redis-cli and check that your data has been migrated. Check Active-Active Geo-Duplication as well by connecting to other clusters/other local endpoints.
Conclusion
Redis has been named the most loved database by developers for many years. If you’re using Dynomite, it’s probably because you love Redis as well. At Redis, the home of both Redis OSS and Redis Enterprise, we can help your organization geo-distribute Redis in a more manageable way, while keeping up with the highest academic standards for conflict resolution.
Get started with Redis today
Speak to a Redis expert and learn more about enterprise-grade Redis today.
