Blog
Redis Enterprise Service on Kops managed Kubernetes Cluster
This tutorial will show you how to easily set up a Kubernetes cluster on a public cloud using a tool called “Kops.” This post is a complement to ourKubernetes webinar, in which we explained the basic Kubernetes primitives, and our previous blog posts aboutRedis Enterprise Service andlocal Kubernetes development. For this tutorial, we will use the latest publicly available containerimage of Redis Enterprise Software. You can read about the high performance, in-memory Redis Enterprise 5.0.2 software releasehere.
What is Kops?
Kops stands for “Kubernetes Operations” and is an official Kubernetes project. The purpose of the Kops tool is to set up a production-grade Kubernetes cluster on a public cloud. We will now walk through the steps needed to set up Kubernetes cluster and install Redis Enterprise Service on the Kops-managed cluster.
STEP 1: Prepare your local machine
You will need to prepare your local machine by installing a few command-line tools (Note: the following instructions are for Mac OS):
Install Kubernetes command-line tool, Kubectl
brew install kubectl
Install Kops command-line tool
brew install kops
Install AWS command-line tool
brew install awscli
STEP 2: Configure Domain
Kops requires a valid domain name for your Kubernetes cluster. Kops will also create DNS entries for the API and bastion host. For this tutorial, I will use Route 53 Hosted Zones k8.vkelkar.com:

DNS Zone Information
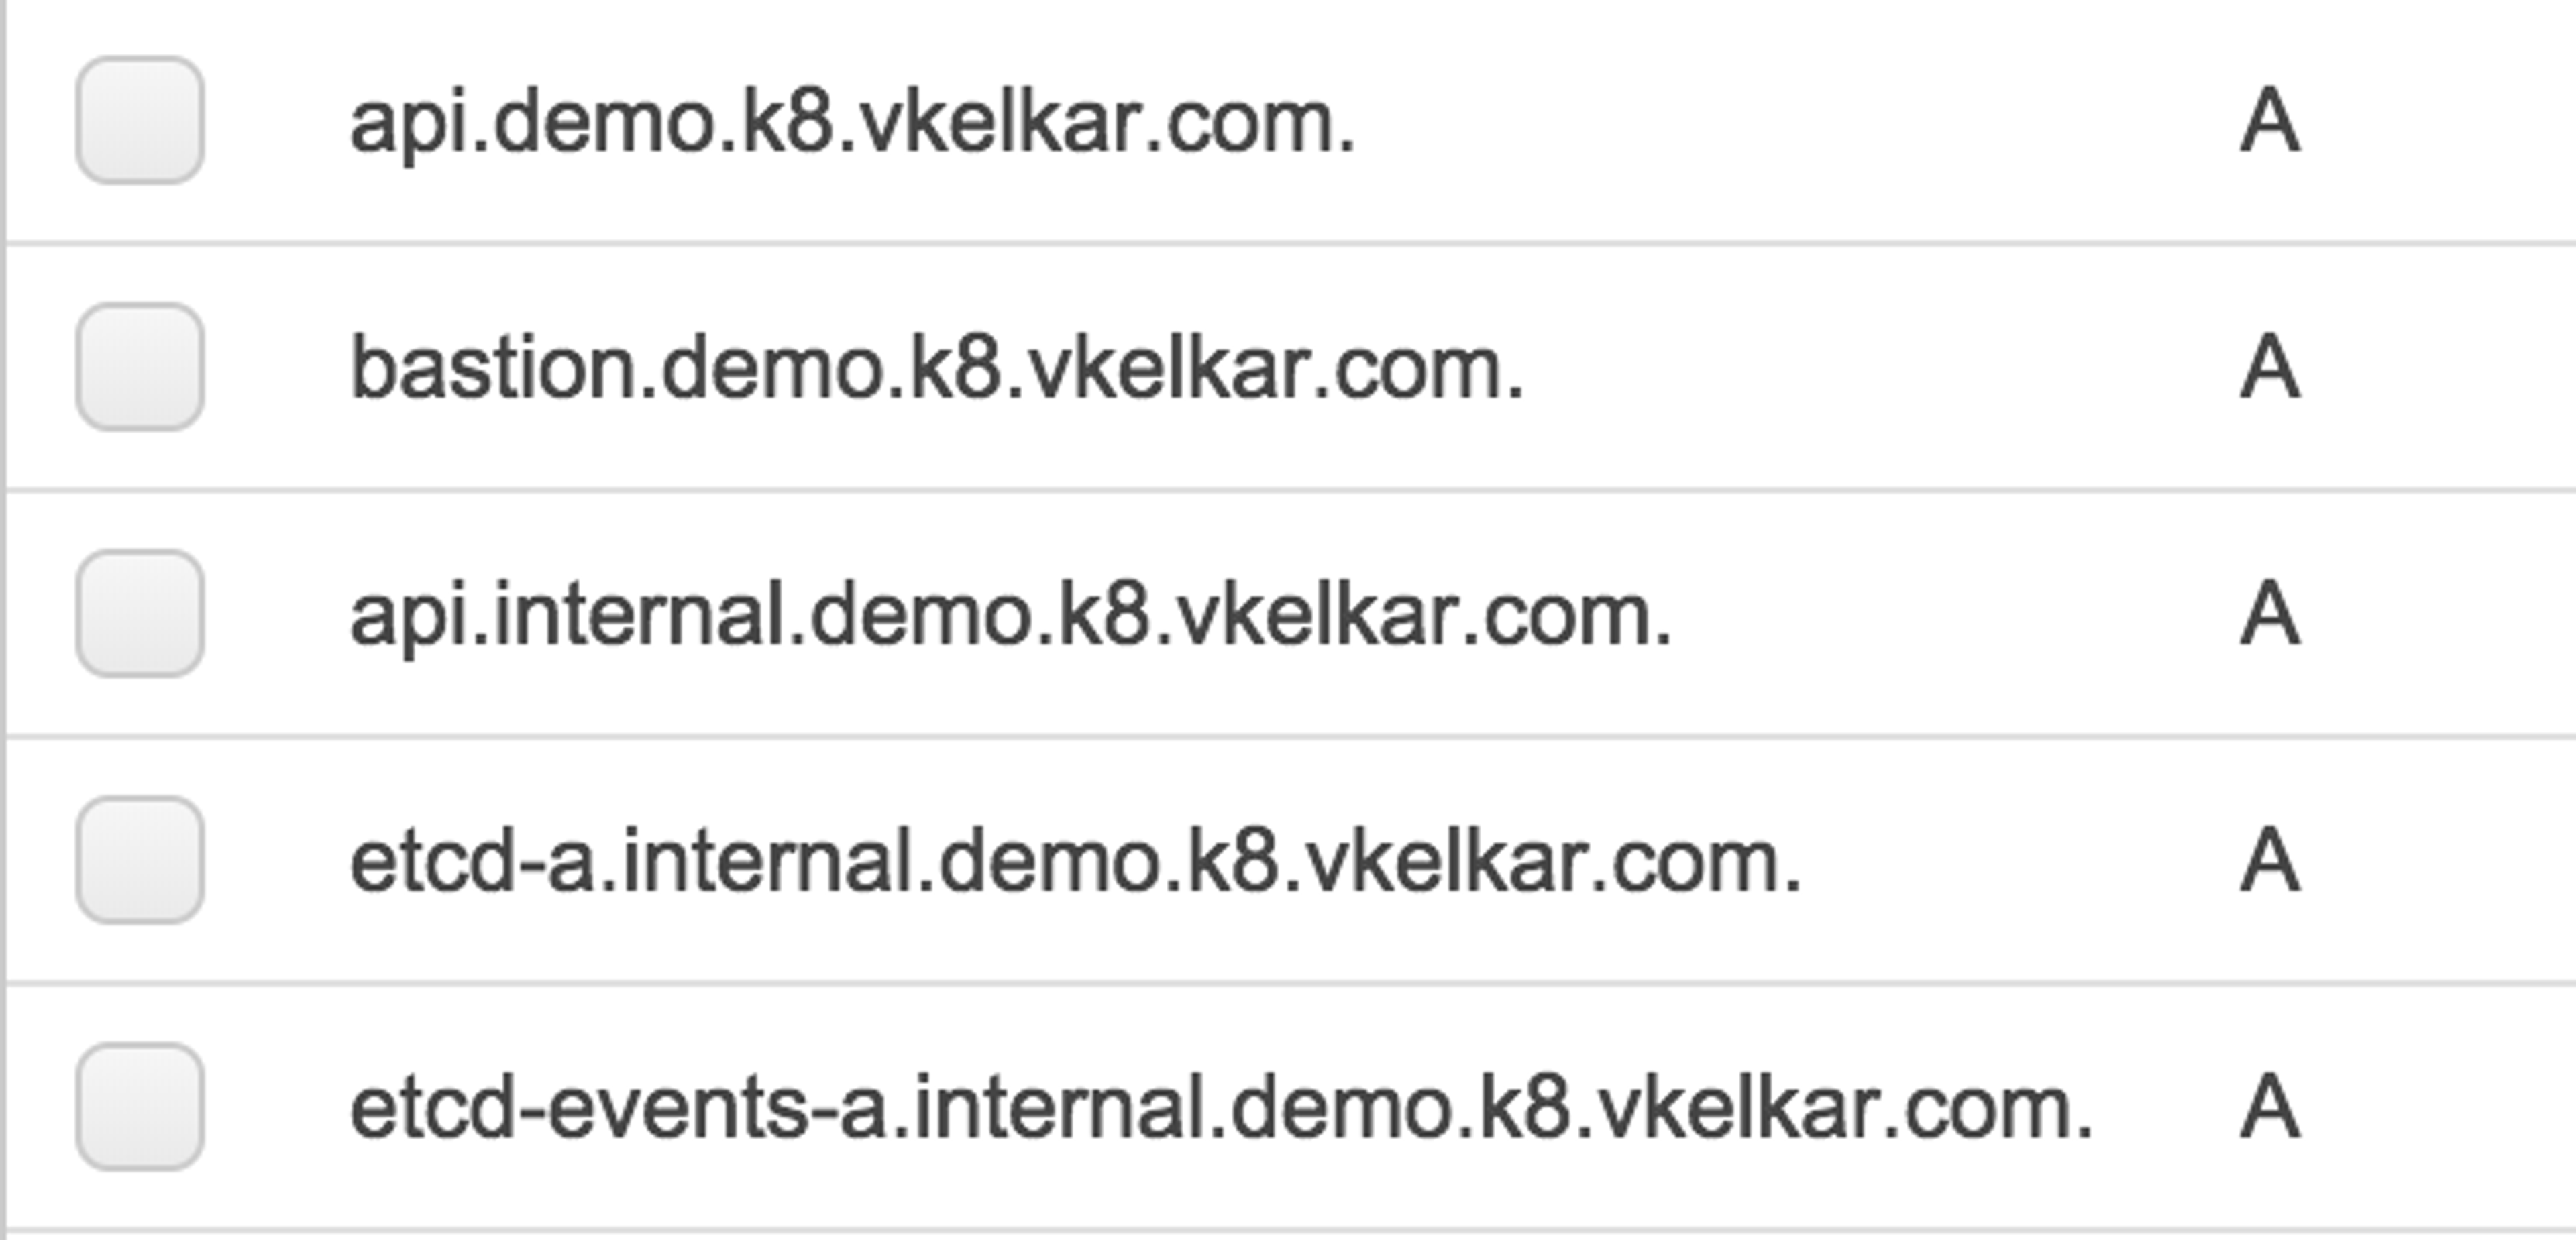
We will use ”demo” as the name of the Kubernetes cluster. Once the cluster is spun up, Kops will add additional DNS entries to the delegated subdomain of k8.vkelkar.com:

DNS Entries
STEP 3: Configure bucket
Kops stores the state of your Kubernetes cluster in an S3 bucket. You have to create the S3 bucket using the aws command line:
aws s3 mb s3://<name-of-your-private-S3-bucket>
Once you create your S3 bucket to store the state of your cluster configuration, you need to either export it as an environment variable or pass it as an argument in the kops command. For this tutorial, I set the environment variable as follows:
export KOPS_STATE_STORE=s3://<name-of-your-private-S3-bucket>
STEP 4: Create Kubernetes Cluster
Now that we have configured the DNS and S3 bucket, it is time to create a production-grade Kubernetes cluster. You can specify the name of the cluster as a command-line option or pass it as a variable. This tutorial used the command-line option, but you can set the variable as follows:
export NAME=demo.k8.vkelkar.com
The Kops command below will set up a private topology cluster and provision a bastion host for that cluster. We have added labels (in the format of “key=value pairs”) to our nodes to track cluster ownership; you can add additional labels to track resource consumption.
kops create cluster --cloud=aws
--networking=weave
--master-size=c3.large
--master-zones=us-west-2a
--node-size=c3.4xlarge
--node-count=4
--topology=private
--bastion
--ssh-public-key=/Users/vkelkar/.ssh/Vick_Kelkar_aws.pub
--zones=us-west-2a,us-west-2b
--name=demo.k8.vkelkar.com
--cloud-labels "ClusterOwner=Vick,Team=PM-Team,Org=Americas"
--image=ami-5c97f024
--yes
The resulting set of Kubernetes cluster and nodes will look like:
kubectl get nodes
NAME STATUS ROLES AGE VERSION
redacted.compute.internal Ready master 8m v1.8.7
redacted.compute.internal Ready node 6m v1.8.7
redacted.compute.internal Ready node 6m v1.8.7
redacted.compute.internal Ready node 7m v1.8.7
redacted.compute.internal Ready node 6m v1.8.7
Here are the additional labels, as shown in the console:

Nodes with additional labels
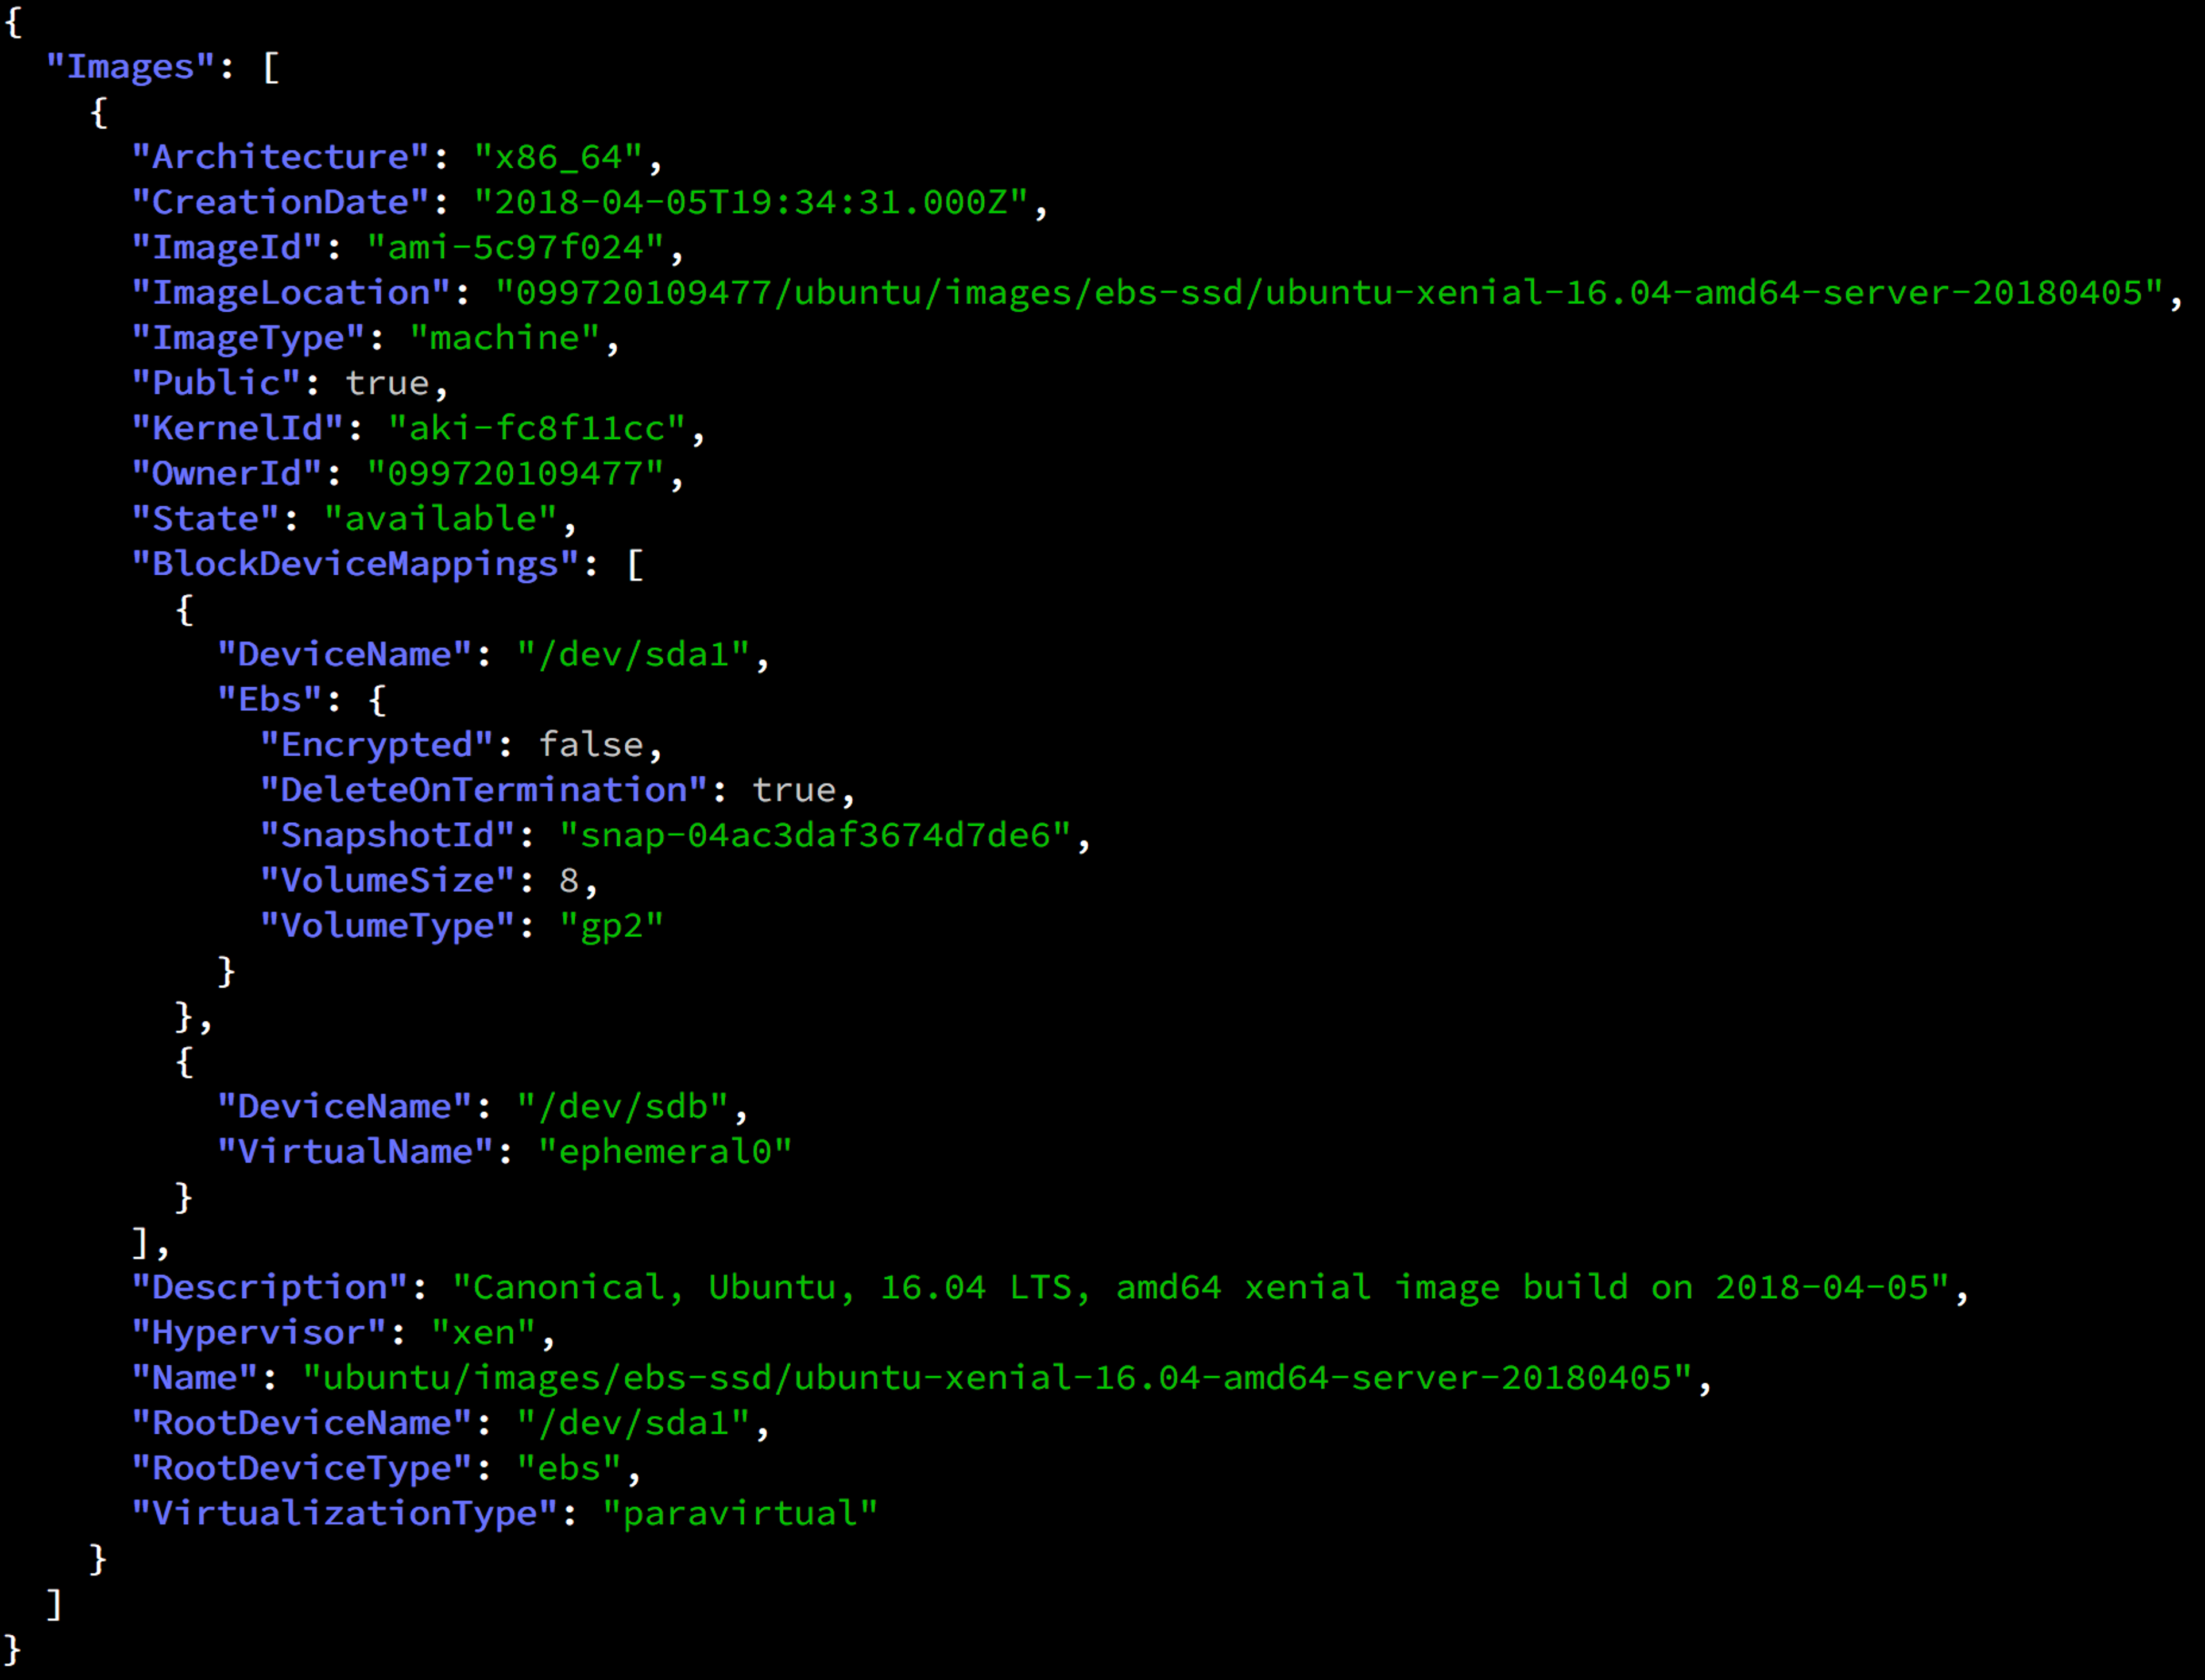
You can find out about the AMI used in this tutorial by running the command:
aws ec2 describe-images –image-id ami-5c97f024

AMI information
STEP 5: Deploy Redis Enterprise Service on Kubernetes Cluster
For this tutorial, we will deploy a three-node Redis Enterprise cluster in the Kubernetes cluster:

Redis Enterprise Cluster Nodes
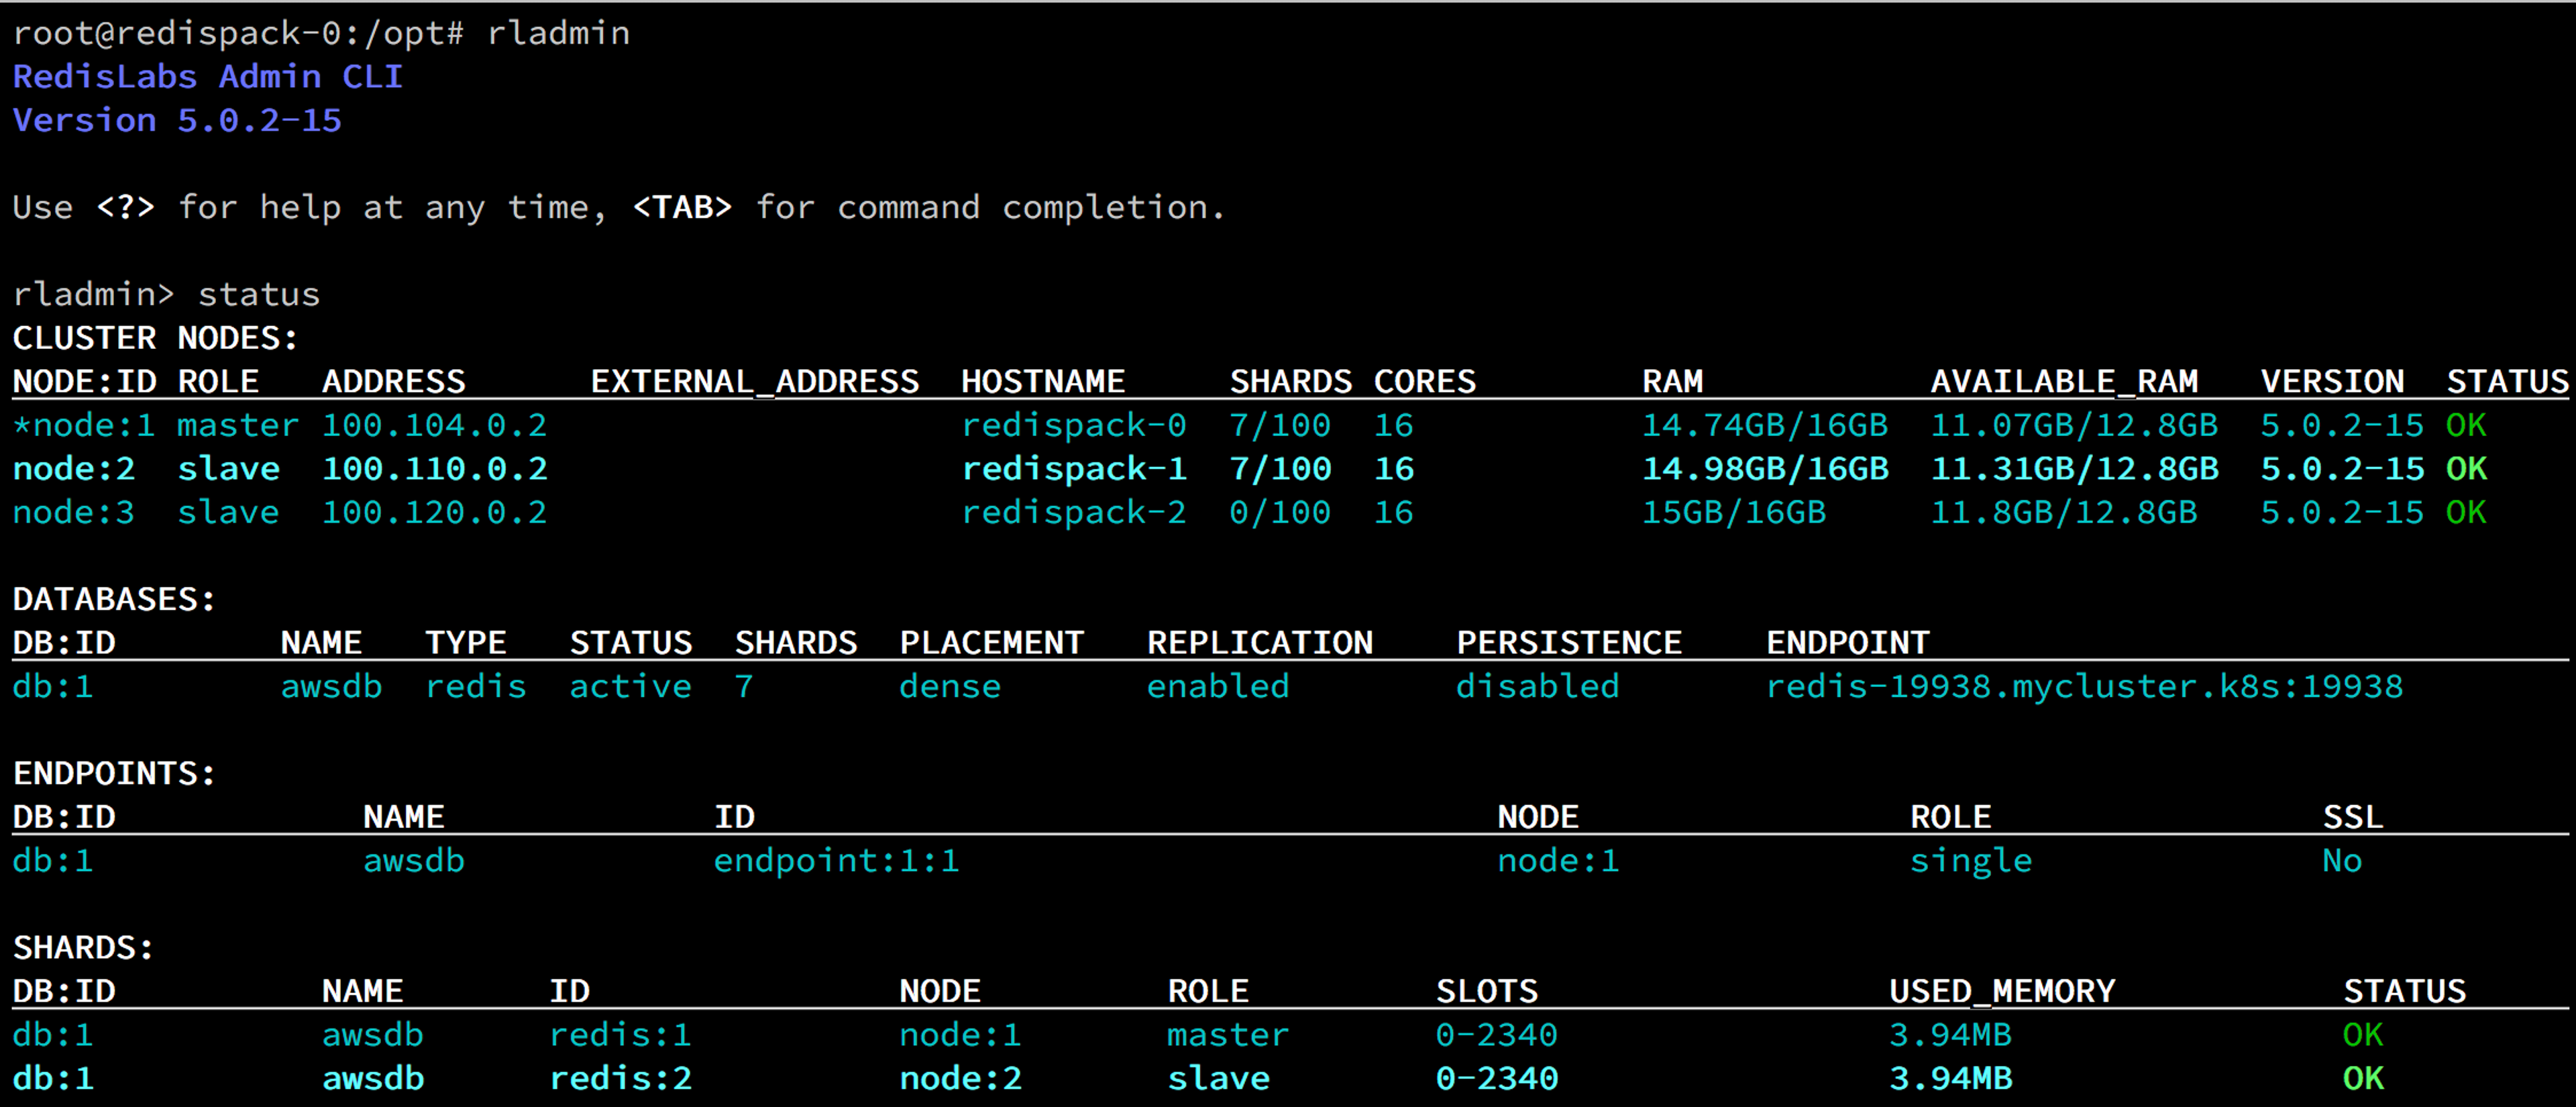
Using the `rladmin` command-line utility included with Redis Enterprise service, we can take a look at the three-node Redis Enterprise cluster and the “awsdb” created on the cluster:

Redis Enterprise rladmin utility output showing ‘awsdb’ database
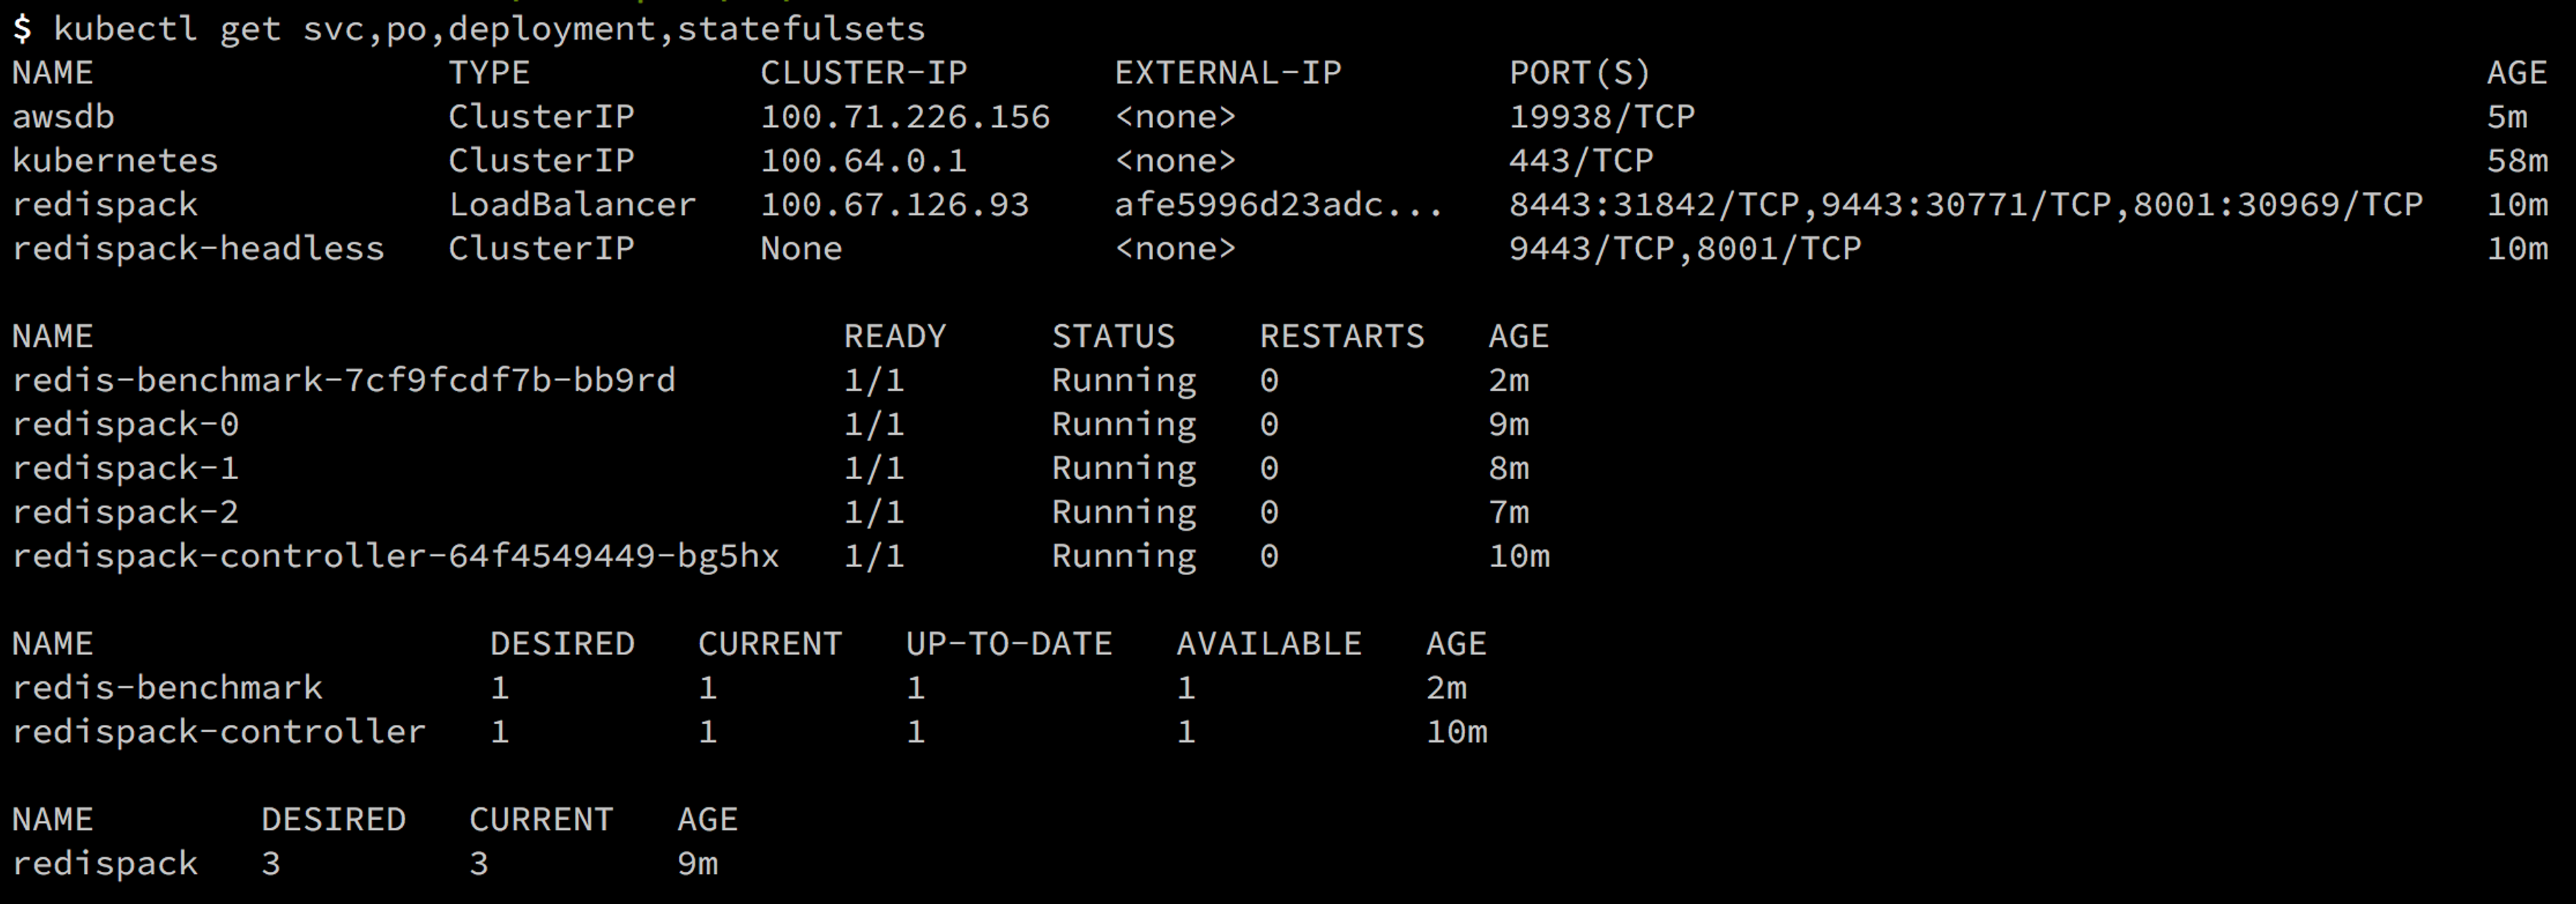
The resource consumption of Redis Enterprise in the Kubernetes cluster will look like:

Redis Enterprise Release resources in Kubernetes Cluster
STEP 6: Delete Kops Kubernetes Cluster
Now that we have successfully deployed the Redis Enterprise cluster on the Kubernetes and were able to create a database called “awsdb” (pictured above), we can delete the Kubernetes cluster by issuing the command:
kops delete cluster demo.k8.vkelkar.com –yes
Conclusion
Kops is a great tool with which to quickly spin up a Kubernetes cluster for your needs. This could be a cloud-independent way to test your Kubernetes release or to reduce the setup time of a production-grade Kubernetes cluster. If you would like to learn more about the Redis Enterprise Kubernetes release, please contact us at [email protected].
Get started with Redis today
Speak to a Redis expert and learn more about enterprise-grade Redis today.
