RedisOM for Python
Learn how to build with Redis Stack and Python
Redis OM Python is a Redis client that provides high-level abstractions for managing document data in Redis. This tutorial shows you how to get up and running with Redis OM Python, Redis Stack, and the Flask micro-framework.
We'd love to see what you build with Redis Stack and Redis OM. Join the Redis community on Discord to chat with us about all things Redis OM and Redis Stack. Read more about Redis OM Python our announcement blog post.
Overview
This application, an API built with Flask and a simple domain model, demonstrates common data manipulation patterns using Redis OM.
Our entity is a Person, with the following JSON representation:
{
  "first_name": "A string, the person's first or given name",
  "last_name": "A string, the person's last or surname",
  "age": 36,
  "address": {
    "street_number": 56,
    "unit": "A string, optional unit number e.g. B or 1",
    "street_name": "A string, name of the street they live on",
    "city": "A string, name of the city they live in",
    "state": "A string, state, province or county that they live in",
    "postal_code": "A string, their zip or postal code",
    "country": "A string, country that they live in."
  },
  "personal_statement": "A string, free text personal statement",
  "skills": [
    "A string: a skill the person has",
    "A string: another still that the person has"
  ]
}
We'll let Redis OM handle generation of unique IDs, which it does using ULIDs. Redis OM will also handle creation of unique Redis key names for us, as well as saving and retrieving entities from JSON documents stored in a Redis Stack database.
Getting Started
Requirements
To run this application you'll need:
- git - to clone the repo to your machine.
- Python 3.9 or higher.
- A Redis Stack database, or Redis with the Search and Query and JSON features installed. We've provided a
docker-compose.ymlfor this. You can also sign up for a free 30Mb database with Redis Cloud - be sure to check the Redis Stack option when creating your cloud database. - curl, or Postman - to send HTTP requests to the application. We'll provide examples using curl in this document.
- Optional: Redis Insight, a free data visualization and database management tool for Redis. When downloading Redis Insight, be sure to select version 2.x or use the version that comes with Redis Stack.
Get the Source Code
Clone the repository from GitHub:
$ git clone https://github.com/redis-developer/redis-om-python-flask-skeleton-app.git
$ cd redis-om-python-flask-skeleton-app
Start a Redis Stack Database, or Configure your Redis Cloud Credentials
Next, we'll get a Redis Stack database up and running. If you're using Docker:
$ docker-compose up -d
Creating network "redis-om-python-flask-skeleton-app_default" with the default driver
Creating redis_om_python_flask_starter ... done
If you're using Redis Cloud, you'll need the hostname, port number, and password for your database. Use these to set the REDIS_OM_URL environment variable like this:
$ export REDIS_OM_URL=redis://default:<password>@<host>:<port>
(This step is not required when working with Docker as the Docker container runs Redis on localhost port 6379 with no password, which is the default connection that Redis OM uses.)
For example if your Redis Cloud database is at port 9139 on host enterprise.redis.com and your password is 5uper53cret then you'd set REDIS_OM_URL as follows:
$ export REDIS_OM_URL=redis://default:[email protected]:9139
Create a Python Virtual Environment and Install the Dependencies
Create a Python virtual environment, and install the project dependencies which are Flask, Requests (used only in the data loader script) and Redis OM:
$ python3 -m venv venv
$ . ./venv/bin/activate
$ pip install -r requirements.txt
Start the Flask Application
Let's start the Flask application in development mode, so that Flask will restart the server for you each time you save code changes in app.py:
$ export FLASK_ENV=development
$ flask run
If all goes well, you should see output similar to this:
$ flask run
 * Environment: development
 * Debug mode: on
 * Running on http://127.0.0.1:5000/ (Press CTRL+C to quit)
 * Restarting with stat
 * Debugger is active!
 * Debugger PIN: XXX-XXX-XXX
You're now up and running, and ready to perform CRUD operations on data with Redis, Search and Query, JSON and Redis OM for Python! To make sure the server's running, point your browser at http://127.0.0.1:5000/, where you can expect to see the application's basic home page:

Load the Sample Data
We've provided a small amount of sample data (it's in data/people.json. The Python script dataloader.py loads each person into Redis by posting the data to the application's create a new person endpoint. Run it like this:
$ python dataloader.py
Created person Robert McDonald with ID 01FX8RMR7NRS45PBT3XP9KNAZH
Created person Kareem Khan with ID 01FX8RMR7T60ANQTS4P9NKPKX8
Created person Fernando Ortega with ID 01FX8RMR7YB283BPZ88HAG066P
Created person Noor Vasan with ID 01FX8RMR82D091TC37B45RCWY3
Created person Dan Harris with ID 01FX8RMR8545RWW4DYCE5MSZA1
Make sure to take a copy of the output of the data loader, as your IDs will differ from those used in the tutorial. To follow along, substitute your IDs for the ones shown above. e.g. whenever we are working with Kareem Khan, change 01FX8RMR7T60ANQTS4P9NKPKX8 for the ID that your data loader assigned to Kareem in your Redis database.
Problems?
If the Flask server fails to start, take a look at its output. If you see log entries similar to this:
raise ConnectionError(self._error_message(e))
redis.exceptions.ConnectionError: Error 61 connecting to localhost:6379. Connection refused.
then you need to start the Redis Docker container if using Docker, or set the REDIS_OM_URL environment variable if using Redis Cloud.
If you've set the REDIS_OM_URL environment variable, and the code errors with something like this on startup:
raise ConnectionError(self._error_message(e))
redis.exceptions.ConnectionError: Error 8 connecting to enterprise.redis.com:9139. nodename nor servname provided, or not known.
then you'll need to check that you used the correct hostname, port, password and format when setting REDIS_OM_URL.
If the data loader fails to post the sample data into the application, make sure that the Flask application is running before running the data loader.
Create, Read, Update and Delete Data
Let's create and manipulate some instances of our data model in Redis. Here we'll look at how to call the Flask API with curl (you could also use Postman), how the code works, and how the data's stored in Redis.
Building a Person Model with Redis OM
Redis OM allows us to model entities using Python classes, and the Pydantic framework. Our person model is contained in the file person.py. Here's some notes about how it works:
- We declare a class
Personwhich extends a Redis OM classJsonModel. This tells Redis OM that we want to store these entities in Redis as JSON documents. - We then declare each field in our model, specifying the data type and whether or not we want to index on that field. For example, here's the
agefield, which we've declared as a positive integer that we want to index on:
age: PositiveInt = Field(index=True)
- The
skillsfield is a list of strings, declared thus:
skills: List[str] = Field(index=True)
- For the
personal_statementfield, we don't want to index on the field's value, as it's a free text sentence rather than a single word or digit. For this, we'll tell Redis OM that we want to be able to perform full text searches on the values:
personal_statement: str = Field(index=True, full_text_search=True)
addressworks differently from the other fields. Note that in our JSON representation of the model, address is an object rather than a string or numerical field. With Redis OM, this is modeled as a second class, which extends the Redis OMEmbeddedJsonModelclass:
class Address(EmbeddedJsonModel):
    # field definitions...
-
Fields in an
EmbeddedJsonModelare defined in the same way, so our class contains a field definition for each data item in the address. -
Not every field in our JSON is present in every address, Redis OM allows us to declare a field as optional so long as we don't index it:
unit: Optional[str] = Field(index=False)
- We can also set a default value for a field... let's say country should be "United Kingdom" unless otherwise specified:
country: str = Field(index=True, default="United Kingdom")
- Finally, to add the embedded address object to our Person model, we declare a field of type
Addressin the Person class:
address: Address
Adding New People
The function create_person in app.py handles the creation of a new person in Redis. It expects a JSON object that adheres to our Person model's schema. The code to then create a new Person object with that data and save it in Redis is simple:
  new_person = Person(**request.json)
  new_person.save()
  return new_person.pk
When a new Person instance is created, Redis OM assigns it a unique ULID primary key, which we can access as .pk. We return that to the caller, so that they know the ID of the object they just created.
Persisting the object to Redis is then simply a matter of calling .save() on it.
Try it out... with the server running, add a new person using curl:
curl --location --request POST 'http://127.0.0.1:5000/person/new' \
--header 'Content-Type: application/json' \
--data-raw '{
    "first_name": "Joanne",
    "last_name": "Peel",
    "age": 36,
    "personal_statement": "Music is my life, I love gigging and playing with my band.",
    "address": {
      "street_number": 56,
      "unit": "4A",
      "street_name": "The Rushes",
      "city": "Birmingham",
      "state": "West Midlands",
      "postal_code": "B91 6HG",
      "country": "United Kingdom"
    },
    "skills": [
      "synths",
      "vocals",
      "guitar"
    ]
}'
Running the above curl command will return the unique ULID ID assigned to the newly created person. For example 01FX8SSSDN7PT9T3N0JZZA758G.
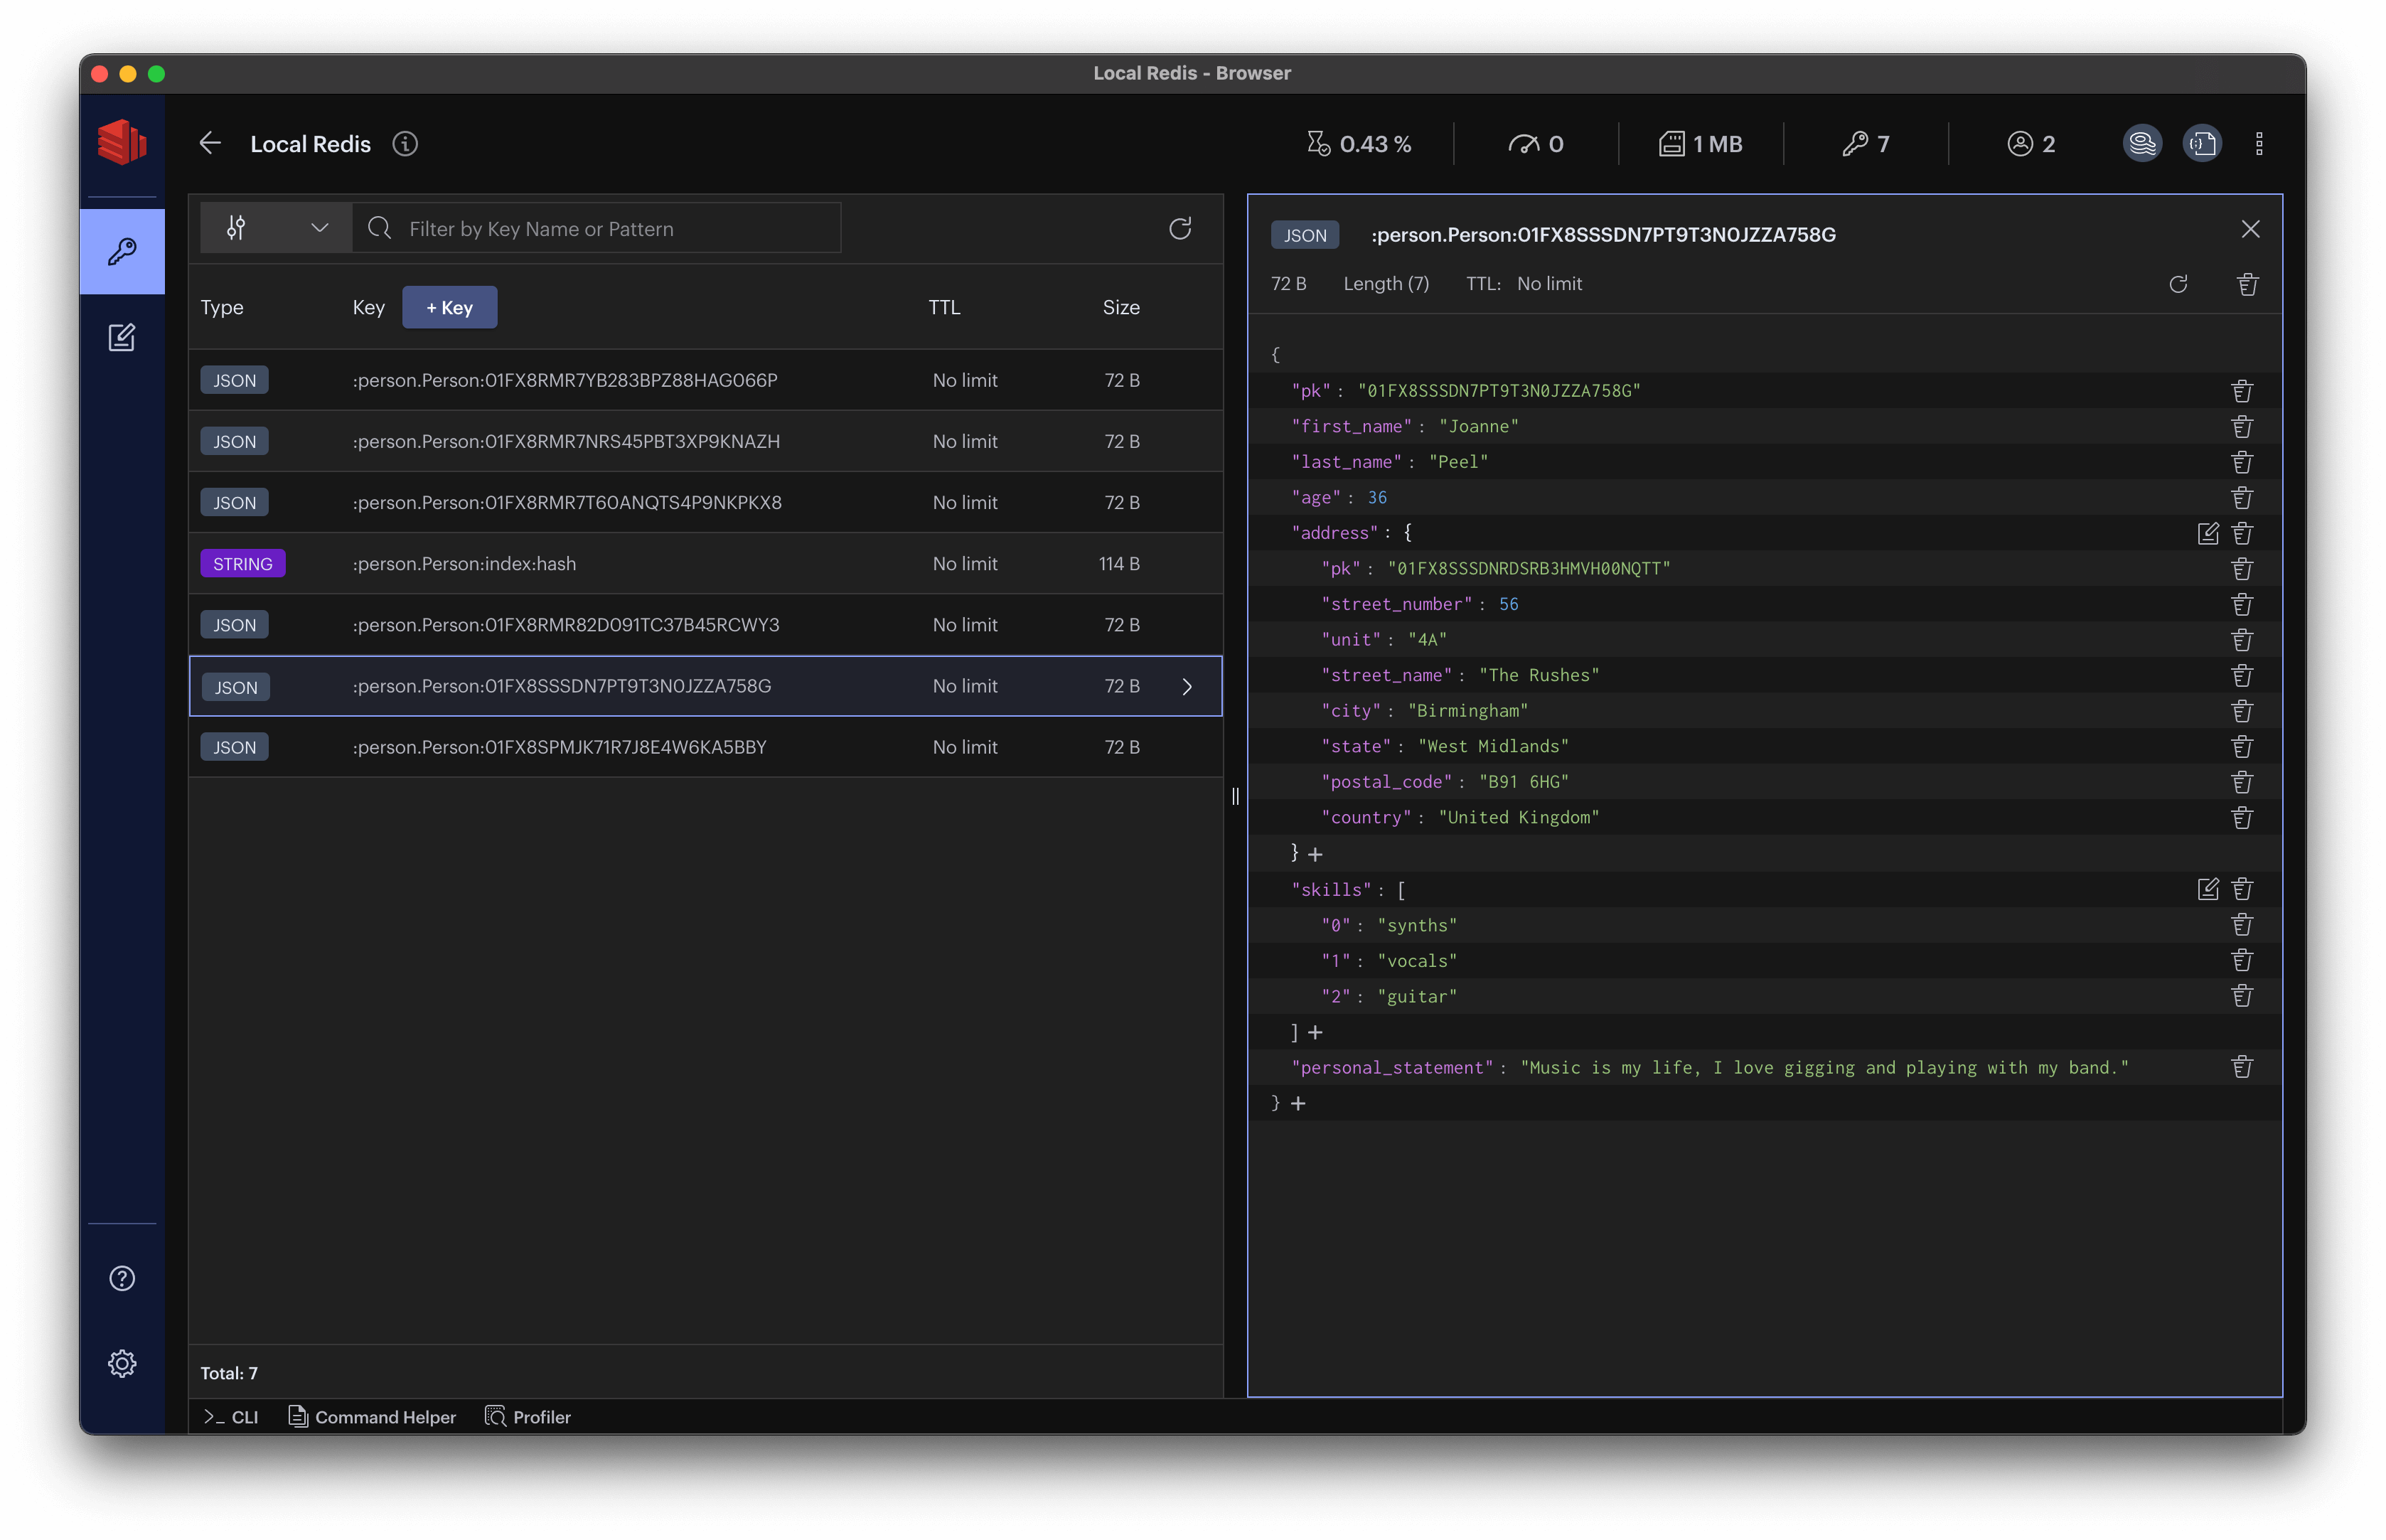
Examining the data in Redis
Let's take a look at what we just saved in Redis. Using Redis Insight or redis-cli, connect to the database and look at the value stored at key :person.Person:01FX8SSSDN7PT9T3N0JZZA758G. This is stored as a JSON document in Redis, so if using redis-cli you'll need the following command:
$ redis-cli
127.0.0.1:6379> json.get :person.Person:01FX8SSSDN7PT9T3N0JZZA758G
If you're using Redis Insight, the browser will render the key value for you when you click on the key name:
When storing data as JSON in Redis, we can update and retrieve the whole document, or just parts of it. For example, to retrieve only the person's address and first skill, use the following command (Redis Insight users should use the built in redis-cli for this):
$ redis-cli
127.0.0.1:6379> json.get :person.Person:01FX8SSSDN7PT9T3N0JZZA758G $.address $.skills[0]
"{\"$.skills[0]\":[\"synths\"],\"$.address\":[{\"pk\":\"01FX8SSSDNRDSRB3HMVH00NQTT\",\"street_number\":56,\"unit\":\"4A\",\"street_name\":\"The Rushes\",\"city\":\"Birmingham\",\"state\":\"West Midlands\",\"postal_code\":\"B91 6HG\",\"country\":\"United Kingdom\"}]}"
For more information on the JSON Path syntax used to query JSON documents in Redis, see the documentation.
Find a Person by ID
If we know a person's ID, we can retrieve their data. The function find_by_id in app.py receives an ID as its parameter, and asks Redis OM to retrieve and populate a Person object using the ID and the Person .get class method:
  try:
      person = Person.get(id)
      return person.dict()
  except NotFoundError:
      return {}
The .dict() method converts our Person object to a Python dictionary that Flask then returns to the caller.
Note that if there is no Person with the supplied ID in Redis, get will throw a NotFoundError.
Try this out with curl, substituting 01FX8SSSDN7PT9T3N0JZZA758G for the ID of a person that you just created in your database:
curl --location --request GET 'http://localhost:5000/person/byid/01FX8SSSDN7PT9T3N0JZZA758G'
The server responds with a JSON object containing the user's data:
{
  "address": {
    "city": "Birmingham",
    "country": "United Kingdom",
    "pk": "01FX8SSSDNRDSRB3HMVH00NQTT",
    "postal_code": "B91 6HG",
    "state": "West Midlands",
    "street_name": "The Rushes",
    "street_number": 56,
    "unit": null
  },
  "age": 36,
  "first_name": "Joanne",
  "last_name": "Peel",
  "personal_statement": "Music is my life, I love gigging and playing with my band.",
  "pk": "01FX8SSSDN7PT9T3N0JZZA758G",
  "skills": [
    "synths",
    "vocals",
    "guitar"
  ]
}
Find People with Matching First and Last Name
Let's find all the people who have a given first and last name... This is handled by the function find_by_name in app.py.
Here, we're using Person's find class method that's provided by Redis OM. We pass it a search query, specifying that we want to find people whose first_name field contains the value of the first_name parameter passed to find_by_name AND whose last_name field contains the value of the last_name parameter:
  people = Person.find(
      (Person.first_name == first_name) &
      (Person.last_name == last_name)
  ).all()
.all() tells Redis OM that we want to retrieve all matching people.
Try this out with curl as follows:
curl --location --request GET 'http://127.0.0.1:5000/people/byname/Kareem/Khan'
Note: First and last name are case sensitive.
The server responds with an object containing results, an array of matches:
{
  "results": [
    {
      "address": {
        "city": "Sheffield",
        "country": "United Kingdom",
        "pk": "01FX8RMR7THMGA84RH8ZRQRRP9",
        "postal_code": "S1 5RE",
        "state": "South Yorkshire",
        "street_name": "The Beltway",
        "street_number": 1,
        "unit": "A"
      },
      "age": 27,
      "first_name": "Kareem",
      "last_name": "Khan",
      "personal_statement":"I'm Kareem, a multi-instrumentalist and singer looking to join a new rock band.",
      "pk":"01FX8RMR7T60ANQTS4P9NKPKX8",
      "skills": [
        "drums",
        "guitar",
        "synths"
      ]
    }
  ]
}
Find People within a Given Age Range
It's useful to be able to find people that fall into a given age range... the function find_in_age_range in app.py handles this as follows...
We'll again use Person's find class method, this time passing it a minimum and maximum age, specifying that we want results where the age field is between those values only:
  people = Person.find(
      (Person.age >= min_age) &
      (Person.age <= max_age)
  ).sort_by("age").all()
Note that we can also use .sort_by to specify which field we want our results sorted by.
Let's find everyone between 30 and 47 years old, sorted by age:
curl --location --request GET 'http://127.0.0.1:5000/people/byage/30/47'
This returns a results object containing an array of matches:
{
  "results": [
    {
      "address": {
        "city": "Sheffield",
        "country": "United Kingdom",
        "pk": "01FX8RMR7NW221STN6NVRDPEDT",
        "postal_code": "S12 2MX",
        "state": "South Yorkshire",
        "street_name": "Main Street",
        "street_number": 9,
        "unit": null
      },
      "age": 35,
      "first_name": "Robert",
      "last_name": "McDonald",
      "personal_statement": "My name is Robert, I love meeting new people and enjoy music, coding and walking my dog.",
      "pk": "01FX8RMR7NRS45PBT3XP9KNAZH",
      "skills": [
        "guitar",
        "piano",
        "trombone"
      ]
    },
    {
      "address": {
        "city": "Birmingham",
        "country": "United Kingdom",
        "pk": "01FX8SSSDNRDSRB3HMVH00NQTT",
        "postal_code": "B91 6HG",
        "state": "West Midlands",
        "street_name": "The Rushes",
        "street_number": 56,
        "unit": null
      },
      "age": 36,
      "first_name": "Joanne",
      "last_name": "Peel",
      "personal_statement": "Music is my life, I love gigging and playing with my band.",
      "pk": "01FX8SSSDN7PT9T3N0JZZA758G",
      "skills": [
        "synths",
        "vocals",
        "guitar"
      ]
    },
    {
      "address": {
        "city": "Nottingham",
        "country": "United Kingdom",
        "pk": "01FX8RMR82DDJ90CW8D1GM68YZ",
        "postal_code": "NG1 1AA",
        "state": "Nottinghamshire",
        "street_name": "Broadway",
        "street_number": 12,
        "unit": "A-1"
      },
      "age": 37,
      "first_name": "Noor",
      "last_name": "Vasan",
      "personal_statement": "I sing and play the guitar, I enjoy touring and meeting new people on the road.",
      "pk": "01FX8RMR82D091TC37B45RCWY3",
      "skills": [
        "vocals",
        "guitar"
      ]
    },
    {
      "address": {
        "city": "San Diego",
        "country": "United States",
        "pk": "01FX8RMR7YCDAVSWBMWCH2B07G",
        "postal_code": "92102",
        "state": "California",
        "street_name": "C Street",
        "street_number": 1299,
        "unit": null
      },
      "age": 43,
      "first_name": "Fernando",
      "last_name": "Ortega",
      "personal_statement": "I'm in a really cool band that plays a lot of cover songs.  I'm the drummer!",
      "pk": "01FX8RMR7YB283BPZ88HAG066P",
      "skills": [
        "clarinet",
        "oboe",
        "drums"
      ]
    }
  ]
}
Find People in a Given City with a Specific Skill
Now, we'll try a slightly different sort of query. We want to find all of the people that live in a given city AND who also have a certain skill. This requires a search over both the city field which is a string, and the skills field, which is an array of strings.
Essentially we want to say "Find me all the people whose city is city AND whose skills array CONTAINS desired_skill", where city and desired_skill are the parameters to the find_matching_skill function in app.py. Here's the code for that:
  people = Person.find(
      (Person.skills << desired_skill) &
      (Person.address.city == city)
  ).all()
The << operator here is used to indicate "in" or "contains".
Let's find all the guitar players in Sheffield:
curl --location --request GET 'http://127.0.0.1:5000/people/byskill/guitar/Sheffield'
Note: Sheffield is case sensitive.
The server returns a results array containing matching people:
{
  "results": [
    {
      "address": {
        "city": "Sheffield",
        "country": "United Kingdom",
        "pk": "01FX8RMR7THMGA84RH8ZRQRRP9",
        "postal_code": "S1 5RE",
        "state": "South Yorkshire",
        "street_name": "The Beltway",
        "street_number": 1,
        "unit": "A"
      },
      "age": 28,
      "first_name": "Kareem",
      "last_name": "Khan",
      "personal_statement": "I'm Kareem, a multi-instrumentalist and singer looking to join a new rock band.",
      "pk": "01FX8RMR7T60ANQTS4P9NKPKX8",
      "skills": [
        "drums",
        "guitar",
        "synths"
      ]
    },
    {
      "address": {
        "city": "Sheffield",
        "country": "United Kingdom",
        "pk": "01FX8RMR7NW221STN6NVRDPEDT",
        "postal_code": "S12 2MX",
        "state": "South Yorkshire",
        "street_name": "Main Street",
        "street_number": 9,
        "unit": null
      },
      "age": 35,
      "first_name": "Robert",
      "last_name": "McDonald",
      "personal_statement": "My name is Robert, I love meeting new people and enjoy music, coding and walking my dog.",
      "pk": "01FX8RMR7NRS45PBT3XP9KNAZH",
      "skills": [
        "guitar",
        "piano",
        "trombone"
      ]
    }
  ]
}
Find People using Full Text Search on their Personal Statements
Each person has a personal_statement field, which is a free text string containing a couple of sentences about them. We chose to index this in a way that makes it full text searchable, so let's see how to use this now. The code for this is in the function find_matching_statements in app.py.
To search for people who have the value of the parameter search_term in their personal_statement field, we use the % operator:
Person.find(Person.personal_statement % search_term).all()
Let's find everyone who talks about "play" in their personal statement.
curl --location --request GET 'http://127.0.0.1:5000/people/bystatement/play'
The server responds with a results array of matching people:
{
  "results": [
    {
      "address": {
        "city": "San Diego",
        "country": "United States",
        "pk": "01FX8RMR7YCDAVSWBMWCH2B07G",
        "postal_code": "92102",
        "state": "California",
        "street_name": "C Street",
        "street_number": 1299,
        "unit": null
      },
      "age": 43,
      "first_name": "Fernando",
      "last_name": "Ortega",
      "personal_statement": "I'm in a really cool band that plays a lot of cover songs.  I'm the drummer!",
      "pk": "01FX8RMR7YB283BPZ88HAG066P",
      "skills": [
        "clarinet",
        "oboe",
        "drums"
      ]
    }, {
      "address": {
        "city": "Nottingham",
        "country": "United Kingdom",
        "pk": "01FX8RMR82DDJ90CW8D1GM68YZ",
        "postal_code": "NG1 1AA",
        "state": "Nottinghamshire",
        "street_name": "Broadway",
        "street_number": 12,
        "unit": "A-1"
      },
      "age": 37,
      "first_name": "Noor",
      "last_name": "Vasan",
      "personal_statement": "I sing and play the guitar, I enjoy touring and meeting new people on the road.",
      "pk": "01FX8RMR82D091TC37B45RCWY3",
      "skills": [
        "vocals",
        "guitar"
      ]
    },
    {
      "address": {
        "city": "Birmingham",
        "country": "United Kingdom",
        "pk": "01FX8SSSDNRDSRB3HMVH00NQTT",
        "postal_code": "B91 6HG",
        "state": "West Midlands",
        "street_name": "The Rushes",
        "street_number": 56,
        "unit": null
      },
      "age": 36,
      "first_name": "Joanne",
      "last_name": "Peel",
      "personal_statement": "Music is my life, I love gigging and playing with my band.",
      "pk": "01FX8SSSDN7PT9T3N0JZZA758G",
      "skills": [
        "synths",
        "vocals",
        "guitar"
      ]
    }
  ]
}
Note that we get results including matches for "play", "plays" and "playing".
Update a Person's Age
As well as retrieving information from Redis, we'll also want to update a Person's data from time to time. Let's see how to do that with Redis OM for Python.
The function update_age in app.py accepts two parameters: id and new_age. Using these, we first retrieve the person's data from Redis and create a new object with it:
  try:
      person = Person.get(id)

  except NotFoundError:
      return "Bad request", 400
Assuming we find the person, let's update their age and save the data back to Redis:
  person.age = new_age
  person.save()
Let's change Kareem Khan's age from 27 to 28:
curl --location --request POST 'http://127.0.0.1:5000/person/01FX8RMR7T60ANQTS4P9NKPKX8/age/28'
The server responds with ok.
Delete a Person
If we know a person's ID, we can delete them from Redis without first having to load their data into a Person object. In the function delete_person in app.py, we call the delete class method on the Person class to do this:
Person.delete(id)
Let's delete Dan Harris, the person with ID 01FX8RMR8545RWW4DYCE5MSZA1:
curl --location --request POST 'http://127.0.0.1:5000/person/01FX8RMR8545RWW4DYCE5MSZA1/delete'
The server responds with an ok response regardless of whether the ID provided existed in Redis.
Setting an Expiry Time for a Person
This is an example of how to run arbitrary Redis commands against instances of a model saved in Redis. Let's see how we can set the time to live (TTL) on a person, so that Redis will expire the JSON document after a configurable number of seconds have passed.
The function expire_by_id in app.py handles this as follows. It takes two parameters: id - the ID of a person to expire, and seconds - the number of seconds in the future to expire the person after. This requires us to run the Redis EXPIRE command against the person's key. To do this, we need to access the Redis connection from the Person model like so:
  person_to_expire = Person.get(id)
  Person.db().expire(person_to_expire.key(), seconds)
Let's set the person with ID 01FX8RMR82D091TC37B45RCWY3 to expire in 600 seconds:
curl --location --request POST 'http://localhost:5000/person/01FX8RMR82D091TC37B45RCWY3/expire/600'
Using redis-cli, you can check that the person now has a TTL set with the Redis expire command:
127.0.0.1:6379> ttl :person.Person:01FX8RMR82D091TC37B45RCWY3
(integer) 584
This shows that Redis will expire the key 584 seconds from now.
You can use the .db() function on your model class to get at the underlying redis-py connection whenever you want to run lower level Redis commands. For more details, see the redis-py documentation.
Shutting Down Redis (Docker)
If you're using Docker, and want to shut down the Redis container when you are finished with the application, use docker-compose down:
$ docker-compose down
Stopping redis_om_python_flask_starter ... done
Removing redis_om_python_flask_starter ... done
Removing network redis-om-python-flask-skeleton-app_default