Tutorial
Rate Limiting in Java Spring with Redis: Fixed Window Implementation
February 25, 202628 minute read

TL;DR:Build a fixed window rate limiter in a Java Spring Boot app using Redis. Start with a basic reactive implementation usingReactiveRedisTemplate, then improve atomicity with Lua scripts and RedisGears. The limiter tracks requests per IP per minute and returns HTTP 429 when the quota is exceeded.
INFOLearn how to build and compare all the rate limiting algorithms in Redis, or see rate limiting in .NET with Redis for a C# implementation.
#What you'll learn
- How fixed window rate limiting works and why Redis is ideal for it
- How to build a rate limiter as a Spring WebFlux filter with
ReactiveRedisTemplate - How to use Redis Lua scripts for atomic rate limiting logic
- How to use RedisGears to run server-side rate limiting functions
- How to test a rate limiter with
curl
#Prerequisites
- Java 11+ and Maven installed
- A running Redis instance (local or Docker:
docker run -p 6379:6379 redis) - Basic familiarity with Spring Boot and reactive programming concepts
- For the RedisGears section: a Redis instance with RedisGears enabled (
docker run -p 6379:6379 redislabs/redismod)
In this tutorial we'll explore several approaches to implement rate limiting in Spring apps using Redis. We'll start with the most basic of Redis recipes and we'll slowly increase the complexity of our implementations.

#What is Rate Limiting?
Rate Limiting entails techniques to regulate the number of requests a particular client can make against a networked service. It caps the total number and/or the frequency of requests. Why do we need Rate Limiting?
There are many reasons why you would want to add a rate limiter to your APIs, whether it is to prevent intentional or accidental API abuse, a rate limiter can stop the invaders at the gate. Let's think of some scenarios where a rate limiter could save your bacon:
- If you ever worked at an API-based startup, you know that to get anywhere you need a “free” tier. A free tier will get potential customers to try your service and spread the word. But without limiting the free tier users you could risk losing the few paid customers your startup has.
- Programmatic integrations with your API could have bugs. Sometimes resource starvation is not caused by a malicious attack. These FFDoS (Friendly-Fire Denial of Service) attacks happen more often than you can imagine.
- Finally, there are malicious players recruiting bots on a daily basis to make API providers' lives miserable. Being able to detect and curtail those attacks before they impact your users could mean the life of our business.
Rate limiting is typically implemented on the server-side but if you have control of the clients you can also preempt certain types of access at that point. It relies on three particular pieces of information:
- Who's making the request: Identifying the source of the attack or abuse is the most important part of the equation. If the offending requests cannot be grouped and associated with a single entity you'll be fighting in the dark.
- What's the cost of the request: Not all requests are created equal, for example, a request that's bound to a single account's data, likely can only cause localized havoc, while a request that spans multiple accounts, and/or broad spans of time (like multiple years) are much more expensive
- What is their allotted quota: How many total requests and/or what's the rate of requests permitted for the user. For example, in the case of the "free tier" you might have a smaller allotment/bucket of requests they can make, or you might reduce them during certain peek times. Why Redis for Rate Limiting?
Redis is especially positioned as a platform to implement rate limiting for several reasons:
- Speed: The checks and calculations required by a rate limiting implementation will add the total request-response times of your API, you want those operations to happen as fast as possible.
- Centralization and distribution: Redis can seamlessly scale your single server/instance setup to hundreds of nodes without sacrificing performance or reliability.
- The Right Abstractions: Redis provides optimized data structures to support several of the most common rate limiter implementations and with i's built-in TTL (time-to-live controls) it allows for efficient management of memory. Counting things is a built-in feature in Redis and one of the many areas where Redis shines above the competition.
#Fixed window rate limiting with Redis and Java
The simplest approach to build a rate limiter is the "fixed window" implementation in which we cap the maximum number of requests in a fixed window of time. For example, if the window size is 1 hour, we can "fix" it at the top of the hour, like 12:00-12:59, 1:00-1:59, and so forth.
The procedure to implement a fixed window rate limiter is fairly simple, for each request we:
- Identify the requester: This might be an API key, a token, a user's name or id, or even an IP address.
- Find the current window: Use the current time to find the window. Assume that we are working with 1 hour windows and it's 3:15 PM, we could use a 24 hour clock and label this window "15".
- Find the request count: Find the fixed window request count for the requester. For example, say we've identified the requester to be user with id "u123", and it's 3:15 PM. We will look for a count under the key "u123:15" where the value store under that key is the count of requests for user u123 from 3:00 PM to 3:59:59 PM.
- Increment the request count: Increment the request count for the window+user key.
- Rate Limit if applicable: If the count exceeds the user's quota, then deny the request, otherwise, allow the requests to proceed.
The fixed window recipe ignores the cost of the request (all requests are created equal) and in this particular implementation it uses a single quota for all all users. This simple implementation minimizes the CPU and I/O utilization but that comes with some limitations. It is possible to experience spikes near the edges of the window, since APIs users might program their requests in a "use or lose it" approach.
One way to minimize the spikiness in this scheme is to have multiple time windows of different granularity. For example, you can rate limit at the hour and minute levels, say, allowing a maximum of 2,000 request per hour, and a maximum of 33 requests per minute.
This basic recipe using Redis Strings, a minute-size window and a quota of 20 requests is outlined on the Redis Blog. I'll summarize it here before we jump into out Spring Reactive implementation:
GET [user-api-key]:[current minute number]such asGET "u123:45"- If the result from line 1 is less than 20 (or the key is not found) go to step 4 otherwise continue to step 3
- Reject the request.
- In an atomic way (using
MULTIandEXEC) increment the key and set the expiry to 59 seconds into the future.
5. Otherwise, fulfill the request.
Ok, now that we know the basic recipe, let's implement it in Spring.
#Reactive Rate Limiting with Spring WebFlux and Redis
#A basic Spring Web Flux App
Let's start by creating a simple Spring Boot application using the Spring Initializr:
- In your browser, launch the Spring Initilizr
- Fill out the form using the following settings:
- Project: Maven Project
- Language: Java
- Spring Boot: 2.5.4
- Project Metadata:
- Group:
com.redis.rl - Artifact:
fixed-window-rate-limiter - Name:
fixed-window-rate-limiter - Description: Redis Fixed Window Rate Limiter
- Package Name:
com.redis.rl - Packaging: JAR
- Java: 11
- Group:
- Dependencies:
- Spring Reactive Web
- String Data Reactive
- Spring Boot DevTools
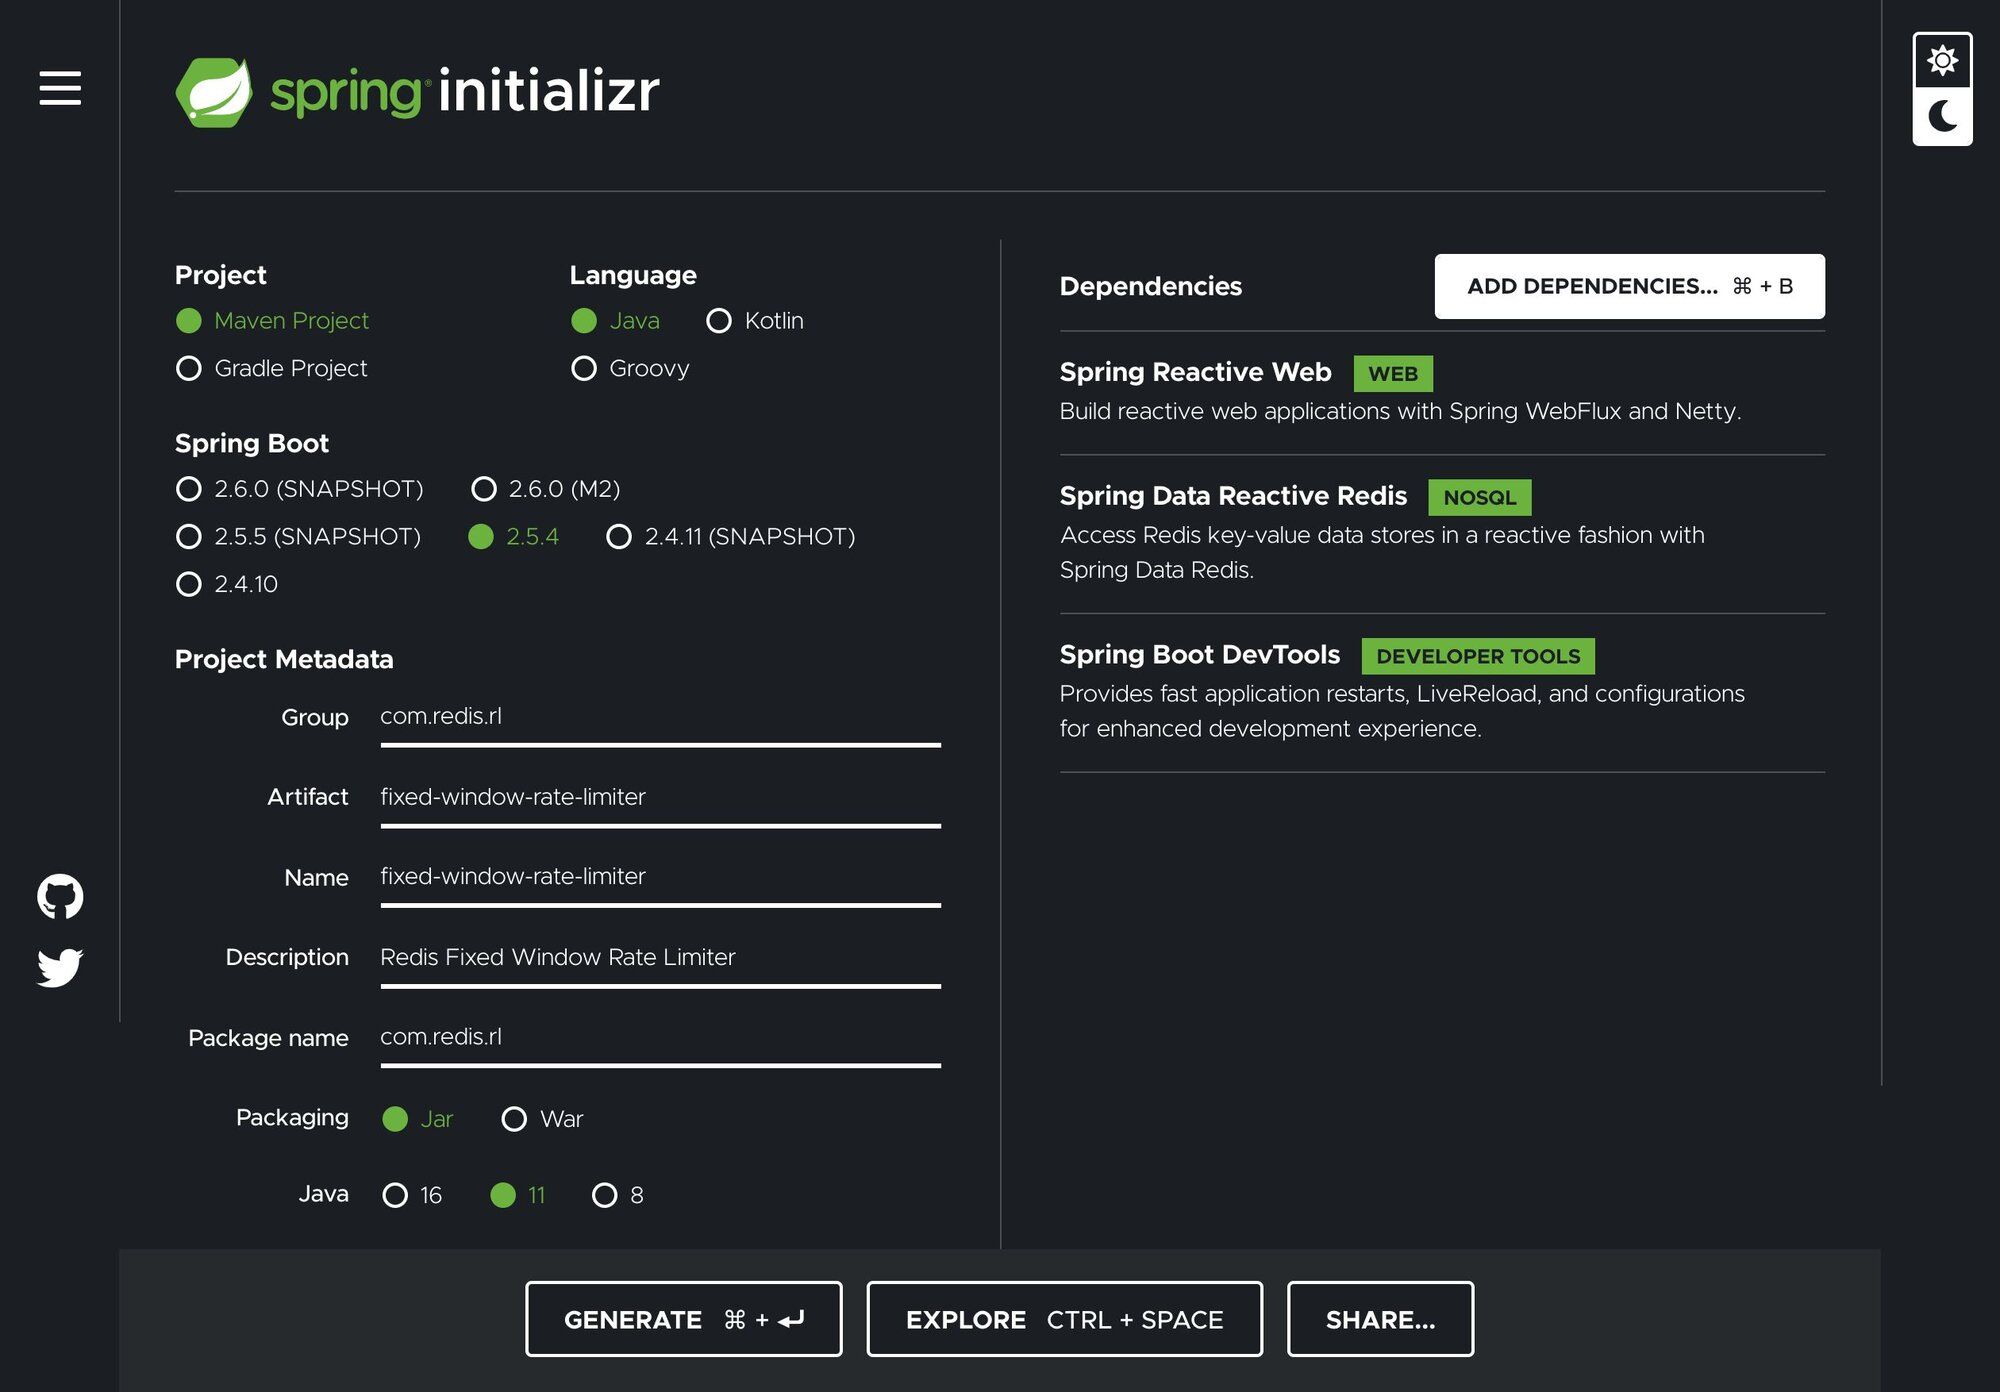
Click on GENERATE and Initializr will generate the zip file for the project and prompt you to download it to your local machine. Unzip the downloaded file (named
fixed-window-rate-limiter.zip) in a suitable directory. For example on a Mac:Now, open the file
FixedWindowRateLimiterApplication.java located under fixed-window-rate-limiter/src/main/java/com/redis/rl/:And let's add the
@Bean annotated method routes() to create the simplest of endpoints; a "ping" endpoint, which replies with a text reponse "PONG":You'll also need the following imports:
Let's use curl to test the newly created endpoint:
#Spring WebFlux Filters
We'll implement our rate limiter as a Spring WebFlux Filter. A filter allows us to intercept a request and modify the response. For our needs we'll use a
HandlerFilterFunction; which we can filter a RouterFunction such as our routes() endpoint.We'll keep everything in one file to make the example easier to manage for our simple example. At the end of the file
FixedWindowRateLimiterApplication.java let's add a class called RateLimiterHandlerFilterFunction as shown:The class implements the
filter method, which currently returns null. Let's modify it to simply pass the request throught.And also, let's apply it to our
routes method:Testing the endpoint with curl should still works as previously.
#Reactive Redis Template
Spring Data Redis provides a Reactive API which plays well with all the other reactive parts of the Spring framework. In order to work with Redis we'll use the
ReactiveRedisTemplate, the aptly named reactiveRedisTemplate method configures a reactive template given a ReactiveRedisConnectionFactory (which will be injected by the framework).The template is configured to use the work with String keys and Long values as shown by the usage of the
StringRedisSerializer and the GenericToStringSerializer.The template offers a high-level abstraction for Redis interactions and we will later pass it to our rate limiter filter to use Redis as our rate limiting back-end:
Below are the required imports added:
Next, let's modify the
RateLimiterHandlerFilterFunction class to include the template and let's add a constructor so that we can properly initialize it:We also need to modify the
routes method to include the redisTemplate in the call to the RateLimiterHandlerFilterFunction constructor:#Identifying the Requester
As mentioned in the introduction to rate limiting, identifying the origin of the request is critical to the efficacy of your rate limiting implementation. In this simple implementation we will focus on the mechanics of rate limiting and do the simplest possible thing we can do to identify the requester.
The
filter method in RateLimiterHandlerFilterFunction takes an instance of a ServerRequest, from which we can obtain the IP address of the requester. Add private method requestAddress to the filter function class:With the
requestAddress in place we can build the key we'll use to check for the requesters' quota. To compute the key we will concatenate the requester's address and the current minute of the hour. We'll prefix the keys with rl_ for "rate limiting":Invoking the endpoint should show the key on the console like:
#Increment and Expire Key
Now we need to implement the logic to execute the
INCR and an EXPIRE logic outlined in Fixed Window implementation using Spring Data Redis Reactive:The "Basic Rate Limiting" recipe calls for the use of a Redis Transaction in which the commands are sent to the server, accumulated in serial way and executed sequentially without any possible interruption by a request from another client.
Basically, we want the
INCR and EXPIRE calls to update the requests-per-unit-of-time counter to happen atomically or not at all. Given that a Reactive API and Redis Transactions (MULTI/EXEC) are not compatible paradigms, which boils down to "you cannot listen to a command that is going to be executed in the future" in a chain of reactive commands A "best possible" approach to achieve this behavior with a reactive API is by using the ReactiveRedisTemplate execute method which takes a ReactiveRedisCallback guaranteing that at least the commands will run on the same Redis connection, but, this is by no means a real "transaction":Let's break down what this monster of a reactive method:
- The method returns an Asynchronous (0-1) Result, a
Mono(a specializedPublisher<T>that emits at most one item in this case aServerResponse) - The method takes the calculated rate limiting
key, the original serverrequestandnexthandler function - In the
doInRedismethod we turn the key into aByteBufferin order to use withReactiveRedisConnectioncommands - The zip methods waits for all the sources to emit one element and combines these elements into an output value ,which we are ignoring since all we are after is sequential execution on the
INCRandEXPIREcommands. - The method then returns a
Mono.empty() - Finally handle the request.
#Completing the filter implementation
To complete the filter implementation, we'll add a constant for the cap on the number of request per minute, that can be optionally loaded from the application's properties:
Let's break down he final
filter method implementation:- We use the Redis template
opsForValue()to retrieve the value stored under the calculated key. - If the value..
- Is greater than or equal to the max quota we deny the request with a 409 response.
- Otherwise, call
incrementAndExpireKey
-
- Is empty/key not found (first request on this window) we call
incrementAndExpireKey
- Is empty/key not found (first request on this window) we call
#Testing with curl
A simple way to test an API rate limiter is using curl in a loop, since we are testing a set number of requests per unit of time the curl loop below will suffice:
We loop 22 times, the example code is set to 20 so 22 will allow us to see two 429 responses. The curl flags used are as follows; first is
-s that silences curl (makes it hide progress bar and errors), -w is the write out options in which we can pass a string with interpolated variables. Then we sleep 1/2 second between cycles.If we run Redis in monitor mode, we should see the call to
GET for a rejected request, and the same plus calls to INCR and EXPIRE for an allowed request:You can find this example on the main branch at https://github.com/redis-developer/fixed-window-rate-limiter
#Atomic Rate Limiting with RedisGears and Java
LETTUCEThis portion of the tutorial uses Lettuce, which is an unsupported Redis library. For production applications, we recommend using Jedis
#Improving atomicity and performance with RedisGears
#What is RedisGears?
RedisGears is a dynamic server-side data processing engine, where the "server" part is Redis itself. RedisGears is distributed as a Redis module. You can start a Redis instance preconfigured with Gears using the official Docker image:
Or, as I do most of the time, using the "redismod" image which include Gears and all the other Redis, Inc. supported modules:
RedisGears was built with the purpose of providing a data processing engine inside of Redis, with more formal semantics than the simpler Lua server-side scripting. Think of it as a more flexible map-reduce engine for Redis. It supports supports transaction, batch, and event-driven processing of Redis data. Gears allow you to localize computation and data provides a built-in coordinator to facilitate processing distributed data in a clustered environment.
In RedisGears, the main unit of processing is the RedisGears function, which can be (currently) written in Python (more languages are being worked on). These functions run on their own thread, separate from Redis' main thread and can be executed in response to keyspace events or imperatively as a result of external commands. The functions are "registered" (deployed) to the Gears engine, and have an associated name and a registration Id.
During registration we pick a specific reader for our function which defines how the function gets its initial data:
KeysReader: Redis keys and values.KeysOnlyReader: Redis keys.StreamReader: Redis Stream messages.PythonReader: Arbitrary Python generator.ShardsIDReader: Shard ID.CommandReader: Command arguments from application client.
#A Rate-Limiting RedisGears Function
Depending on the reader type, Gear Functions can either be run immediately, on demand, as batch jobs or in an event-driven manner by registering it to trigger automatically on various types of events.
The Python function
rate_limit takes 3 parameters:key: The Redis key backing the counter for a given user.max_request: The request quota for the user.expiry: The number of seconds in the future to set the counter TTL.
Place the script under
src/main/resources/scripts. Now, Let's break it down:#The rate_limit function
Similarly to what we did in the previous implementation, we:
- Retrieve the current number of requests for the passed
keybyexecute-ing theGETcommand. - Cast the result to an
intand if not found, default to-1 - Cast
max_requestsandexpirytoint - If the quota hasn't been exceeded, perform the
INCR/EXPIREcommands in a transactions (with atomic():) and returnFalse(no rate limiting - request is allowed) - Otherwise, return
True(deny the request)
#Function Registration
- At the bottom of the script, in the
# Function registrationsection, we instantiate theGearsBuilder(GB) using theCommandReaderreader. TheGearsBuilder"builds" the context of the function, in parameters, transformations, triggers, etc. - We use the
mapmethod to performs a one-to-one mapping of records to the params of therate_limitfunction via a mapper function callback. - We can now invoke the
registeraction to register the function as an event handler. The event in our case is the trigger'RateLimiter'.
#RedisGears in SpringBoot
In order to use our RedisGear function from our SpringBoot application we need to do a few things:
- Deploy the function to the Redis server
- Execute the function to get a yay/nay answer on each request
#Lettuce Mod
LettuceMod is a Java client for Redis Modules based on Lettuce created by Julien Ruaux . It supports the following modules in standalone or cluster configurations:
- Triggers and Functions
- JSON
- Search
- Time Series
To use LettuceMod we'll add the dependency to the Maven POM as shown:
#Accessing Gears Commands in SpringBoot
To access any of the LettuceMod supported modules we will inject a
StatefulRedisModulesConnection in our FixedWindowRateLimiterApplication class as follows:Add the matching import statement:
#Registering the Gears function
We'll start by writing a function to determine whether the function with the trigger
RateLimiter has been registered. It takes a List of Registrations and digs deep to extract the value of the trigger argument using the Java Streams API:In the
@PostConstruct annotated method loadGearsScript method:- We retrieve an instance of the
RedisGearsCommandsfrom the previously injectedStatefulRedisModulesConnection - We get the currently registered Gears functions via the
dumpregistrationsmethod - We pass the list of registrations to our
getGearsRegistrationIdForTrigger - If we don't find the registration we proceed to register the function:
- Load the function from the classpath into a
Stringnamedpy - Use the
pyexecutemethod passing thepyscript payload
- Load the function from the classpath into a
#Modifying the Filter to use the Gears function
Next, we'll modify the filter to include the
StatefulRedisModulesConnection as well as the quota; the value that we need to pass to the function:Now we can modify the
filter method to use the function. Gears functions are invoked by triggering the correct event RateLimiter and passing the parameters required by the function; the key, the quota and the TTL seconds in the future.As we've have done previously, if the function returns
false we let the request through, otherwise we return an HTTP 429:#Testing with curl
Once again, we use curl loop to test the limiter:
You should see the 21st request being rejected:
If we run Redis in monitor mode, we should see the Lua calls to
RG.TRIGGER and under that you should see the calls to GET, INCR and EXPIRE for allowed requests:And for rate limited request you should see only the call to
GET:The complete code for this implementation is under the branch
with_gears.#Atomic Rate Limiting with Redis Lua Scripts and Java
#Improving atomicity and performance with Lua
One way to improve our implementation is by moving the responsibility of performing the
INCR and EXPIRE operations from the incrAndExpireKey method, to a Lua script.#Rate Limiting Lua Script
Redis has the ability to execute Lua scripts on the server side. Lua scripts are executed atomically, that is, no other script or command will run while a script is running, which gives us the same transactional semantics as
MULTI / EXEC.Below is a simple Lua script to encapsulate the rate limiting logic. The script returns
true if the request is to be rejected or false otherwise:Place the script under
src/main/resources/scripts. Now, Let's break it down:- Lua scripts in Redis work with keys (
KEYS[]) and arguments (ARGV[]) in our case we are expecting onekeyinKEYS[1](Lua arrays are 1-based) - We retrieve the quota for the key in
requestsby making acallto theGETcommand, returning-1if the key does not exist, and converting the value to a number. - The quota is passed as the first argument (
ARGV[1]) and stored inmax_requests, the expiry in seconds is the second argument and stored inexpiry - The
ifstatement checks whether the request is the first request in the time window or if the number of requests have not exceeded the quota, in which case we run theINCR-EXPIREcommands and retunrfalse(meaning we are not rate limiting and allowing the request through). - If they've exceeded the quote, then we rate limit by returning
true
If you want to learn more about Lua, see Programming in Lua.
#Redis Lua Scripts in Spring Data Redis
Spring Data Redis supports Lua scripting via the class
RedisScript. It handles serialization and intelligently uses the Redis script cache. The cache is populated using the SCRIPT LOAD command. The default ScriptExecutor uses EVALSHA using the SHA1 of the script and falling back to EVAL if the script has not yet been loaded into the cache.Let's add the bean annotated method
script() to load our script from the classpath:#Modifying the Filter to use Lua
Next, we'll modify the filter to include the script as well as the quota; the value that we need to pass to the script:
Now we can modify the
filter method to use the script. Scripts are run using the execute methods of RedisTemplate or ReactiveRedisTemplate. The execute methods use a configurable ScriptExecutor/ReactiveScriptExecutor that inherits the key and value serialization setting of the template to run the scripts:Let's break down the method additions:
- The
filtermethod uses the templateexecutemethod passing the script, keys and arguments. - We expect a
singleresult (trueorfalse). Thesinglemethod takes a default value to be returned in case we get an empty result. - Finally, we use the
flatMapmethod to grab the value:- If it is
truewe reject the request with an HTTP 429. - If it is
falsewe handle the request
- If it is
#Applying the filter
Let's add a configurable
@Value annotated Long value to the FixedWindowRateLimiterApplication to hold the request quota.In our
application.properties we'll set it to a max of 20 request per minute:To invoke the filter we use the newly modified constructor, passing the template, the script, and the
maxRequestPerMinute value:#Testing with curl
Using our trusty curl loop:
You should see the 21st request being rejected:
If we run Redis in monitor mode, we should see the Lua calls to
EVALSHA, followed by the call to GET for a rejected request, and the same plus calls to INCR and EXPIRE for an allowed request:The complete code for this implementation is under the branch
with_lua.#Next steps
Now that you've implemented fixed window rate limiting, here are some ways to go further:
- Explore other algorithms: Learn how sliding window, token bucket, and leaky bucket rate limiters compare to fixed window and when to use each one.
- Try a different language: See how to implement rate limiting in .NET with Redis using C#.
- Add multiple windows: Combine minute-level and hour-level rate limits to smooth out traffic spikes at window boundaries.
- Use API keys instead of IPs: Replace IP-based identification with API key or token-based identification for more granular control.
- Monitor your rate limiter: Use Redis's
MONITORcommand or RedisInsight to observe rate limiting behavior in real time.