Tutorial
Redis High Availability: Replication & Sentinel
February 26, 202610 minute read
TL;DR:Set up Redis high availability by configuring primary-replica replication (using thereplicaofdirective) and deploying Redis Sentinel for automatic failover. With at least one replica and three Sentinel instances, Redis detects primary failures and promotes a replica automatically, keeping your application online with minimal disruption.
#Course Structure
This tutorial is part of the Running Redis at Scale course. You can jump to any section:
- Introduction to Running Redis at Scale
- Talking to Redis - CLI, clients, and tuning
- Persistence and Durability - RDB and AOF
- High Availability ← You are here
- Scalability - Redis Cluster
- Observability - Metrics and troubleshooting
- Course Conclusion
#What you'll learn
- How Redis replication works and how to configure a primary-replica setup
- How to use the
WAITcommand for synchronous replication guarantees - What Redis Sentinel is and how it provides automatic failover
- How to deploy and configure a Sentinel cluster
- How to test failover and verify high availability
High availability is a computing concept describing systems that guarantee a high level of uptime, designed to be fault-tolerant, highly dependable, operating continuously without intervention and without a single point of failure.
What does this mean for Redis specifically? Well, it means that if your primary Redis server fails, a backup will kick in, and you, as a user, will see little to no disruption in the service. There are two components needed for this to be possible: replication and automatic failover.
Replication is the continuous copying of data from a primary database to a backup, or a replica database. The two databases are usually located on different physical servers, so that we can have a functional copy of our data in case we lose the server where our primary database sits. For details on how Redis persists data to disk before replication, see Persistence and Durability.
But having a backup of our data is not enough for high availability. We also have to have a mechanism that will automatically kick in and redirect all requests towards the replica in the event that the primary fails. This mechanism is called automatic failover.
In this tutorial, we'll see how Redis handles replication and which automatic failover solutions it offers. Let's dig in.
#How does Redis replication work?
Replication in Redis follows a simple primary-replica model where the replication happens in one direction - from the primary to one or multiple replicas. Data is only written to the primary instance and replicas are kept in sync so that they're exact copies of the primaries.
#How Replication Works
To create a replica, you instantiate a Redis server instance with the configuration directive replicaof set to the address and port of the primary instance. Once the replica instance is up and running, the replica will try to sync with the primary. To transfer all of its data as efficiently as possible, the primary instance will produce a compacted version of the data in a snapshot (.rdb) file and send it to the replica.
The replica will then read the snapshot file and load all of its data into memory, which will bring it to the same state the primary instance had at the moment of creating the .rdb file. When the loading stage is done, the primary instance will send the backlog of any write commands run since the snapshot was made. Finally, the primary instance will send the replica a live stream of all subsequent commands.
#Asynchronous Replication
By default, replication is asynchronous. This means that if you send a write command to Redis you will receive your acknowledged response first, and only then will the command be replicated to the replica.
If the primary goes down after acknowledging a write but before the write can be replicated, then you might have data loss. To avoid this, the client can use the WAIT command. This command blocks the current client until all of the previous write commands are successfully transferred and acknowledged by at least some specified number of replicas.
#The WAIT Command
For example, if we send the command WAIT 2 0, the client will block (will not return a response to the client) until all of the previous write commands issued on that connection have been written to at least 2 replicas. The second argument - 0 - will instruct the server to block indefinitely, but we could set it to a number (in milliseconds) so that it times out after a while and returns the number of replicas that successfully acknowledged the commands.
#Read Replicas
Replicas are read-only. This means that you can configure your clients to read from them, but you cannot write data to them. If you need additional read throughput, you can configure your Redis client to read from replicas as well as from your primary node. However, it's often easier just to scale out your cluster. This lets you scale reads and writes without writing any complex client logic.
#Active-Active
Also, you should know about Active-Active, an advanced feature of Redis Software and Redis Cloud. Active-Active replicates entire databases across geographically-distributed clusters. With Active-Active, you can write locally to any replica databases, and those writes will be reflected globally. Something to keep in mind when you're really scaling out! For more on horizontal scaling, see Scalability.
#Exercise 1: Setting Up Replication
#Step 1: Configure the Primary Instance
First let's create and configure the primary instance. We'll start with a few configuration changes in its primary.conf configuration file.
Now open the
primary.conf file with your favorite text editor and set the following configuration directives:Finally, let's start the primary instance:
#Step 2: Configure the Replica Instance
Next, let's prepare the configuration file for the replica:
And let's start the replica:
#Step 3: Test Replication
Open two terminal tabs and use them to start connections to the primary and replica instances:
Authenticate on both tabs by running the command
AUTH followed by your password:On the second (replica) tab run the
MONITOR command which will allow you to see every command executed against that instance.Go back to the first (primary) tab and execute any write command, for example
In the second tab you should see that the command was already sent to the replica:
#Step 4: Keep Instances Running
Keep the instances running, or at least their configuration files around. We'll need them for the Sentinel exercise below.
#What is Redis Sentinel?
We've learned that we can't have high availability without replication and automatic failover. We covered replication above, and now we'll explain Sentinel - a tool that provides the automatic failover.
Redis Sentinel is a distributed system consisting of multiple Redis instances started in sentinel mode. We call these instances Sentinels.
The group of Sentinels monitors a primary Redis instance and its replicas. If the sentinels detect that the primary instance has failed, the sentinel processes will look for the replica that has the latest data and will promote that replica to be the new primary. This way, the clients talking to the database will be able to reconnect to the new primary and continue functioning as usual, with minimal disruption to the users.
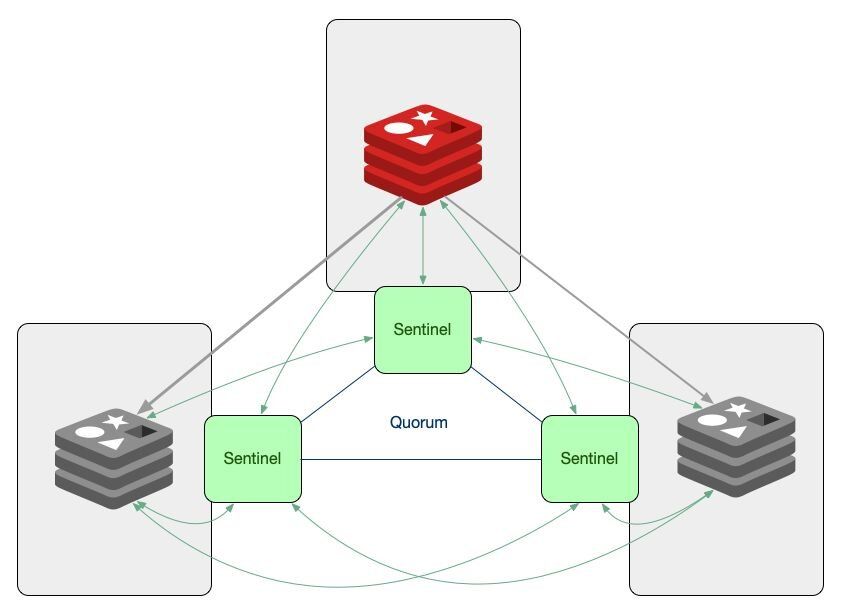
#How does Sentinel decide a primary is down?
In order for the Sentinels to be able to decide that a primary instance is down we need to have enough Sentinels agree that the server is unreachable from their point of view.
Having a number of Sentinels agreeing that they need to take an action is called reaching a quorum. If the Sentinels can't reach quorum, they cannot decide that the primary has failed. The exact number of Sentinels needed for quorum is configurable.
#What happens during a failover?
Once the Sentinels have decided that a primary instance is down, they need to elect and authorize a leader (a Sentinel instance) that will do the failover. A leader can only be chosen if the majority of the Sentinels agree on it.
In the final step, the leader will reconfigure the chosen replica to become a primary by sending the command
REPLICAOF NO ONE and it will reconfigure the other replicas to follow the newly promoted primary.#Sentinel and Client Libraries
If you have a system that uses Sentinel for high availability, then you need to have a client that supports Sentinel. Not all libraries have this feature, but most of the popular ones do, so make sure you add it to your list of requirements when choosing your library.
For more information on Redis Sentinel, check out the documentation on redis.io.
#Exercise 2: Setting Up Sentinel
#Step 1: Prerequisites
If you still have the primary and replica instances we set up in Exercise 1 - great! We'll reuse them to create our Sentinel setup. If not - refer back to Exercise 1 above and go through the steps again.
When done, you will have a primary Redis instance with one replica.
#Step 2: Create Sentinel Configuration
To initialise a Redis Sentinel, you need to provide a configuration file, so let's go ahead and create one:
Open the file and paste in the following settings:
Breakdown of terms:
port- The port on which the Sentinel should runsentinel monitor- monitor the Primary on a specific IP address and port. Having the address of the Primary the Sentinels will be able to discover all the replicas on their own. The last argument on this line is the number of Sentinels needed for quorum. In our example - the number is 2.sentinel down-after-milliseconds- how many milliseconds should an instance be unreachable so that it's considered downsentinel failover-timeout- if a Sentinel voted another Sentinel for the failover of a given master, it will wait this many milliseconds to try to failover the same master again.sentinel auth-pass- In order for Sentinels to connect to Redis server instances when they are configured with requirepass, the Sentinel configuration must include the sentinel auth-pass directive.
#Step 3: Create Additional Sentinel Configurations
Make two more copies of this file -
sentinel2.conf and sentinel3.conf and edit them so that the PORT configuration is set to 5001 and 5002, respectively.#Step 4: Start the Sentinels
Let's initialise the three Sentinels in three different terminal tabs:
#Step 5: Query Sentinel
If you connected to one of the Sentinels now you would be able to run many new commands that would give an error if run on a Redis instance. For example:
#Step 6: Test Failover
If we killed the primary Redis instance now by pressing Ctrl+C or by running the
redis-cli -p 6379 DEBUG sleep 30 command, we'll be able to observe in the Sentinels' logs that the failover process will start in about 5 seconds. If you run the command that returns the IP address of the Primary again you will see that the replica has been promoted to a Primary:#Next steps
Now that you understand Redis high availability with replication and Sentinel, continue building your knowledge:
- Scalability - Learn how Redis Cluster distributes data across multiple nodes for horizontal scaling
- Persistence and Durability - Understand RDB snapshots and AOF logs to protect your data on disk
- Observability - Monitor Redis health with metrics, alerts, and troubleshooting techniques
- Redis Sentinel documentation - Deep dive into Sentinel configuration and operational best practices