{"categories":["docs","operate","rc"],"description":"Prepare your source database, network setup, and database credentials for Data integration.","duplicateOf":"head:data-ai-metadata","location":"body","title":"Prepare source database","tableOfContents":{"sections":[]},"codeExamples":[]}
Prepare your source database, network setup, and database credentials for Data integration.
Redis Cloud
Prepare source database
Prepare every source database before adding it to a pipeline. Each source needs its own change data capture (CDC) configuration, connectivity, and credentials. See Prerequisites for a list of supported source databases and database versions.
You can use a hosted Supabase PostgreSQL database as
the source for an RDI pipeline on Redis Cloud. The integration was validated with
RDI 1.19.0 and hosted Supabase PostgreSQL 17.6.
First, follow the steps in Prepare Supabase for RDI
to create the database role, grant table access, account for Row Level
Security, and create a publication. Then complete the Redis Cloud-specific steps below.
Warning:
Supabase AWS PrivateLink connectivity isn't supported. Supabase shares a
Resource Configuration through AWS Resource Access Manager and requires a
Resource-type VPC endpoint. This differs from the AWS PrivateLink
endpoint-service connectivity supported by RDI on Redis Cloud, so you can skip
Set up AWS Private Link connectivity and use the Supabase
public direct database endpoint instead.
Configure public connectivity
Supabase logical replication requires the direct database endpoint. Don't use
a Supavisor transaction or session pooler endpoint.
The direct endpoint uses IPv6 by default, but RDI on Redis Cloud requires an
IPv4 endpoint, so you must enable the Supabase
dedicated IPv4 add-on
(you need a paid Supabase plan to do this).
When you create the RDI pipeline:
Select PostgreSQL as the source type.
Select Public endpoint.
Copy every Redis Cloud outbound IP address displayed by the setup flow.
In Supabase, open Database settings > Network restrictions.
Add every Redis Cloud outbound address as a /32 CIDR.
If you recreate the RDI workspace, its outbound addresses can change. Add the
new addresses to Supabase before starting the replacement pipeline, and remove
the old addresses after the new connection succeeds.
A credentials secret containing the dedicated Supabase username and
password.
A plaintext CA certificate secret containing the certificate downloaded
from Supabase Database settings > SSL configuration.
Encrypt both secrets with the customer-managed AWS KMS key configured for the
RDI workspace. Use the AWS region that contains your Redis Cloud subscription.
In the pipeline's Secrets section:
Enter the credentials secret ARN.
Select TLS under Transit security.
Enter the CA certificate secret ARN.
Select Validate.
RDI on Redis Cloud uses TLS and validates the Supabase CA certificate.
Configure the source
In the RDI pipeline setup flow, open the source configuration and enter the
following values:
Field
Value
Source IP address / Hostname
db.<project-ref>.supabase.co
Port
5432
Database
postgres
Under Collector properties, set:
Property
Value
plugin.name
pgoutput
publication.name
rdi_publication
publication.autocreate.mode
disabled
slot.name
A unique value, such as rdi_supabase
The publication name must match the publication you created in Supabase. Use a
unique replication slot name for each active pipeline connected to the
project.
Select Test source. After the test succeeds, select the schemas and tables
to capture and deploy the pipeline.
Monitor the pipeline
After deployment:
Confirm the initial snapshot reaches zero pending and rejected records.
Insert, update, and delete test records in Supabase.
Confirm the corresponding counters increase in the pipeline metrics.
Supabase logical replication slots retain write-ahead log (WAL) while the
pipeline is stopped. Follow the steps in
Monitor replication slots
to monitor retained WAL and prepare for Supabase PostgreSQL upgrades.
Get cluster account ID
Before you can set up your source connectivity and secrets, you need the AWS Account ID for your Redis Cloud cluster so that you can give it access to your connectivity and secrets.
On the Redis Cloud console, open your target database's Data Integration tab.
Select Add pipeline, or resume an existing draft. To add a source to a running pipeline, select Add source on its Dashboard.
For a new pipeline, complete Settings, including the target database, and select Continue.
In Add sources, select the source type and enter a unique Source name. This name identifies the source in the pipeline configuration and transformation jobs. See Add sources for naming rules.
Select Continue to open Configure source.
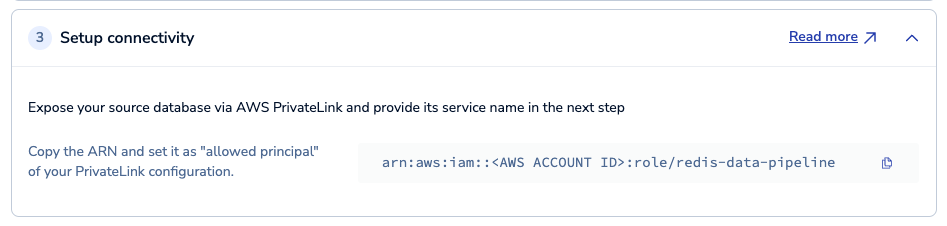
Under Source connectivity, copy the Role ARN and extract its AWS account ID.
The account ID is the number after arn:aws:iam::. For example, arn:aws:iam::123456789012:role/redis-data-pipeline contains account ID 123456789012.
For a source using Public Endpoint, also copy the Redis Cloud outbound IP address to add to the source database's allowlist.
Select Save & exit to return to setup after preparing connectivity and secrets.
Repeat the preparation for each source. Keep track of which endpoint service and secrets belong to each source; configuring one source does not configure the others.
Set up AWS Private Link connectivity
Note:
If your source database is accessible via a public endpoint and you want to use public connectivity for your data pipeline, proceed to Share source database credentials.
If your source database is not accessible via a public endpoint, you need to set up an endpoint service through AWS PrivateLink to be able to connect to it. For how traffic flows over PrivateLink, how to connect to an on-premises database over AWS Direct Connect, and how to keep the connection available during failover, see the AWS PrivateLink reference.
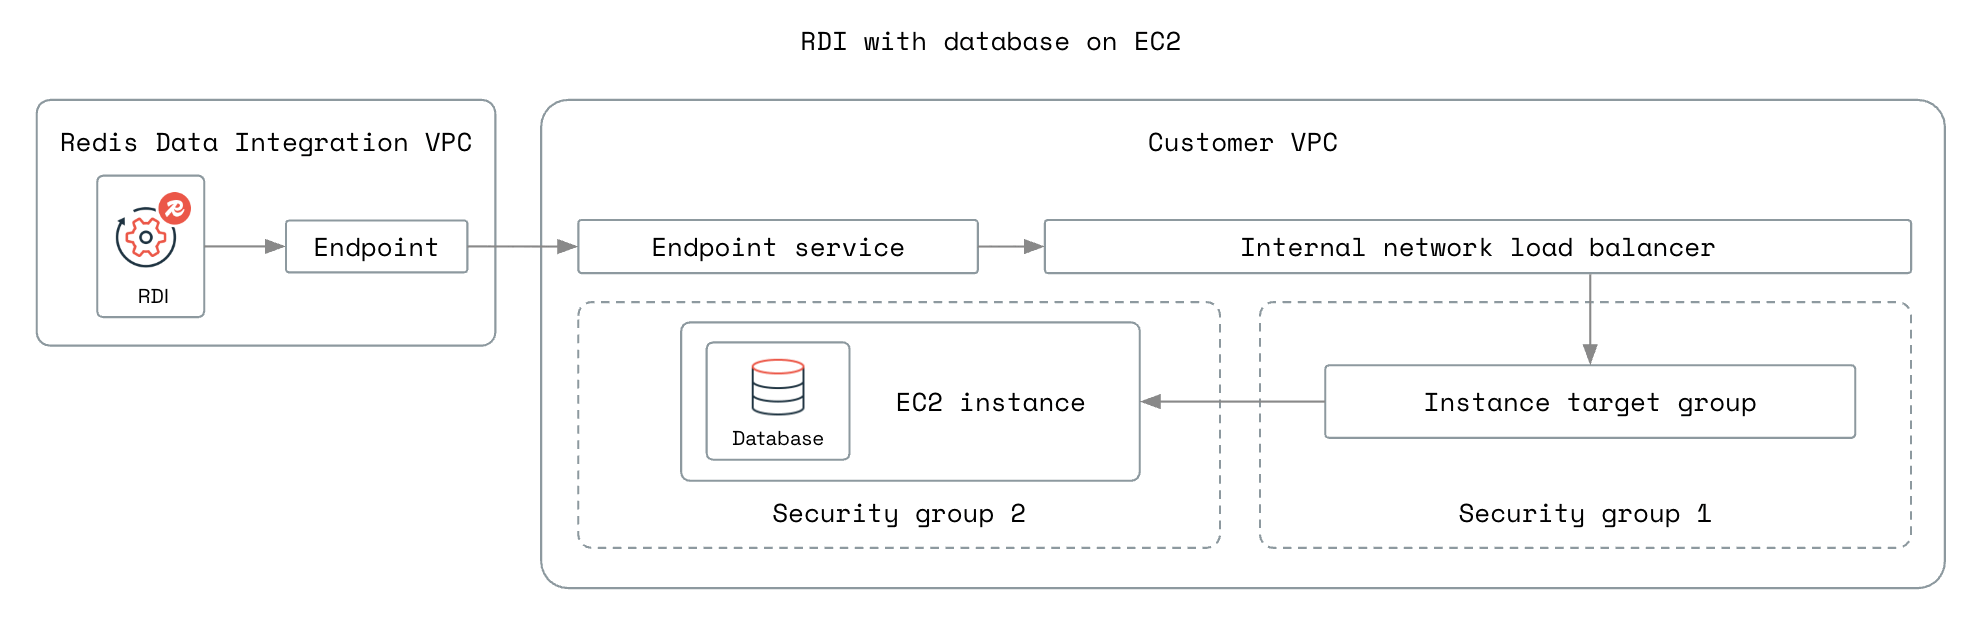
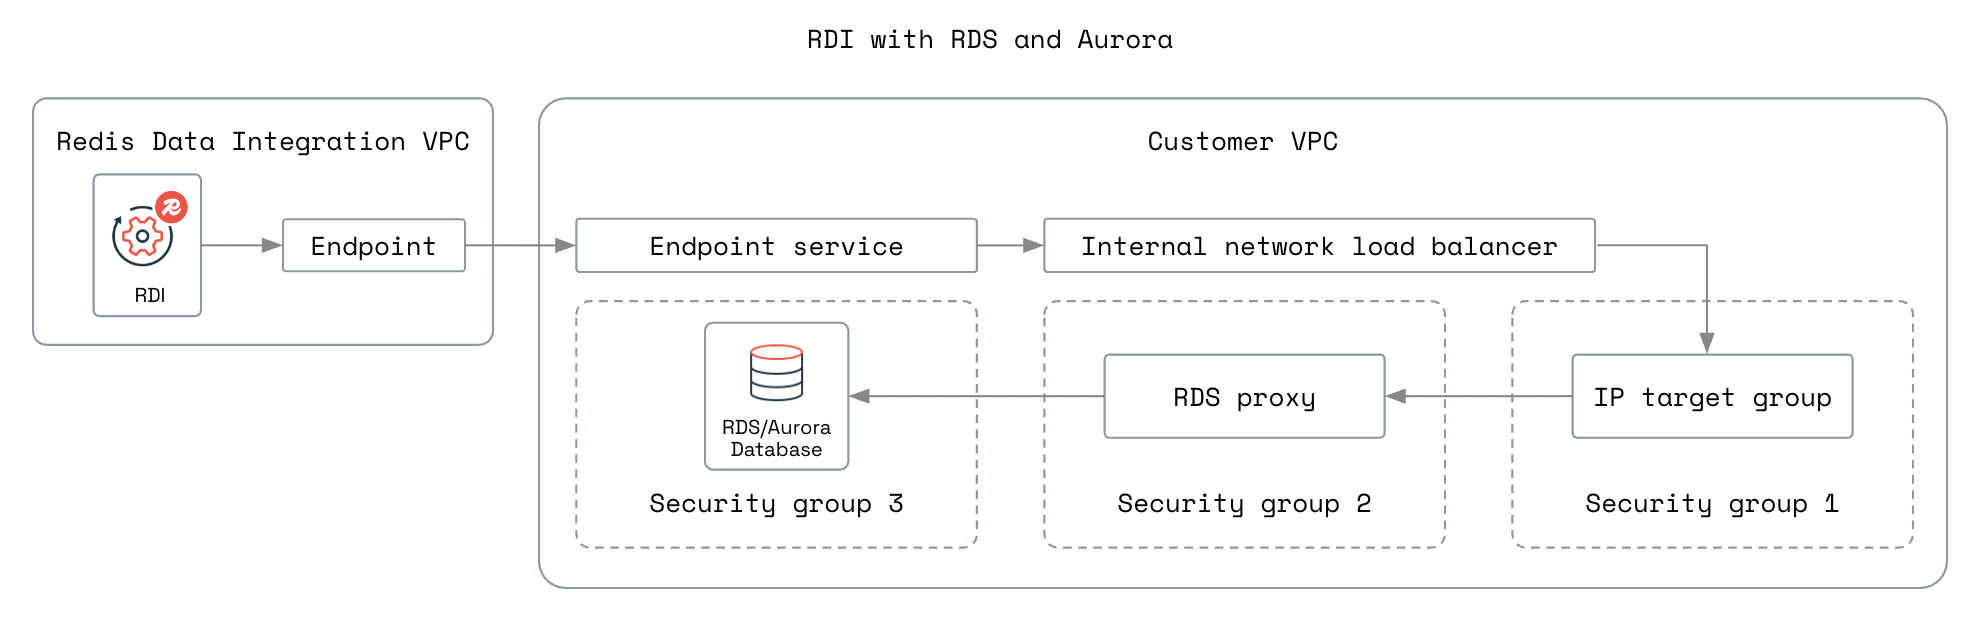
The following diagrams show the network setup for the different database setups:
Database hosted on an AWS EC2 instance:
Database hosted on AWS RDS or AWS Aurora:
Select the steps for your database setup.
To set up PrivateLink for a database hosted on an EC2 instance:
In Network mapping, select the VPC and availability zone associated with your source database.
In Security groups, select the security group associated with your source database, or another security group that allows traffic from PrivateLink and allows traffic to the database.
Protocol : Port: Select TCP, and then enter the port number where your database is exposed.
The IP address type and VPC should be selected already and match the VPC you selected earlier.
In Register targets, select the EC2 instance that runs your source database, enter the port, and select Include as pending below. Then, select Create target group to create your target group. Return to Listeners and routing in the Network Load Balancer setup.
Set the following Listener properties:
Protocol: Select TCP.
Port: Enter your source database's port.
Default action: Select the target group you created in the previous step.
Review the network load balancer settings, and then select Create load balancer to continue.
After the network load balancer is active, select Security.
If you selected the same security group as your source database, you must not enforce security group rules on PrivateLink traffic. Select Edit and then deselect Enforce inbound rules on PrivateLink traffic, and then select Save changes.
Select the security group ID to open the Security group settings.
Select Edit inbound rules, then Add rule to add a rule with the following settings:
Type: Select HTTP.
Source: Select Anywhere - IPv4.
Select Save rules to save your changes.
Select Actions > Edit Load Balancer Attributes.
Under Load balancer targets selection policy select Enable cross-zone load balancing.
Click the Save Changes button.
Create endpoint service
In the AWS Management Console, use the Services menu to locate and select Networking & Content Delivery > VPC. There, select PrivateLink and Lattice > Endpoint services. Create an endpoint service with the following settings:
To set up PrivateLink for a database hosted on AWS RDS or AWS Aurora:
To connect to your RDS or Aurora database, we recommend using a Lambda function approach. This provides a reliable and secure connection method for all database types.
If you have specific requirements that necessitate using RDS Proxy instead of the recommended Lambda function approach, see the RDS Proxy setup guide. Note that RDS Proxy is not recommended and does not work with PostgreSQL.
In Network mapping, select the VPC and availability zone associated with your source database.
In Security groups, select the security group associated with your source database, or another security group that allows traffic from PrivateLink and allows traffic to the database.
Protocol : Port: Select TCP, and then enter the port number where your database is exposed.
The IP address type and VPC should be selected already and match the VPC you selected earlier.
In Register targets, enter the static IP address of your database, enter the port, and select Include as pending below. Then, select Create target group to create your target group. Return to Listeners and routing in the Network Load Balancer setup.
To get the static IP address of your database, run the following command on an EC2 instance in the same VPC as the database:
$ nslookup <database-endpoint>
Replace <database-endpoint> with the endpoint of your RDS or Aurora database.
Set the following Listener properties:
Protocol: Select TCP.
Port: Enter your source database's port.
Default action: Select the target group you created in the previous step.
Review the network load balancer settings, and then select Create load balancer to continue.
After the network load balancer is active, select Security.
If you selected the same security group as your source database, you must not enforce security group rules on PrivateLink traffic. Select Edit and then deselect Enforce inbound rules on PrivateLink traffic, and then select Save changes.
Select the security group ID to open the Security group settings.
Select Edit inbound rules, then Add rule to add a rule with the following settings:
Type: Select HTTP.
Source: Select Anywhere - IPv4.
Select Save rules to save your changes.
Select Actions > Edit Load Balancer Attributes.
Under Load balancer targets selection policy select Enable cross-zone load balancing.
Click the Save Changes button.
Create endpoint service
In the AWS Management Console, use the Services menu to locate and select Networking & Content Delivery > VPC. There, select PrivateLink and Lattice > Endpoint services. Create an endpoint service with the following settings:
Setting up the Lambda function is optional but recommended for production environments. The Lambda function provides automatic failover handling and a more robust connection to your RDS or Aurora database.
The Lambda function monitors RDS failover events and automatically updates the NLB Target Group to point to the new primary instance's IP address. This ensures RDI reconnects automatically after a failover.
Option 1: Use the Redis Terraform module
Redis provides a ready-to-use Terraform module that automates the Lambda function deployment. This is the recommended approach.
Monitors RDS events: Subscribes to RDS failover events via SNS
Detects failover: When a failover occurs, RDS triggers an SNS notification
Resolves new IP: The Lambda function queries DNS to get the new primary's IP address
Updates NLB target: Automatically updates the NLB Target Group with the new IP
This process typically completes within 30-60 seconds for Aurora, or 60-120 seconds for standard RDS.
Verify the deployment
After deployment, verify the Lambda function is configured correctly:
Check the Lambda function in AWS Console → Lambda → Functions
Verify the environment variables are set correctly:
Cluster_EndPoint: Your RDS endpoint
RDS_Port: Your database port
NLB_TG_ARN: Your NLB Target Group ARN
Check the SNS subscription in AWS Console → SNS → Subscriptions
Option 2: Full infrastructure deployment
For new deployments, Redis provides a complete Terraform example that deploys the entire infrastructure including the RDS database, NLB, PrivateLink, and Lambda function.
To set up Private Link for a MongoDB Atlas source database:
MongoDB Atlas manages its own endpoint service. The flow is a two-way handshake — you get an endpoint service ID from Atlas, give it to Redis Cloud, and then take the VPC Endpoint ID that Redis Cloud returns back to Atlas to complete the connection.
Note:
Create the Atlas private endpoint in the same AWS region as your Redis Cloud target database.
Select the Private Endpoint tab, then select Dedicated Cluster.
Select Add Private Endpoint.
Select AWS as the cloud provider.
Select the AWS region that matches your Redis Cloud target database.
Select Next.
Atlas displays an Endpoint Service ID (for example, vpce-svc-xxxxxxxxxxxxxxxxx). Copy this value.
Register the endpoint service with Redis Cloud
In the Redis Cloud console, in the pipeline creation flow, go to the Source connectivity step.
In the Private Link service name field, paste the Endpoint Service ID you copied from Atlas.
Redis Cloud creates a VPC endpoint and displays a VPC Endpoint ID (for example, vpce-xxxxxxxxxxxxxxxxx). Copy this value.
Complete the connection in MongoDB Atlas
Return to the Add Private Endpoint page in the Atlas UI. In the Your VPC Endpoint ID field, enter the VPC Endpoint ID you copied from the Redis Cloud console. Select Create.
Wait for the endpoint status to show as Available. This can take a few minutes.
In the Atlas UI, go to your cluster and select Connect > Private Endpoint.
Choose the private endpoint you just registered (the vpce- ID you entered above).
Choose a connection method, then select Shell.
Copy the connection string shown.
Note:
Copy the connection string from the Private Endpoint connection method only. The standard connection string does not route traffic through the private endpoint.
Finish pipeline setup
Return to the Redis Cloud pipeline creation flow and paste the connection string into the Source configuration section.
Share source database credentials
Share the credentials and certificates for each source through AWS Secrets Manager. Enter the matching secret ARNs when you configure that source in the console.
Create secrets containing the source database credentials encrypted using that key.
Create encryption key
In the AWS Management Console, use the Services menu to locate and select Security, Identity, and Compliance > Key Management Service. Create an encryption key with the following settings:
In Step 1 - Configure key:
Key type: Select Symmetric.
Key usage: Select Encrypt and decrypt.
Under Advanced options, set the following:
Key material origin: Select KMS - recommended.
Regionality: Select Single-Region key.
In Step 2 - Add labels, add an alias and description for the key.
In Step 3 - Define key administrative permissions, under Key deletion, select Allow key administrators to delete this key.
In Step 4 - Define key usage permissions, under Other AWS accounts, select Add another AWS account. Enter the AWS account ID for the Redis Cloud cluster that you saved earlier.
Review the key policy and key settings, and then select Finish to create the key.
Create database credentials secrets
To let Redis Cloud access your source database, you need to create AWS secrets for the source database's credentials and certificates.
The required secrets depend on your source database's security configuration. The following table shows the required secrets for each configuration:
Security configuration
Required secrets
Username and password only
Credentials secret (username and password for the RDI pipeline user)
Username and key pair only (Snowflake source databases only)
Credentials secret (username for the RDI pipeline user)
Private key secret
TLS connection
Credentials secret (username and password for the RDI pipeline user)
CA Certificate secret (server certificate)
mTLS connection
Credentials secret (username and password for the RDI pipeline user)
CA Certificate secret (server certificate)
Client certificate secret
Client key secret
mTLS connection with client key passphrase
Credentials secret (username and password for the RDI pipeline user)
CA Certificate secret (server certificate)
Client certificate secret
Client key secret
Client key passphrase secret
Note:
When creating secrets for TLS or mTLS, ensure that all certificates and keys are in PEM format. The only exception to this is that for PostgreSQL, the source's private key secret must be in DER format. If you have a key in PEM format, you must convert it to DER before creating the secret using the command:
This command assumes that the private key is not encrypted. See the openssl documentation to learn how to convert an encrypted private key.
Select a tab to learn how to create the required secret.
In the AWS Management Console, use the Services menu to locate and select Security, Identity, and Compliance > Secrets Manager. Create a secret of type Other type of secret with the following settings:
Key/value pairs: Enter the following key/value pairs.
username: Database username for the RDI pipeline user
password: Database password for the RDI pipeline user
Note:
Snowflake source databases that use user/key pair authentication should only enter the username for the database.
Encryption key: Select the encryption key you created earlier.
Resource permissions: Add the following permissions to your secret to allow the Redis data pipeline to access your secret. Replace <AWS ACCOUNT ID> with the AWS account ID for the Redis Cloud cluster that you saved earlier.
In the AWS Management Console, use the Services menu to locate and select Security, Identity, and Compliance > Secrets Manager. Create a secret of type Other type of secret with the following settings:
Key/value pairs: Select Plaintext and enter the server certificate.
Encryption key: Select the encryption key you created earlier.
Resource permissions: Add the following permissions to your secret to allow the Redis data pipeline to access your secret. Replace <AWS ACCOUNT ID> with the AWS account ID for the Redis Cloud cluster that you saved earlier.
In the AWS Management Console, use the Services menu to locate and select Security, Identity, and Compliance > Secrets Manager. Create a secret of type Other type of secret with the following settings:
Key/value pairs: Select Plaintext and enter the client certificate.
Encryption key: Select the encryption key you created earlier.
Resource permissions: Add the following permissions to your secret to allow the Redis data pipeline to access your secret. Replace <AWS ACCOUNT ID> with the AWS account ID for the Redis Cloud cluster that you saved earlier.
<path-to-client-key> - Path to the client key file
<encryption-key-arn> - ARN of the encryption key you created earlier
After you create the secret, you need to add permissions to allow the data pipeline to access it.
In the AWS Management Console, use the Services menu to locate and select Security, Identity, and Compliance > Secrets Manager. Select the private key secret you just created and then select Edit permissions.
Add the following permissions to your secret. Replace <AWS ACCOUNT ID> with the AWS account ID for the Redis Cloud cluster that you saved earlier.
In the AWS Management Console, use the Services menu to locate and select Security, Identity, and Compliance > Secrets Manager. Create a secret of type Other type of secret with the following settings:
Key/value pairs: Select Plaintext and enter the client key passphrase.
Encryption key: Select the encryption key you created earlier.
Resource permissions: Add the following permissions to your secret to allow the Redis data pipeline to access your secret. Replace <AWS ACCOUNT ID> with the AWS account ID for the Redis Cloud cluster that you saved earlier.
This secret is required for Snowflake source databases that use key-pair authentication.
In the AWS Management Console, use the Services menu to locate and select Security, Identity, and Compliance > Secrets Manager. Create a secret of type Other type of secret with the following settings:
Key/value pairs: Select Plaintext and enter the private key in plain text PEM format.
Encryption key: Select the encryption key you created earlier.
Resource permissions: Add the following permissions to your secret to allow the Redis data pipeline to access your secret. Replace <AWS ACCOUNT ID> with the AWS account ID for the Redis Cloud cluster that you saved earlier.
After you have prepared connectivity and credentials for each source, resume your pipeline draft from the workspace and complete Configure source. Continue with Create data pipeline.