Manage Active-Active databases
Manage your Active-Active database settings.
| Redis Software |
|---|
You can configure and manage your Active-Active database from either the Cluster Manager UI or the command line.
Database settings
Most Active-Active database settings can be changed after database creation. One notable exception is database clustering, which can't be turned on or off after the database has been created.
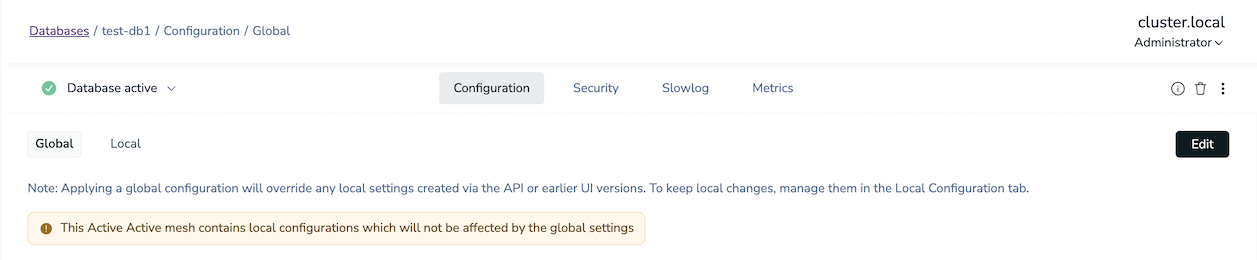
As of Redis Software version 8.0.16, the Cluster Manager UI supports both global and local configuration changes for Active-Active databases. In earlier versions, configuration changes made in the Cluster Manager UI applied only to the local instance and required additional manual updates for each participating cluster.
Change global configuration
Global configuration changes are applied to all participating clusters in the Active-Active database. However, if your Active-Active mesh contains local configurations, they will continue to override global settings on the database instances where they are applied.
To make global configuration changes in the Cluster Manager UI:
-
Select the Active-Active database from the Databases list and go to its Configuration screen.
-
While on the Global tab, click Edit.

-
Make your configuration changes.
-
Click Save to apply the changes globally to all participating clusters.
Change local configuration
Local configuration changes override global configuration settings and are applied only to the database instance on the current cluster.
To apply changes to a local Active-Active database instance, use one of the following methods:
To change the local configuration in the Cluster Manager UI:
-
Select the Active-Active database from the Databases list and go to its Configuration screen.
-
Go to the Local tab.

-
Click Edit, then make your configuration changes.
-
Click Save to apply the changes to the current database instance only.
View differences between global and local configuration
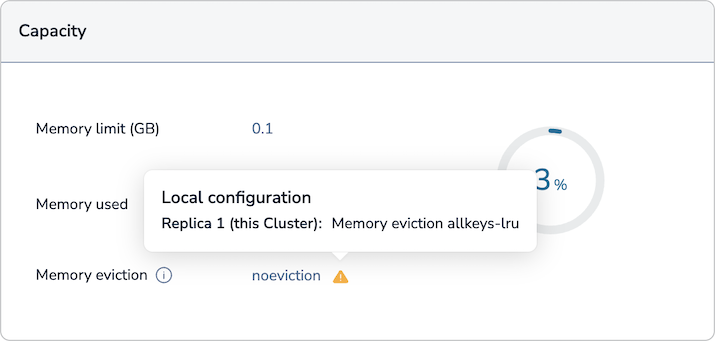
In the Cluster Manager UI, an Active-Active database's Global configuration tab indicates when a local configuration differs from the global configuration:
If a warning symbol appears next to a setting on the Global configuration tab, point to the warning symbol to show details about the local configuration differences:
On the Local configuration tab, any locally configured settings that differ from the global settings are marked with a Local configuration label:

Participating clusters
You can add and remove participating clusters of an Active-Active database to change the topology.
To manage the changes to Active-Active topology, use crdb-cli or the participating clusters list in the Cluster Manager UI.
Add participating clusters
All existing participating clusters must be online and in a syncing state when you add new participating clusters.
New participating clusters create the Active-Active database instance based on the global Active-Active database configuration. After you add new participating clusters to an existing Active-Active database, the new database instance can accept connections and read operations. The new instance does not accept write operations until it is in the syncing state.
To add a new participating cluster to an existing Active-Active configuration using the Cluster Manager UI:
-
Select the Active-Active database from the Databases list and go to its Configuration screen.
-
Click Edit.
-
In the Participating clusters section, go to Other participating clusters and click + Add cluster.
-
In the Add cluster configuration panel, enter the new cluster's URL, port number, and the admin username and password for the new participating cluster:

-
Click Join cluster to add the cluster to the list of participating clusters.
-
Click Save.
Remove participating clusters
All existing participating clusters must be online and in a syncing state when you remove an online participating cluster. If you must remove offline participating clusters, you can forcefully remove them. If a forcefully removed participating cluster tries to rejoin the cluster, its Active-Active database membership will be out of date. The joined participating clusters reject updates sent from the removed participating cluster. To prevent rejoin attempts, purge the forcefully removed instance from the participating cluster.
To remove a participating cluster using the Cluster Manager UI:
-
Select the Active-Active database from the Databases list and go to its Configuration screen.
-
Click Edit.
-
In the Participating clusters section, point to the cluster you want to delete in the Other participating clusters list:
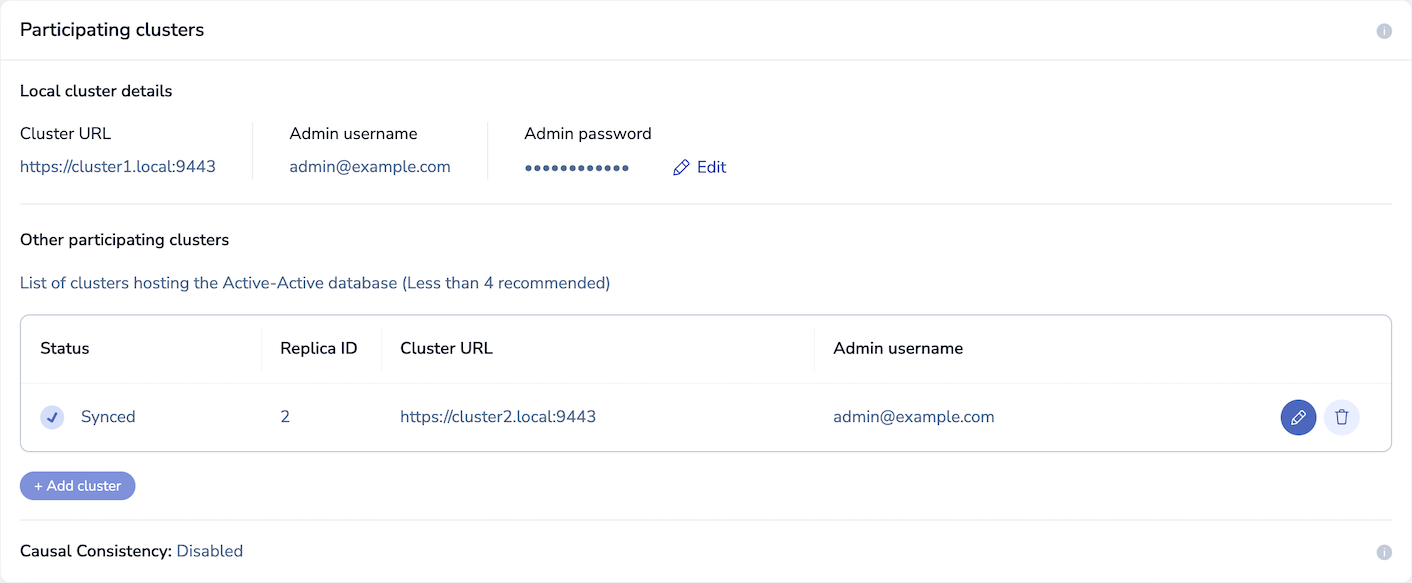
-
Click
 to remove the cluster.
 -
Click Save.
Replication backlog
Redis databases that use replication for high availability maintain a replication backlog (per shard) to synchronize the primary and replica shards of a database. In addition to the database replication backlog, Active-Active databases maintain a backlog (per shard) to synchronize the database instances between clusters.
By default, both the database and Active-Active replication backlogs are set to one percent (1%) of the database size divided by the number of shards. This can range between 1MB to 250MB per shard for each backlog.
Change the replication backlog size
Use the crdb-cli utility to control the size of the replication backlogs. You can set it to auto or set a specific size.
Update the database replication backlog configuration with the crdb-cli command shown below.
crdb-cli crdb update --crdb-guid <crdb_guid> --default-db-config "{\"repl_backlog_size\": <size in MB | 'auto'>}"
Update the Active-Active (CRDT) replication backlog with the command shown below:
crdb-cli crdb update --crdb-guid <crdb_guid> --default-db-config "{\"crdt_repl_backlog_size\": <size in MB | 'auto'>}"
Data persistence
Active-Active supports AOF (Append-Only File) data persistence only. Snapshot persistence is not supported for Active-Active databases and should not be used.
If an Active-Active database is currently using snapshot data persistence, use crdb-cli to switch to AOF persistence:
crdb-cli crdb update --crdb-guid <CRDB_GUID> --default-db-config '{"data_persistence": "aof", "aof_policy":"appendfsync-every-sec"}'