Disaster recovery (DR)
Configure disaster recovery for Redis Data Integration with GCS or DynamoDB leader election.
Redis Data Integration (RDI) can run across two or more sites so that another site takes over when the active site fails. Each site runs its own RDI installation, an instance, in a separate Kubernetes cluster. The instances use an external lease to elect one of them, the leader, to run the pipelines. The other instances are followers and wait to take over. The examples in this guide use two sites, A and B.
RDI keeps its state, such as pipeline configurations and saved source positions, in the RDI database. In a disaster recovery (DR) setup, the RDI database is an Active-Active database with a database instance at each site, so this state replicates between the sites. Each RDI instance connects to the database instance at its own site.
For Kubernetes installations, RDI supports leases in Google Cloud Storage (GCS), since RDI 1.15.0, and in Amazon DynamoDB, since RDI 2.2.0. DR requires a Kubernetes installation and one of these lease stores.
DR differs from the high availability (HA) pair for the VM installations, where two instances share one RDI database and use it for leader election. Use an HA pair to survive the failure of one RDI instance, and DR to survive the loss of a site.
Understand the topology
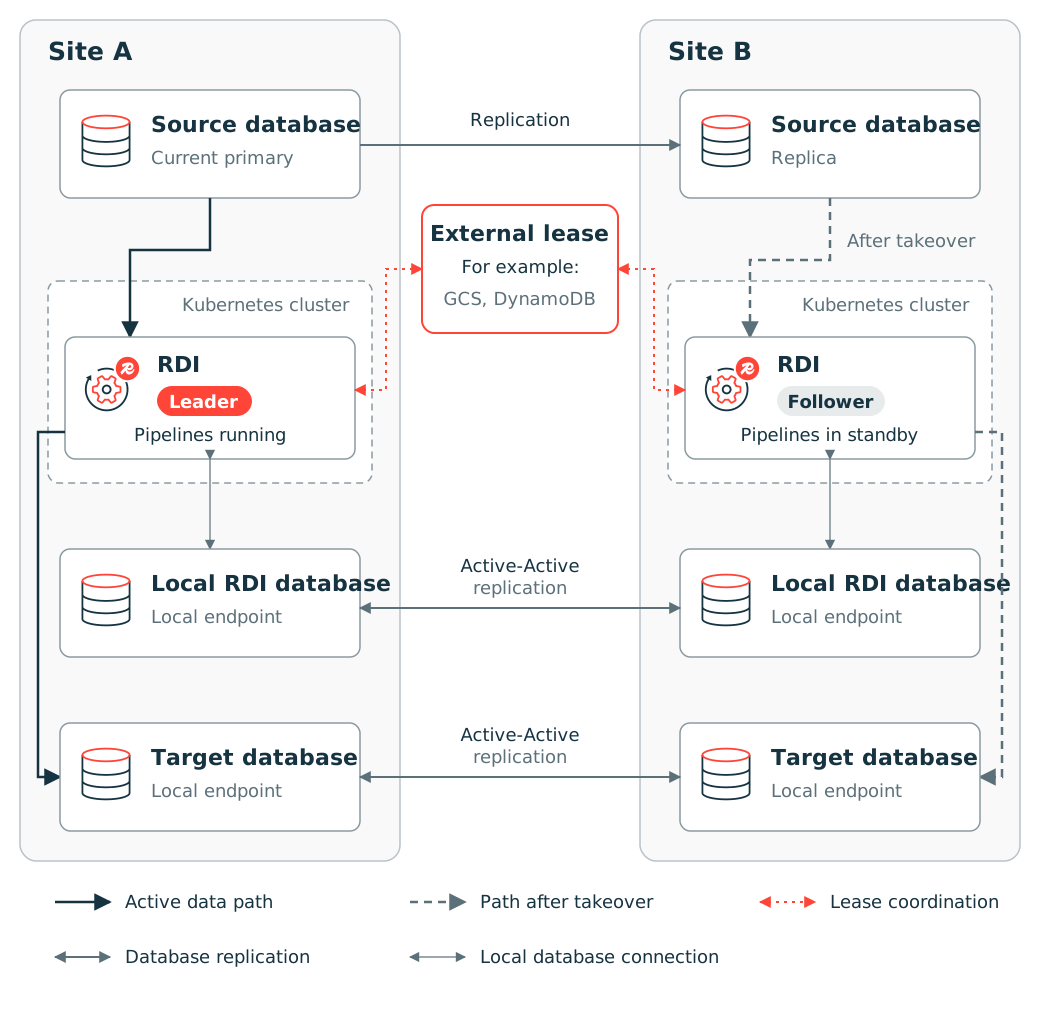
Each RDI instance is in one of three states:
| State | Takes part in leader election | Runs the pipelines | Typical use |
|---|---|---|---|
| Leader | Yes, and holds the lease | Yes | The active site. |
| Follower | Yes | No. Takes over when the lease is released or expires. | Automatic failover. |
| Standby | No. Its standby_mode setting is true. |
No | Manual failover, or a site under maintenance. |
redis-di info reports Leader Election Mode: follower for both followers and standby
instances. Check standby_mode with redis-di get-setting standby_mode to tell them apart.
On an instance that isn't the leader, RDI reports the pipelines as standby and their
components as stopped. An instance that has never been the leader has no pipelines.
Each site's RDI instance captures from the source database named in its pipeline configuration. Usually that's the closest database that supports snapshots and change data capture (CDC): the active source database or a replica of it. It can also be a shared endpoint, such as a Domain Name System (DNS) name that resolves to the active source database. Which kinds of replica RDI can capture from, and when, depends on the source database. See Source databases and data after a failover. Manage source replication, promotion, and endpoint routing separately from RDI failover.
The target in this example also uses Active-Active replication. Configure target availability separately from RDI leader election. If the target at site B is a Replica Of destination, use manual failover and stop replication into it before you enable site B. You must not write to a Replica Of destination.
The RDI instances use the lease to elect one leader and let another site take over when a whole site or region fails. See How automatic failover works.
RDI database replication
A disaster recovery setup requires Active-Active replication for the RDI database.
Source databases and data after a failover
The new leader can resume capture only if its source database still has the changes from the position that RDI saved. The new leader resumes from the state in its local RDI database instance: the collector's saved source position and any change records not yet processed.
RDI saves the position in the source database's own format, such as an Oracle system change number (SCN) or a PostgreSQL log sequence number (LSN). The source database at the new leader's site must have the same history as the one RDI captured from. Otherwise, capture can fail, or start from the wrong place.
The following table gives the general requirement for each source. Replication and failover details vary by source database, version, and managed service.
| Source | Saved position | New leader requirements |
|---|---|---|
| Oracle | SCN | Sources share the same SCN history, for example a physical standby. |
| MySQL and MariaDB | Global transaction identifier (GTID) set | GTIDs are enabled, and the source contains every transaction in the saved GTID set, with binary logs (binlogs) kept from that point. A replica writes replicated changes to its own binlog. |
| PostgreSQL | LSN of the replication slot | The source is a promoted physical standby with a synchronized copy of RDI's replication slot. This requires PostgreSQL 17 with slot synchronization enabled on the standby, and slot.failover: true in the source's advanced.source before RDI creates the slot. Debezium doesn't change an existing slot, so reset an existing pipeline after you set the option. RDI can't use the slot copy until the standby is promoted. RDI hasn't been tested with the pg_failover_slots extension for PostgreSQL 14 to 16. A logical replica needs a pipeline reset. |
| SQL Server | LSN | The source is a replica of the same database in an Always On availability group, so it has the same transaction log. The CDC capture job runs on the new primary after promotion. |
| MongoDB | Change stream resume token | The source belongs to the same replica set or sharded cluster, and its oplog still contains the saved position. A separate cluster that another tool copies needs a pipeline reset. |
| Google Cloud Spanner | Change stream position | Both sites capture from the same Spanner database, and the saved position is within the change stream's retention period. |
Before you rely on DR, check that RDI can resume capture from its saved position at each site's source database. A replicated copy of the source alone does not guarantee this. Retain enough source change history to cover capture lag, snapshots, and the longest outage you plan to recover from.
After a takeover, one of the following applies:
- Capture continues from the saved position. If the source database still has the change history from that position, RDI captures every later change. Active-Active replication is asynchronous, so the saved state can lag behind the failed site's state. RDI can then apply some changes to the target again. If the source replicates asynchronously, a promoted source can lack changes that RDI already delivered. These changes remain in the target.
- Capture can't continue. For example, the source database has no compatible change history or capture state for the saved position. Reset the pipeline to take a new snapshot. The snapshot reloads inserted and updated rows. Rows deleted from the source between the failed site's last processed change and the start of the snapshot remain in the target. Delete them from the target yourself.
An Active-Active target replicates separately from the RDI database, so it can lag further behind. RDI can then skip changes that the failed site delivered but that haven't reached the new leader's target instance. They're missing there until the failed site's target instance syncs. If that instance loses them, or you remove it from the Active-Active database, they're lost from the target.
Prepare both sites
- Create the RDI database as an Active-Active database with an instance at each site. It must also meet the RDI database requirements.
- Prepare the external lease.
- Prepare the source database at each site for CDC, including the source endpoints and any promotion or routing steps. Check the requirements in Source databases and data after a failover.
- Configure target database availability, as described in Understand the topology.
- Configure network access from each RDI instance to its site's source database, its target database, and the same external lease.
- Keep the clocks at both sites synchronized, for example with Network Time Protocol (NTP).
This guide describes how to set up RDI for disaster recovery. An existing RDI database can't
be changed into an Active-Active database. To add DR to an existing installation, export each
pipeline with
redis-di export,
set up both sites as described here, and deploy the pipelines. RDI then takes a new snapshot.
Configure a lease
RDI needs a lease store that allows at most one leader and stays available when any one site or region fails. The lease is one record that the instances at every site read and write. Both supported stores meet these requirements:
| Requirement | GCS lease | DynamoDB lease |
|---|---|---|
| All sites of a DR setup use one record. | The object that gcsLease.objectName names. |
The item that dynamoDBLease.keyName names. |
| Each write is conditional. It succeeds only if the lease is free, expired, or held by the writing instance, so two sites can't both acquire it. | Conditional object creation and metadata updates. | Conditional PutItem and DeleteItem requests. |
| The store checks each condition against the latest write from any site, not a local copy. | Cloud Storage is strongly consistent. It writes object metadata, which holds the lease, synchronously across the bucket's regions. | Only a global table with multi-Region strong consistency (MRSC) does this. In the default eventual consistency mode, each Region checks its own copy. |
| The lease survives the loss of any one site or region. | Use a dual-region or multi-region bucket. | Use an MRSC table, which spans three Amazon Web Services (AWS) Regions. A replica Region that can reach neither of the other two rejects writes, so its site stops leading. |
The lease holds the leader's instanceID and an expiry time. If no site can reach the store, no
instance can become the leader, and the pipelines stop.
Choose one provider and follow its guide to create the lease resource and grant operator access. Return to Prepare both sites before configuring or installing RDI:
With more than two sites, sites can share a replica Region of the DynamoDB table.
Set operator.leaderElection.leaseType to gcs or dynamodb, as the provider guides show.
RDI uses the redsync lease for any other value, and redsync can't be used with an
Active-Active RDI database. After installing, check that the operator log at each site
contains Creating GCS lease or Creating DynamoDB lease.
Protect the lease
Don't delete the lease while any instance takes part in leader election. A participating instance recreates it on its next attempt, so two sites can briefly lead.
For GCS, don't apply an Object Lifecycle Management rule that deletes the lease object, such as a rule that deletes objects by age. RDI creates the object once and then only updates it, so such a rule eventually deletes it.
Share a lease store between DR setups
A DR setup uses one lease for all its pipelines. Separate DR setups, such as a production
setup and a test setup, can share one GCS bucket or DynamoDB table. Give each setup its own
lease with gcsLease.objectName or dynamoDBLease.keyName, and use the same value at every
site of that setup. For example, in the DynamoDB values files of the production setup:
operator:
  leaderElection:
    instanceID: prod-site-a
    dynamoDBLease:
      tableName: <lease-table>
      keyName: rdi-prod-lease
And in the values files of the test setup:
operator:
  leaderElection:
    instanceID: test-site-a
    dynamoDBLease:
      tableName: <lease-table>
      keyName: rdi-test-lease
Set keyName explicitly for every setup, because it defaults to rdi-lease. Setups that use
the same lease compete for it, so only one of them runs its pipelines. Each setup still needs
its own Kubernetes clusters and Active-Active RDI database.
Lease timing
The lease timings are Helm values under operator.leaderElection:
| Helm value | Default | What it controls |
|---|---|---|
ttl |
60s |
How long the lease stays valid after the leader last renewed it. |
refreshInterval |
10s |
How often each instance tries to acquire or renew the lease and reads its runtime settings. |
timeout |
30s |
Total time for one attempt to acquire, renew, or release the lease, including retries. |
retryPolicy |
attempts: 3, initialInterval: 1s, backoffFactor: 2.0 |
Retries within timeout. |
checkTimeout |
15s |
Total time to read the runtime settings from the RDI database. |
checkRetryPolicy |
attempts: 3, initialInterval: 1s, backoffFactor: 2.0 |
Retries within checkTimeout. |
- A leader that enters standby releases the lease within
refreshInterval. A leader that can't read its RDI database after thecheckRetryPolicyattempts, or withincheckTimeout, also releases it. Another instance acquires it on its next attempt. - A leader that fails, restarts, or can't reach the lease store doesn't release the lease.
Another instance can acquire it after
ttl. A leader that restarts and renews withinttlkeeps the lease. - If you change the timings, keep the sum of
timeout,checkTimeout, andrefreshIntervalless thanttl, so that a leader that can't renew the lease stops leading before another site can acquire it.
An instance that stops leading removes its pipeline components, which can take a minute or more.
With the default settings, expect another site to take over within about 2 minutes. Pipeline startup and catch-up add to the recovery time.
Install RDI at both sites
Install the same RDI version in separate Kubernetes clusters after preparing both sites.
Choose a failover mode
The failover mode sets whether site B waits as a follower or in standby. See the instance
states in Understand the topology. Both instances take part in
leader election after installation. Set the mode with the standby_mode
instance setting,
and change it at any time:
| Mode | standby_mode |
Who starts the takeover? | Use it when |
|---|---|---|---|
| Automatic | false at both sites, the default |
The follower, after the leader releases the lease or the lease expires. | RDI can resume capture from the source database at site B as soon as site B takes over. For example, both sites capture from one Spanner database. |
| Manual | false at site A, true at site B |
You, by enabling participation on the destination instance. | The source database at site B needs a step first, such as promotion or a check of its change history. For example, a PostgreSQL standby must be promoted before RDI can use its slot copy. |
With manual failover, prepare the source first. Promote the source database at site B or confirm that RDI can resume capture from the saved position, then enable site B. If capture can't resume from the saved position, reset the pipeline after site B takes over. See Source databases and data after a failover.
Configure each site's values file
Create rdi-values-site-a.yaml and rdi-values-site-b.yaml from the chart's values, following
Install the RDI Helm chart.
Set the connection to the local RDI database and the instance identifier (ID) in each file.
For site A:
connection:
  host: <site-a-rdi-db-host>
  port: <site-a-rdi-db-port>
  username: <site-a-rdi-db-user>
  password: <site-a-rdi-db-password>

api:
  jwtKey: <site-a-api-signing-key>

operator:
  leaderElection:
    enabled: true
    instanceID: site-a
For site B:
connection:
  host: <site-b-rdi-db-host>
  port: <site-b-rdi-db-port>
  username: <site-b-rdi-db-user>
  password: <site-b-rdi-db-password>

api:
  jwtKey: <site-b-api-signing-key>

operator:
  leaderElection:
    enabled: true
    instanceID: site-b
The standby_mode setting stays in the RDI database when you uninstall RDI. After you
install an instance on an RDI database that an earlier installation used, run
redis-di get-setting standby_mode. If it isn't <none>, run
redis-di delete-setting standby_mode.
Set operator.leaderElection.instanceID before you install each instance, and keep it unchanged
across upgrades.
Use a different instanceID at each site. The ID defaults to cluster-1. Instances that
share an ID both act as the leader, and they share runtime
settings such as standby_mode.
These snippets contain only the common, site-specific settings. Add the provider's lease
settings in Configure the lease and install RDI before
installing. Complete the other installation settings, including Transport Layer Security (TLS)
and API access, as described in
The values.yaml file.
Configure the lease and install RDI
Complete the lease settings in both values files, then install RDI and check the operators using the guide for your provider:
Deploy pipelines and secrets
Configure a separate RDI command-line interface (CLI)
context for each
instance. The examples use site-a and site-b as context names:
redis-di set-context site-a --api-url "https://<site-a-rdi-api-host>" \
  --user "<rdi-user>" --cacert "<site-a-ca-file>"
redis-di set-context site-b --api-url "https://<site-b-rdi-api-host>" \
  --user "<rdi-user>" --cacert "<site-b-ca-file>"
-
Check leadership on both instances:
redis-di --context site-a info
redis-di --context site-b info
One reports
Leader Election Mode: leaderand the otherLeader Election Mode: follower. The examples assume that site A is the leader.If leadership isn't as expected, check the operator log at each site:
kubectl --context "<site-kube-context>" --namespace rdi logs deployment/rdi-operator -
For manual failover, put site B in standby:
redis-di --context site-b set-setting standby_mode true -
Set the secrets for every pipeline on both instances. Secret values of the same pipeline may differ across instances. You can set secrets before a pipeline exists. Include the source and target credentials and any certificates.
When the sites use different source or target endpoints, set the endpoints as generic secrets at each site. For a source named
mysql:redis-di --context site-a set-secret HOST "<site-a-source-host>" \ --db mysql --pipeline "<pipeline>" redis-di --context site-a set-secret HOST "<site-a-target-host>" \ --db target --pipeline "<pipeline>" redis-di --context site-b set-secret HOST "<site-b-source-host>" \ --db mysql --pipeline "<pipeline>" redis-di --context site-b set-secret HOST "<site-b-target-host>" \ --db target --pipeline "<pipeline>"Reference
${MYSQL_DB_HOST}in the source'sconnection.hostand${TARGET_DB_HOST}in the target'sconnection.hostinconfig.yaml. RDI then resolves the same pipeline configuration to the local endpoints at each site. -
For a new pipeline, create it empty on the leader, then deploy its configuration. For a leader at site A:
redis-di --context site-a deploy "<pipeline>" --empty
redis-di --context site-a deploy "<pipeline>" --dir "<pipeline-directory>"
Don't run
deploy --emptyon an existing pipeline. It clears the pipeline's configuration and its saved source positions.RDI saves the pipeline configuration in the RDI database and restores it when another instance becomes the leader. Do not deploy a separate configuration on the follower.
-
Run
redis-di --context site-a describe "<pipeline>"for each pipeline on the leader. Check that its components run without errors and that source changes reach the target.
Test a takeover
Move leadership to site B and back, following Move leadership manually. Verify pipeline health and data delivery at each site before you rely on the setup.
How automatic failover works
The leader stops leading in these cases:
| Event at the leader's site | What the leader does | When another site can take over |
|---|---|---|
You set standby_mode to true. |
Releases the lease. | On its next attempt. |
The operator can't read its RDI database instance after the checkRetryPolicy attempts, or within checkTimeout. |
Releases the lease. | On its next attempt. |
| The operator can't renew the lease, for example because it can't reach the lease store. | Stops leading before the lease expires. | After the lease expires. |
| The operator stops, for example because its pod, node, or Kubernetes cluster fails. | Nothing. | After the lease expires. |
Another site takes over only if its operator is running, it can read its own RDI database instance, it isn't in standby, and it can reach the lease store. If no site can reach the lease store, no site can become the leader, and no pipelines run. See Lease timing.
The new leader starts the pipeline components and resumes from the state in its local RDI database instance. See Source databases and data after a failover.
After a failover, check the new leader and its pipelines. When the old site recovers, it remains a follower while the other site holds the lease. To move leadership back, see Move leadership manually.
Move leadership manually
Use this procedure for a manually controlled takeover. It assumes site A is the leader and site B is the destination.
-
Check that site B is ready to take over:
-
Site B reports
Leader Election Mode: follower:redis-di --context site-b info -
Site B has the secrets of every pipeline. Compare the
KEYandDBcolumns at both sites:redis-di --context site-a list-secrets --pipeline "<pipeline>" redis-di --context site-b list-secrets --pipeline "<pipeline>" -
Site B's instances of the RDI database and the target are in sync. On Redis Software, check the replication lag of each database with the database availability API:
curl -u "<rest-api-user>:<password>" \
  "https://<site-b-cluster-fqdn>:9443/v1/bdbs/<database-id>/availability?extend_check=lag"
A
200 OKresponse means that the lag is within the tolerance, 100 milliseconds by default.
To check that site B can reach the source and target, move leadership to site B and back during a maintenance window.
-
-
On both reachable instances, record the current runtime setting:
redis-di --context site-a get-setting standby_mode redis-di --context site-b get-setting standby_mode -
If site B is in standby, enable it. It waits as a follower while site A holds the lease:
redis-di --context site-b set-setting standby_mode falseIf site A is unreachable, site B takes over after the lease expires.
-
If site A is reachable, put it in standby. Site A releases the lease, and site B takes over within
refreshInterval:redis-di --context site-a set-setting standby_mode true -
If site A was unreachable and you use manual failover, set its
standby_modetotruewhen it becomes reachable.
After the takeover, set standby_mode for the operating mode you want:
| Mode | Site A standby_mode |
Site B standby_mode |
|---|---|---|
| Automatic | false |
false |
| Manual, site A leads | false |
true |
| Manual, site B leads | true |
false |
To restore the previous settings instead, use the values you recorded. Run
redis-di delete-setting standby_mode for a recorded value of <none>. Don't leave every
instance in standby, or no instance runs the pipelines.
To move leadership back to site A, repeat the procedure with the sites exchanged.
Verify a takeover
-
Run
redis-di --context site-a infoandredis-di --context site-b infoon the reachable instances. Confirm that the destination reportsLeader Election Mode: leaderand any reachable former leader reportsLeader Election Mode: follower. -
On the new leader, describe each pipeline that should be running. For a new leader at site B:
redis-di --context site-b describe "<pipeline>"Check its components and errors.
-
Make a test change in the source and confirm that the expected result reaches the target. Leadership alone does not confirm pipeline health or data delivery.
Monitor a DR setup
Scrape the operator at both sites and monitor the pipelines of the leader, as described in Observability. Alert when:
- No instance reports
rdi_operator_is_leaderas1for more than 2 minutes. Check the standby settings, lease access, and RDI database connectivity. - Active-Active replication of the RDI database or the target lags or reports syncer errors.
- An operator logs
ERRORmessages repeatedly over a longer period.
After a takeover, check that the new leader's collector reports Connected and that
MilliSecondsBehindSource decreases.
Upgrade or downgrade a DR setup
Follow the RDI upgrade instructions.
Upgrade the leader first. Check leadership, pipeline health, and data delivery before
upgrading the follower. Finish upgrading both instances before creating a pipeline other
than default.
With a GCS lease, the upgraded leader migrates the lease to a format that versions before 2.2.0 can't read. The follower can take over only after you upgrade it, so upgrade it as soon as you've checked the leader.
Downgrading from RDI 2.0.0 or later to a version earlier than 2.0.0 is not supported. Do not
downgrade after creating a pipeline other than default. A DR setup with a DynamoDB lease
requires RDI 2.2.0 or later.
To downgrade to RDI 2.0.0 with a GCS lease, plan for downtime:
-
Put both instances in standby, and check that neither reports
Leader Election Mode: leader:redis-di --context site-a set-setting standby_mode true redis-di --context site-b set-setting standby_mode true -
Delete the lease object:
gcloud storage rm "gs://<lease-bucket>/<lease-object>" -
Downgrade both instances with Helm. Versions before 2.2.0 use
operator.leaderElection.standbyModeinstead of thestandby_modesetting. The first instance that takes part in leader election recreates the lease in its earlier format. -
Check that only one instance is the leader, and verify pipeline health and data delivery.
The standby_mode settings remain in the RDI database. If you upgrade to 2.2.0 again, run
redis-di delete-setting standby_mode on each instance as soon as it runs 2.2.0, or set the
mode you want.
Uninstall a DR setup
Delete a follower's pipelines with kubectl delete pipelines. The RDI API rejects pipeline
changes on a follower. When you delete pipelines on a follower, RDI keeps their data in the
RDI database for the active instance. When you delete pipelines on the active instance, RDI
removes their components and cleans up their data in the RDI database.
Delete the pipelines before you run helm uninstall. Pipeline resources left behind keep
their finalizers, which stops Kubernetes from deleting the RDI custom resource definitions
(CRDs) and the namespace.
Remove one instance
- If the instance is the leader, follow Move leadership manually to put it in standby and let the other instance take over.
- Check that the other instance reports
Leader Election Mode: leader, its pipelines run without errors, and data reaches the target. - On the instance you want to remove, run the commands in Uninstall RDI. Do not flush the RDI database while another instance uses it.
Remove both instances
- Remove the follower first, as described in Remove one instance.
- On the active instance, run the commands in Uninstall RDI.
- After both instances are removed, optionally remove any remaining data as described in Uninstall RDI.