Prepare Oracle and Oracle RAC for RDI
Prepare Oracle and Oracle RAC databases to work with RDI
Oracle provides two main systems that Debezium can use to capture data changes:
The sections below explain how to configure each system for use with Debezium and RDI. The checklists summarize the steps you should follow to configure each system. You may find it helpful to use them to track your progress as you work through the steps.
LogMiner
{ "$schema": "https://redis.io/schemas/checklist.json", "id": "oraclelogminerlist", "items": [ { "name": "Configure Oracle LogMiner", "position": 1, "url": "#1-configure-oracle-logminer" }, { "name": "Enable supplemental logging", "position": 2, "url": "#supp-logging" }, { "name": "Check the redo log sizing", "position": 3, "url": "#3-check-the-redo-log-sizing" }, { "name": "Set the Archive log destination", "position": 4, "url": "#4-set-the-archive-log-destination" }, { "name": "Create a user for the connector", "position": 5, "url": "#create-dbz-user" } ], "type": "checklist" }- [ ] [Configure Oracle LogMiner](#1-configure-oracle-logminer) - [ ] [Enable supplemental logging](#supp-logging) - [ ] [Check the redo log sizing](#3-check-the-redo-log-sizing) - [ ] [Set the Archive log destination](#4-set-the-archive-log-destination) - [ ] [Create a user for the connector](#create-dbz-user)
XStream
{ "$schema": "https://redis.io/schemas/checklist.json", "id": "oraclexstreamlist", "items": [ { "name": "Configure recovery area", "position": 1, "url": "#1-configure-recovery-area" }, { "name": "Enable GoldenGate replication", "position": 2, "url": "#2-enable-goldengate-replication" }, { "name": "Configure XStream", "position": 3, "url": "#3-configure-xstream" }, { "name": "Enable supplemental logging", "position": 4, "url": "#4-enable-supplemental-logging" }, { "name": "Create XStream users", "position": 5, "url": "#5-create-xstream-users" }, { "name": "Create an XStream outbound server", "position": 6, "url": "#6-create-an-xstream-outbound-server" }, { "name": "Add a custom Docker image for the Debezium server", "position": 7, "url": "#7-add-a-custom-docker-image-for-the-debezium-server" }, { "name": "Make RDI use the custom image", "position": 8, "url": "#8-make-rdi-use-the-custom-image-vm-installation" }, { "name": "Enable the Oracle configuration in RDI", "position": 9, "url": "#9-enable-the-oracle-configuration-in-rdi" } ], "type": "checklist" }- [ ] [Configure recovery area](#1-configure-recovery-area) - [ ] [Enable GoldenGate replication](#2-enable-goldengate-replication) - [ ] [Configure XStream](#3-configure-xstream) - [ ] [Enable supplemental logging](#4-enable-supplemental-logging) - [ ] [Create XStream users](#5-create-xstream-users) - [ ] [Create an XStream outbound server](#6-create-an-xstream-outbound-server) - [ ] [Add a custom Docker image for the Debezium server](#7-add-a-custom-docker-image-for-the-debezium-server) - [ ] [Make RDI use the custom image](#8-make-rdi-use-the-custom-image-vm-installation) - [ ] [Enable the Oracle configuration in RDI](#9-enable-the-oracle-configuration-in-rdi)
Optional: XMLTYPE Support
{ "$schema": "https://redis.io/schemas/checklist.json", "id": "oraclexmltypelist", "items": [ { "name": "Create a custom Debezium Server image", "position": 1, "url": "#create-a-custom-debezium-server-image" }, { "name": "Configure RDI for XMLTYPE support", "position": 2, "url": "#configure-rdi-for-xmltype-support" }, { "name": "Test XMLTYPE support", "position": 3, "url": "#test-xmltype-support" } ], "type": "checklist" }- [ ] [Create a custom Debezium Server image](#create-a-custom-debezium-server-image) - [ ] [Configure RDI for XMLTYPE support](#configure-rdi-for-xmltype-support) - [ ] [Test XMLTYPE support](#test-xmltype-support)
LogMiner
Follow the steps below to configure LogMiner and prepare your database for use with RDI.
1. Configure Oracle LogMiner
The following example shows the configuration for Oracle LogMiner.
sysdba. See the
separate example below to configure Amazon RDS for Oracle.ORACLE_SID=ORACLCDB dbz_oracle sqlplus /nolog
CONNECT sys/top_secret AS SYSDBA
alter system set db_recovery_file_dest_size = 10G;
alter system set db_recovery_file_dest = '/opt/oracle/oradata/recovery_area' scope=spfile;
-- ======================================================================================================================================================
-- !!!IMPORTANT!!!:
-- In order to avoid Oracle downtime, please check if the LOG_MODE on your database is already set to `ARCHIVELOG` before executing the following commands:
-- SELECT log_mode FROM v$database;
-- If the LOG_MODE is already `ARCHIVELOG`, then you can skip the rest of the commands in this script
-- ======================================================================================================================================================
shutdown immediate
startup mount
alter database archivelog;
alter database open;
-- You should now see "Database log mode: Archive Mode"
archive log list
exit;
Configure Amazon RDS for Oracle
AWS provides its own set of commands to configure LogMiner.
Check that Oracle has backups enabled with the following command:
SQL> SELECT LOG_MODE FROM V$DATABASE;

LOG_MODE
------------
ARCHIVELOG
The LOG_MODE should be set to ARCHIVELOG. If it isn't then you
should reboot your Oracle AWS RDS instance.
Once LOG_MODE is correctly set to ARCHIVELOG, execute the following
commands to complete the LogMiner configuration. The first command enables
archive logging and the second adds supplemental logging.
exec rdsadmin.rdsadmin_util.set_configuration('archivelog retention hours',24);
exec rdsadmin.rdsadmin_util.alter_supplemental_logging('ADD');
2. Enable supplemental logging
You must enable supplemental logging for the tables you want to capture or for the entire database. This lets Debezium capture the state of database rows before and after changes occur.
The following example shows how to configure supplemental logging for all columns
in a single table called inventory.customers:
ALTER TABLE inventory.customers ADD SUPPLEMENTAL LOG DATA (ALL) COLUMNS;
You must also enable minimal supplemental logging at the database level with the following command:
ALTER DATABASE ADD SUPPLEMENTAL LOG DATA;
3. Check the redo log sizing
Before you use the Debezium connector, you should check with your database administrator that there are enough redo logs with enough capacity to store the data dictionary for your database. In general, the size of the data dictionary increases with the number of tables and columns in the database. If you don't have enough capacity in the logs then you might see performance problems with both the database and the Debezium connector.
4. Set the Archive log destination
You can configure up to 31 different destinations for archive logs
(you must have administrator privileges to do this). You can set parameters for
each destination to specify its purpose, such as log shipping for physical
standbys, or external storage to allow for extended log retention. Oracle reports
details about archive log destinations in the V$ARCHIVE_DEST_STATUS view.
The Debezium Oracle connector only uses destinations that have a status of
VALID and a type of LOCAL. If you only have one destination with these
settings then Debezium will use it automatically.
If you have more than one destination with these settings,
then you should consult your database administrator about which one to
choose for Debezium.
Use the log.mining.archive.destination.name property in the connector configuration
to select the archive log destination for Debezium.
For example, suppose you have two archive destinations, LOG_ARCHIVE_DEST_2 and
LOG_ARCHIVE_DEST_3, and they both have status set to VALID and type set to
LOCAL. Debezium could use either of these destinations, so you must select one
of them explicitly in the configuration. To select LOG_ARCHIVE_DEST_3, you would
use the following setting:
{
    "log.mining.archive.destination.name": "LOG_ARCHIVE_DEST_3"
}
5. Create a user for the connector
The Debezium Oracle connector must run as an Oracle LogMiner user with specific permissions.
Typically, when you create the Oracle account for the connector, you grant the account a level of access that permits the connector to detect changes from all tables in the database. However, in some environments, security policies might prohibit you from granting such a broad level of access.
The following example shows some SQL that creates an Oracle user account for the connector in a multi-tenant database model. The grant settings in the example permit the Debezium user to access all user tables in the database.
To comply with security policies, you can modify the SELECT ANY TABLE and FLASHBACK ANY TABLE grants
so that the connector can access only those tables that you intend to capture.
Do not modify other grants, such as the SELECT ANY TRANSACTION grant,
or the set of SELECT ON V_$ grants, which provide access to dynamic performance views (V_$).
These grants are required for the connector to function.
ORCLCDB as the container database (CDB) name and ORCLPDB1 as the pluggable database (PDB) name. Replace these with the CDB and PDB names from your own environment.sqlplus sys/top_secret@//localhost:1521/ORCLCDB as sysdba
CREATE TABLESPACE logminer_tbs DATAFILE '/opt/oracle/oradata/ORCLCDB/logminer_tbs.dbf'
SIZE 25M REUSE AUTOEXTEND ON MAXSIZE UNLIMITED;
exit;
sqlplus sys/top_secret@//localhost:1521/ORCLPDB1 as sysdba
CREATE TABLESPACE logminer_tbs DATAFILE '/opt/oracle/oradata/ORCLCDB/ORCLPDB1/logminer_tbs.dbf'
SIZE 25M REUSE AUTOEXTEND ON MAXSIZE UNLIMITED;
exit;
sqlplus sys/top_secret@//localhost:1521/ORCLCDB as sysdba
CREATE USER c##dbzuser IDENTIFIED BY dbz
DEFAULT TABLESPACE logminer_tbs
QUOTA UNLIMITED ON logminer_tbs
CONTAINER=ALL;
GRANT CREATE SESSION TO c##dbzuser CONTAINER=ALL;
GRANT SET CONTAINER TO c##dbzuser CONTAINER=ALL;
GRANT SELECT ON V_$DATABASE to c##dbzuser CONTAINER=ALL;
-- See `Limiting privileges` below if the privileges
-- granted by these two commands raise security concerns.
GRANT FLASHBACK ANY TABLE TO c##dbzuser CONTAINER=ALL;
GRANT SELECT ANY TABLE TO c##dbzuser CONTAINER=ALL;
--
GRANT SELECT_CATALOG_ROLE TO c##dbzuser CONTAINER=ALL;
GRANT EXECUTE_CATALOG_ROLE TO c##dbzuser CONTAINER=ALL;
GRANT SELECT ANY TRANSACTION TO c##dbzuser CONTAINER=ALL;
GRANT LOGMINING TO c##dbzuser CONTAINER=ALL;
-- See `Limiting privileges` below if the privileges
-- granted by these two commands raise security concerns.
GRANT CREATE TABLE TO c##dbzuser CONTAINER=ALL;
GRANT LOCK ANY TABLE TO c##dbzuser CONTAINER=ALL;
--
GRANT CREATE SEQUENCE TO c##dbzuser CONTAINER=ALL;
GRANT EXECUTE ON DBMS_LOGMNR TO c##dbzuser CONTAINER=ALL;
GRANT EXECUTE ON DBMS_LOGMNR_D TO c##dbzuser CONTAINER=ALL;
GRANT SELECT ON V_$LOG TO c##dbzuser CONTAINER=ALL;
GRANT SELECT ON V_$LOG_HISTORY TO c##dbzuser CONTAINER=ALL;
GRANT SELECT ON V_$LOGMNR_LOGS TO c##dbzuser CONTAINER=ALL;
GRANT SELECT ON V_$LOGMNR_CONTENTS TO c##dbzuser CONTAINER=ALL;
GRANT SELECT ON V_$LOGMNR_PARAMETERS TO c##dbzuser CONTAINER=ALL;
GRANT SELECT ON V_$LOGFILE TO c##dbzuser CONTAINER=ALL;
GRANT SELECT ON V_$ARCHIVED_LOG TO c##dbzuser CONTAINER=ALL;
GRANT SELECT ON V_$ARCHIVE_DEST_STATUS TO c##dbzuser CONTAINER=ALL;
GRANT SELECT ON V_$TRANSACTION TO c##dbzuser CONTAINER=ALL;
GRANT SELECT ON V_$MYSTAT TO c##dbzuser CONTAINER=ALL;
GRANT SELECT ON V_$STATNAME TO c##dbzuser CONTAINER=ALL;
exit;
| Role name | Description |
|---|---|
| CREATE SESSION | Enables the connector to connect to Oracle. |
| SET CONTAINER | Enables the connector to switch between pluggable databases. This is only required when the Oracle installation has container database support (CDB) enabled. |
| SELECT ON V_$DATABASE | Enables the connector to read the V_$DATABASE table. |
| FLASHBACK ANY TABLE | Enables the connector to perform Flashback queries, which is how the connector performs the initial snapshot of data. Optionally, rather than granting FLASHBACK permission on all tables, you can grant the FLASHBACK privilege for specific tables only. |
| SELECT ANY TABLE | Enables the connector to read any table. Optionally, rather than granting SELECT permission on all tables, you can grant the SELECT privilege for specific tables only. |
| SELECT_CATALOG_ROLE | Enables the connector to read the data dictionary, which is needed by Oracle LogMiner sessions. |
| EXECUTE_CATALOG_ROLE | Enables the connector to write the data dictionary into the Oracle redo logs, which is needed to track schema changes. |
| SELECT ANY TRANSACTION | Enables the snapshot process to perform a Flashback snapshot query against any transaction so that the connector can read past changes from LogMiner. When FLASHBACK ANY TABLE is granted, this should also be granted. This grant is optional for Oracle 19c and later. In those later releases, the connector obtains the required privileges through the EXECUTE_CATALOG_ROLE and LOGMINING grants. |
| LOGMINING | This role was added in newer versions of Oracle as a way to grant full access to Oracle LogMiner and its packages. On older versions of Oracle that don’t have this role, you can ignore this grant. |
| CREATE TABLE | Enables the connector to create its flush table in its default tablespace. The flush table allows the connector to explicitly control flushing of the LGWR internal buffers to disk. |
| LOCK ANY TABLE | Enables the connector to lock tables during schema snapshot. If snapshot locks are explicitly disabled via configuration, this grant can be safely ignored. |
| CREATE SEQUENCE | Enables the connector to create a sequence in its default tablespace. |
| EXECUTE ON DBMS_LOGMNR | Enables the connector to run methods in the DBMS_LOGMNR package. This is required to interact with Oracle LogMiner. On newer versions of Oracle this is granted via the LOGMINING role but on older versions, this must be explicitly granted. |
| EXECUTE ON DBMS_LOGMNR_D | Enables the connector to run methods in the DBMS_LOGMNR_D package. This is required to interact with Oracle LogMiner. On newer versions of Oracle this is granted via the LOGMINING role but on older versions, this must be explicitly granted. |
| SELECT ON V_$…. | Enables the connector to read these tables. The connector must be able to read information about the Oracle redo and archive logs, and the current transaction state, to prepare the Oracle LogMiner session. Without these grants, the connector cannot operate. |
Limiting privileges
The privileges granted in the example above are convenient, but you may prefer to restrict them further to improve security. In particular, you might want to prevent the Debezium user from creating tables, or selecting or locking any table.
The Debezium user needs the CREATE TABLE privilege to create the
LOG_MINING_FLUSH table when it connects for the first
time. After this point, it doesn't need to create any more tables,
so you can safely revoke this privilege with the following command:
REVOKE CREATE TABLE FROM c##dbzuser container=all;
The example above grants the SELECT ANY TABLE and
FLASHBACK ANY TABLE privileges for convenience, but only the tables synced to RDI
and the V_$XXX tables strictly need these privileges.
You can replace the GRANT SELECT ANY TABLE command with explicit
commands for each table. For example, you would use commands like the
following for the tables in our sample
chinook
database. (Note that Oracle 19c requires you to run a separate GRANT
command for each table individually.)
GRANT SELECT ON chinook.album TO c##dbzuser;
GRANT SELECT ON chinook.artist TO c##dbzuser;
GRANT SELECT ON chinook.customer TO c##dbzuser;
...
Similarly, instead of GRANT FLASHBACK ANY TABLE, you would use the following
commands:
GRANT FLASHBACK ON chinook.album TO c##dbzuser;
GRANT FLASHBACK ON chinook.artist TO c##dbzuser;
GRANT FLASHBACK ON chinook.customer TO c##dbzuser;
...
The LOCK privilege is automatically granted by the SELECT
privilege, so you can omit this command if you have granted SELECT
on specific tables.
Revoking existing privileges
If you initially set the Debezium user's privileges on all tables, but you now want to restrict them, you can revoke the existing privileges before resetting them as described in the Limiting privileges section.
Use the following commands to revoke and reset the SELECT privileges:
REVOKE SELECT ANY TABLE FROM c##dbzuser container=all;
ALTER SESSION SET container=orclpdb1;

GRANT SELECT ON chinook.album TO c##dbzuser;
-- ...etc
The equivalent commands for FLASHBACK are:
REVOKE FLASHBACK ANY TABLE FROM c##dbzuser container=all;
ALTER SESSION SET container=orclpdb1;
GRANT FLASHBACK ON chinook.album TO c##dbzuser;
The SELECT privilege automatically includes the LOCK
privilege, so when you grant SELECT for specific tables
you should also revoke LOCK on all tables:
REVOKE LOCK ANY TABLE FROM c##dbzuser container=all;
6. Configuration is complete
Once you have followed the steps above, your Oracle database is ready for Debezium to use.
XStream
XStream is a set of database components and APIs to communicate change data to and from an Oracle database. RDI specifically uses XStream Out to capture changes.
Follow the steps in the sections below to configure XStream to work with Debezium and RDI.
sysdba user.sqlplus sys/<PASSWORD> as sysdba
1. Configure recovery area
Create a directory for the recovery area on the Oracle host (or Oracle container if you are using a containerized Oracle).
For single-instance (non-RAC) deployments on local disk, you can use:
mkdir -p /opt/oracle/oradata/recovery_area
ALTER SYSTEM SET db_recovery_file_dest_size = 10G; -- Adjust size as needed
ALTER SYSTEM SET db_recovery_file_dest = '/opt/oracle/oradata/recovery_area' SCOPE=BOTH;
2. Enable GoldenGate replication
Check if enable_goldengate_replication is already set to true:
For a CDB, check the parameter in the root container:
SELECT VALUE FROM V$PARAMETER WHERE NAME = 'enable_goldengate_replication';
If it is not set to true, you need to set it and restart the database:
ALTER SYSTEM SET enable_goldengate_replication=true SCOPE=BOTH CONTAINER=ALL;
3. Configure XStream
Use the following SQL commands to configure XStream (using the
chinook
schema as an example):
-- ======================================================================================================================================================
-- !!!IMPORTANT!!!:
-- In order to avoid Oracle downtime, please check if the LOG_MODE on your database is already set to `ARCHIVELOG` before executing the following commands:
-- SELECT log_mode FROM v$database;
-- If the LOG_MODE is already `ARCHIVELOG`, then you can skip the rest of the commands in this script
-- ======================================================================================================================================================
SQL> shutdown immediate
Database closed.
Database dismounted.
ORACLE instance shut down.
SQL> startup mount
ORACLE instance started.

Total System Global Area 1476391776 bytes
Fixed Size     9134944 bytes
Variable Size 1006632960 bytes
Database Buffers   452984832 bytes
Redo Buffers     7639040 bytes
Database mounted.
SQL> alter database archivelog;
SQL> alter database open;
SQL> archive log list
Database log mode       Archive Mode
Automatic archival       Enabled
Archive destination       USE_DB_RECOVERY_FILE_DEST
Oldest online log sequence     10
Next log sequence to archive   12
Current log sequence       12

-- Confirm the database is in ARCHIVELOG mode.
SQL> SELECT LOG_MODE FROM V$DATABASE;
4. Enable supplemental logging
Enable supplemental logging for the tables you want to capture or for the entire database. This lets Debezium capture the state of database rows before and after changes occur.
SQL> ALTER DATABASE ADD SUPPLEMENTAL LOG DATA;

SQL> alter session set container=orclpdb1;

SQL> ALTER TABLE CHINOOK.ALBUM ADD SUPPLEMENTAL LOG DATA (ALL) COLUMNS;
SQL> ALTER TABLE CHINOOK.ARTIST ADD SUPPLEMENTAL LOG DATA (ALL) COLUMNS;
SQL> ALTER TABLE CHINOOK.CUSTOMER ADD SUPPLEMENTAL LOG DATA (ALL) COLUMNS;
SQL> ALTER TABLE CHINOOK.EMPLOYEE ADD SUPPLEMENTAL LOG DATA (ALL) COLUMNS;
SQL> ALTER TABLE CHINOOK.GENRE ADD SUPPLEMENTAL LOG DATA (ALL) COLUMNS;
SQL> ALTER TABLE CHINOOK.INVOICE ADD SUPPLEMENTAL LOG DATA (ALL) COLUMNS;
SQL> ALTER TABLE CHINOOK.INVOICELINE ADD SUPPLEMENTAL LOG DATA (ALL) COLUMNS;
SQL> ALTER TABLE CHINOOK.MEDIATYPE ADD SUPPLEMENTAL LOG DATA (ALL) COLUMNS;
SQL> ALTER TABLE CHINOOK.PLAYLIST ADD SUPPLEMENTAL LOG DATA (ALL) COLUMNS;
SQL> ALTER TABLE CHINOOK.PLAYLISTTRACK ADD SUPPLEMENTAL LOG DATA (ALL) COLUMNS;
SQL> ALTER TABLE CHINOOK.TRACK ADD SUPPLEMENTAL LOG DATA (ALL) COLUMNS;
orclpdb1 as the PDB name. Replace it with the name of the pluggable database (PDB) that you use in your own environment.5. Create XStream users
ORCLCDB as the CDB name and ORCLPDB1/orclpdb1 as the PDB name in file paths and ALTER SESSION SET CONTAINER commands. Replace these with the CDB and PDB names from your own Oracle deployment.Create an XStream administrator user with the following SQL:
sqlplus sys/<PASSWORD> as sysdba

SQL> ALTER SESSION SET CONTAINER=CDB$ROOT;
SQL> CREATE TABLESPACE xstream_adm_tbs DATAFILE '/opt/oracle/oradata/ORCLCDB/xstream_adm_tbs.dbf'
    SIZE 25M REUSE AUTOEXTEND ON MAXSIZE UNLIMITED;

SQL> alter session set container=orclpdb1;

SQL> CREATE TABLESPACE xstream_adm_tbs DATAFILE '/opt/oracle/oradata/ORCLCDB/ORCLPDB1/xstream_adm_tbs.dbf'
    SIZE 25M REUSE AUTOEXTEND ON MAXSIZE UNLIMITED;

SQL> alter session set container=cdb$root;

SQL> CREATE USER c##dbzadmin IDENTIFIED BY dbz
    DEFAULT TABLESPACE xstream_adm_tbs
    QUOTA UNLIMITED ON xstream_adm_tbs
    CONTAINER=ALL;

SQL> GRANT CREATE SESSION, SET CONTAINER TO c##dbzadmin CONTAINER=ALL;

SQL> BEGIN
     DBMS_XSTREAM_AUTH.GRANT_ADMIN_PRIVILEGE(
        grantee                 => 'c##dbzadmin',
        privilege_type          => 'CAPTURE',
        grant_select_privileges => TRUE,
        container               => 'ALL'
     );
  END;
  /
Then, create the XStream user:
sqlplus sys/<PASSWORD> as sysdba

SQL> CREATE TABLESPACE xstream_tbs DATAFILE '/opt/oracle/oradata/ORCLCDB/xstream_tbs.dbf'
    SIZE 25M REUSE AUTOEXTEND ON MAXSIZE UNLIMITED;

SQL> alter session set container=orclpdb1;

SQL> CREATE TABLESPACE xstream_tbs DATAFILE '/opt/oracle/oradata/ORCLCDB/ORCLPDB1/xstream_tbs.dbf'
    SIZE 25M REUSE AUTOEXTEND ON MAXSIZE UNLIMITED;

SQL> alter session set container=cdb$root;

SQL> CREATE USER c##dbzxsuser IDENTIFIED BY dbz
    DEFAULT TABLESPACE xstream_tbs
    QUOTA UNLIMITED ON xstream_tbs
    CONTAINER=ALL;

SQL> GRANT CREATE SESSION TO c##dbzxsuser CONTAINER=ALL;
SQL> GRANT SET CONTAINER TO c##dbzxsuser CONTAINER=ALL;
SQL> GRANT SELECT ON V_$DATABASE to c##dbzxsuser CONTAINER=ALL;
SQL> GRANT FLASHBACK ANY TABLE TO c##dbzxsuser CONTAINER=ALL;
SQL> GRANT SELECT_CATALOG_ROLE TO c##dbzxsuser CONTAINER=ALL;
SQL> GRANT EXECUTE_CATALOG_ROLE TO c##dbzxsuser CONTAINER=ALL;
SQL> GRANT SELECT ANY TABLE TO c##dbzxsuser CONTAINER=ALL;
SQL> GRANT LOCK ANY TABLE TO c##dbzxsuser CONTAINER=ALL;
If you are using the Debezium XStream documentation, you should note that it misses out the last two GRANT statements shown above:
GRANT SELECT ANY TABLE TO c##dbzxsuser CONTAINER=ALL;
GRANT LOCK ANY TABLE TO c##dbzxsuser CONTAINER=ALL;
However, without these, no tables can be read by Debezium, so neither the initial snapshot nor any subsequent updates will produce any data.
6. Create an XStream outbound server
Create the outbound server with the following SQL.
ORCLCDB is the CDB service name and orclpdb1 is the PDB name. Replace them with the appropriate service and PDB names for your own environment.Note that you must connect as the c##dbzadmin user created in the previous step,
not the sys user:
sqlplus c##dbzadmin/dbz@localhost:1521/ORCLCDB
-- =====================================================
-- Create XStream Outbound Server
-- =====================================================
-- This script creates the XStream outbound server for CDC
-- Run as: sqlplus c##dbzadmin/dbz@localhost:1521/ORCLCDB
-- =====================================================

-- Step 1: Create XStream Outbound Server
DECLARE
  tables  DBMS_UTILITY.UNCL_ARRAY;
  schemas DBMS_UTILITY.UNCL_ARRAY;
BEGIN
  tables(1)  := NULL;
  schemas(1) := 'C##DBZUSER';

  DBMS_XSTREAM_ADM.CREATE_OUTBOUND(
    server_name           => 'dbzxout',
    source_container_name => 'XEPDB1',
    table_names           => tables,
    schema_names          => schemas
  );
END;
/

-- Step 2: Configure XStream User to connect to outbound server
-- This must be run as sys user
CONNECT sys/oracle AS SYSDBA

BEGIN
  DBMS_XSTREAM_ADM.ALTER_OUTBOUND(
    server_name  => 'dbzxout',
    connect_user => 'c##dbzxsuser'
  );
END;
/

-- Verification: Check outbound server was created
SELECT server_name, source_database, capture_name, capture_user, connect_user, queue_owner, queue_name
FROM dba_xstream_outbound;

-- Verification: Check capture process
SELECT capture_name, status, capture_type, source_database
FROM dba_capture;

PROMPT
PROMPT =====================================================
PROMPT XStream Outbound Server Created Successfully!
PROMPT =====================================================
PROMPT Server name: dbzxout
PROMPT Schema: C##DBZUSER
PROMPT PDB: XEPDB1
PROMPT =====================================================
7. Add a custom Docker image for the Debezium server
To support XStream connector, you must create a custom Docker image that includes the required Instant Client package libraries for Linux x64 from the Oracle website.
-
On the Docker machine, download the Instant Client package for Linux x64 from the Oracle website
wget https://download.oracle.com/otn_software/linux/instantclient/2380000/instantclient-basic-linux.x64-23.8.0.25.04.zip -
Unzip it to the
./dbz-oradirectory:unzip instantclient-basic-linux.x64-23.8.0.25.04.zip -d ./dbz-ora -
Create a
Dockerfilein the./dbz-oradirectory with the following contents:FROM debezium/server:3.0.8.Final USER root RUN microdnf -y install libaio \ && microdnf clean all \ && mkdir -p /opt/oracle/instant_client \ && rm -f /debezium/lib/ojdbc11*.jar COPY instantclient_23_8/* /opt/oracle/instant_client USER jboss COPY instantclient_23_8/xstreams.jar /debezium/lib COPY instantclient_23_8/ojdbc11.jar /debezium/lib ENV LD_LIBRARY_PATH=/opt/oracle/instant_client -
Create the custom image:
docker build -t dbz-ora dbz-ora -
Add the image to the K3s image registry using the following commands:
docker tag dbz-ora quay.io/debezium/server:3.0.8.Final
docker image save quay.io/debezium/server:3.0.8.Final -o dbz3.0.8-xstream-linux-amd.tar
sudo k3s ctr images import dbz3.0.8-xstream-linux-amd.tar all
8. Make RDI use the custom image (VM installation)
Edit the rdi-operator configmap:
kubectl edit configmap rdi-operator -n rdi
In the editor, find the collector section and change the image settings:
      collector:
        image:
          pullPolicy: IfNotPresent
          registry: docker.io # change this to `quay.io`
          repository: redislabs/debezium-server # Change this to `debezium/server`
          tag: 3.0.8.Final-rdi.1 # Change this to `3.0.8.Final`
Save the configmap. Once it is saved, the operator will restart automatically and will apply the changes.
9. Enable the Oracle configuration in RDI
Finally, you must update your config.yaml file to enable XStream.
The example below shows the relevant parts of the sources section:
sources:
  oracle:
    type: cdc
    logging:
      level: info
    connection:
      type: oracle
      host: host.docker.internal
      port: 1521
      user: ${SOURCE_DB_USERNAME}
      password: ${SOURCE_DB_PASSWORD}
    advanced:
      source:
        database.dbname: ORCLCDB
        database.pdb.name: ORCLPDB1
        database.connection.adapter: xstream
        database.out.server.name: dbzxout
ORCLCDB and ORCLPDB1 in the example above are sample CDB and PDB names. Set database.dbname and database.pdb.name to the CDB and PDB names for your own Oracle database.See the
Debezium Oracle documentation
for a full list of properties you can use in the advanced.source subsection.
10. Configuration is complete
After you have followed the steps above, your Oracle database is ready for Debezium to use.
Support for Oracle XMLTYPE columns (optional)
If your Oracle database contains tables with columns of type
XMLTYPE,
you must configure additional libraries for Debezium Server to process these columns correctly.
Create a custom Debezium Server image
To support XMLTYPE columns, you must create a custom Docker image
that includes the required Oracle XML libraries.
-
Download the required libraries from Maven Central:
mkdir xml cd xml wget https://repo.maven.apache.org/maven2/com/oracle/database/xml/xdb/19.27.0.0/xdb-19.27.0.0.jar wget https://repo.maven.apache.org/maven2/com/oracle/database/xml/xmlparserv2/19.27.0.0/xmlparserv2-19.27.0.0.jar mv xdb-19.27.0.0.jar xdb.jar mv xmlparserv2-19.27.0.0.jar xmlparserv2.jar -
Create a
Dockerfilein the same directory:FROM quay.io/debezium/server:3.0.8.Final USER root COPY xdb.jar /debezium/lib COPY xmlparserv2.jar /debezium/lib -
Build the custom image:
cd .. docker build -t dbz-xml xml docker tag dbz-xml quay.io/debezium/server:3.0.8.Final docker image save quay.io/debezium/server:3.0.8.Final -o dbz3.0.8-xml-linux-amd.tar -
Add the image to your K3s image repository:
sudo k3s ctr images import dbz3.0.8-xml-linux-amd.tar all
Configure RDI for XMLTYPE support
In your RDI configuration file, set the lob.enabled property to true in the
advanced.source section:
sources:
  oracle:
    type: cdc
    logging:
      level: info
    connection:
      type: oracle
      host: oracle
      port: 1521
      user: ${SOURCE_DB_USERNAME}
      password: ${SOURCE_DB_PASSWORD}
      database: ORCLCDB
    advanced:
      source:
        database.pdb.name: ORCLPDB1
        lob.enabled: true
ORCLCDB as the CDB name and ORCLPDB1 as the PDB name. Replace these with your actual CDB and PDB names when configuring XMLTYPE support.Test XMLTYPE support
You can create a test table to verify that XMLTYPE columns work correctly
(using the
CHINOOK
schema as an example):
CREATE TABLE tab1 (
  xmlid INT NOT NULL,
  col1  SYS.XMLTYPE,
  CONSTRAINT PK_tab1 PRIMARY KEY (xmlid)
);

DECLARE
  v_xml   SYS.XMLTYPE;
  v_doc   CLOB;
BEGIN
  -- XMLTYPE created from a CLOB
  v_doc := '<?xml version="1.0"?>' || Chr(10) || ' <TABLE_NAME>MY_TABLE</TABLE_NAME>';
  v_xml := SYS.XMLTYPE.createXML(v_doc);

  INSERT INTO tab1 (xmlid, col1) VALUES (1, v_xml);

  -- XMLTYPE created from a query
  SELECT SYS_XMLGEN(table_name)
  INTO   v_xml
  FROM   user_tables
  WHERE  rownum = 1;

  INSERT INTO tab1 (xmlid, col1) VALUES (2, v_xml);

  COMMIT;
END;
/

ALTER TABLE CHINOOK.TAB1 ADD SUPPLEMENTAL LOG DATA (ALL) COLUMNS;
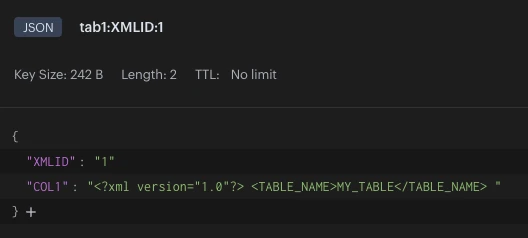
After you run an initial snapshot, the XML data appears in your Redis target database:
FAQ
How does CDB differ from Non-CDB?
CDB (Container Database – multitenant)
- Root container
CDB$ROOTplus one or more pluggable databases (PDBs). - Common users (for example
C##DBZADMIN,C##DBZXSUSER) exist across all containers. - Application data lives in PDBs.
- Many XStream-related operations use
CONTAINER=ALLandALTER SESSION SET CONTAINER.
Non-CDB (traditional)
- Single database, no containers.
- Users are regular database users without the
C##prefix (for exampleDBZADMIN,DBZXSUSER). - Application data lives directly in that single database.
- No
CONTAINER=ALLorALTER SESSION SET CONTAINERclauses are required.
From an RDI/Debezium point of view, both models are supported; the main differences are in the user names you create and whether you need container-related clauses in the SQL.
How does single-instance differ from RAC?
Single-instance
- One Oracle instance running on one server.
- You run the LogMiner/XStream setup scripts once.
- All configuration (users, tablespaces, outbound server, logging) is stored in that database instance.
RAC (Real Application Clusters)
- Multiple instances (nodes) share the same database and storage.
- You still run the XStream setup only once on any one node.
- All nodes share the same:
- Database files
- Archive logs
- XStream outbound server
- Capture process
Important RAC points:
- Archive log mode is enabled at the database level and applies to all nodes.
- Tablespaces you create are in shared storage and visible from all nodes.
- Users you create exist in the shared database and can connect through any node.
- Debezium/RDI can connect to any RAC node or to a SCAN address; it does not need a specific node.
In RAC setups, do you need to execute steps on all nodes?
No. The XStream configuration is database-level, so you execute the setup once on any node:
- Enable archive log mode: once (affects the whole database).
- Create XStream tablespaces: once (on shared storage).
- Create XStream users: once (in the shared database).
- Create the XStream outbound server: once (visible from all nodes).
- Enable supplemental logging: once (database-wide).
You may run client connection tests from multiple nodes, but the actual administrative steps only need to be executed once.
Why are two XStream tablespaces required?
XStream is not just reading your tables - it's storing its own data:
Customer's existing tablespace:
    graph TB
    USERS["<b>USERS</b><br/><br/>- CUSTOMERS table<br/>- ORDERS table<br/>- PRODUCTS table<br/>- TRANSACTIONS table<br/><br/>(Application data)"]
XStream tablespaces:
    graph TB
    ADM["<b>XSTREAM_ADM_TBS</b><br/><br/>- Capture process metadata<br/>- Outbound server config<br/>- Checkpoint information<br/>- Position tracking"]
    USER_TS["<b>XSTREAM_TBS</b><br/><br/>- LCR Queue change records<br/>- Buffered changes<br/>- Transaction state"]
Real Example: What Gets Stored Where
Scenario: Customer has CUSTOMERS table
Customer's existing tablespace (USERS):
-- Application data
SELECT * FROM MY_APP.CUSTOMERS;
-- Returns: customer_id, name, address, balance, etc.
XStream tablespaces (NEW):
-- XStream metadata (in XSTREAM_ADM_TBS)
SELECT capture_name, status, start_scn, checkpoint_scn
FROM dba_capture;
-- Returns: dbzxout_capture, ENABLED, 12345678, 12345690

-- XStream queue (in XSTREAM_TBS)
SELECT queue_name, enqueue_time, dequeue_time, state
FROM dba_queues;
-- Returns: dbzxout_queue, <timestamp>, <timestamp>, READY
Size Comparison
Customer's Application Tablespaces:
-- Typical size: Large
SELECT tablespace_name,
       ROUND(SUM(bytes)/1024/1024/1024, 2) AS size_gb
FROM dba_data_files
WHERE tablespace_name = 'USERS'
GROUP BY tablespace_name;

-- Result: 50 GB, 100 GB, 500 GB, etc.
XStream Tablespaces:
-- Typical size: Small
SELECT tablespace_name,
       ROUND(SUM(bytes)/1024/1024, 2) AS size_mb
FROM dba_data_files
WHERE tablespace_name IN ('XSTREAM_ADM_TBS', 'XSTREAM_TBS')
GROUP BY tablespace_name;

-- Result:
-- XSTREAM_ADM_TBS: 100-500 MB
-- XSTREAM_TBS: 500 MB - 2 GB (depends on queue size)
General Recommendations
This guide uses two separate tablespaces:
xstream_adm_tbs– XStream administrator tablespace.xstream_tbs– XStream user (connect) tablespace.
They serve different purposes and follow the principle of least privilege.
1. Separation of concerns and security
-
Administrator tablespace (
xstream_adm_tbs)- Used by the XStream admin user (for example
C##DBZADMINorDBZADMIN). - Stores XStream metadata and control structures:
- Capture process metadata
- Outbound server configuration
- Queue tables and queues
- Other XStream internal objects
- Belongs to a highly privileged user that can create and manage XStream objects.
- Used by the XStream admin user (for example
-
User tablespace (
xstream_tbs)- Used by the XStream connect user (for example
C##DBZXSUSERorDBZXSUSER). - Lower-privileged account used by Debezium/RDI to read changes.
- Keeps operational data and temporary objects separate from admin metadata.
- Used by the XStream connect user (for example
2. Resource management
Having two tablespaces lets you:
- Monitor space usage separately for admin vs user workloads.
- Allow for different growth patterns (admin metadata typically grows more slowly).
- Apply separate quotas per user/tablespace.
- Tune storage parameters differently for each tablespace if needed.
3. Operational benefits
- Backup and recovery:
- You can back up or restore admin and user data independently.
- Critical XStream metadata is isolated in its own tablespace.
- Maintenance and troubleshooting:
- You can perform maintenance on one tablespace without affecting the other.
- Easier to diagnose which part of the XStream setup is consuming space.
- Security and auditing:
- Clear separation of administrative vs operational data.
- Easier to audit which users access which objects.
4. Can you use a single tablespace?
Technically you could place both users in a single tablespace, but this is not recommended for production:
- It weakens separation of duties and least-privilege design.
- It makes monitoring and capacity planning harder.
- It mixes admin metadata and application-facing data in one place.
Oracle and Debezium best practices recommend separating admin and user workloads into different tablespaces.
What is the XStream outbound server?
The XStream outbound server is the component that streams database changes out of Oracle in a supported way. It:
- Captures committed changes (INSERT, UPDATE, DELETE) from redo logs.
- Converts them into logical change records (LCRs).
- Exposes an API that external consumers such as Debezium/RDI use.
High-level architecture
    graph LR
    RedoLogs["<b>Redo Logs</b>"]
    Capture["<b>Capture Process</b>"]
    Queue["<b>Queue</b>"]
    Outbound["<b>XStream Outbound<br/>Server</b>"]
    Consumer["<b>Debezium/RDI</b>"]

    RedoLogs --> Capture
    Capture --> Queue
    Queue --> Outbound
    Outbound --> Consumer
Key components
- Redo logs: Contain the physical change records for the database.
- Capture process: Mines redo logs and turns them into logical change records.
- Queue: Temporarily stores captured changes.
- XStream outbound server (for example
DBZXOUT):- Provides the streaming interface for consumers.
- Applies filters (schemas/tables) configured when you create it.
- Connect user (for example
C##DBZXSUSERorDBZXSUSER):- The user Debezium/RDI connects as.
- Reads changes from the outbound server.
Why it is needed
Without an XStream outbound server:
- There is no supported, structured API for consuming change events.
- You would have to parse redo logs directly, which is complex and unsupported.
- You lose built-in filtering, transaction grouping, and restart/resume semantics.
With an XStream outbound server:
- Changes are available in near real time.
- You can capture only selected schemas/tables.
- Debezium/RDI uses Oracle’s supported XStream API.
- Transactions are preserved and grouped correctly.
- Offsets/positions allow clean resume after restarts.
- Multiple consumers can be attached to the same outbound server if needed.