Quickstart
Get started with a simple pipeline example
In this tutorial you will learn how to install RDI and set up a pipeline to ingest live data from a PostgreSQL database into a Redis database.
Prerequisites
- A Redis Enterprise database that will serve as the pipeline target. The dataset that will be ingested is quite small in size, so a single shard database should be enough. RDI also needs to maintain its own database on the cluster to store state information. This requires Redis Enterprise v6.4 or greater.
- Redis Insight to edit your pipeline
- A virtual machine (VM) with one of the following operating systems:
- RHEL 8 or 9
- Ubuntu 20.04, 22.04, or 24.04
Overview
The following diagram shows the structure of the pipeline we will create (see the architecture overview to learn how the pipeline works):
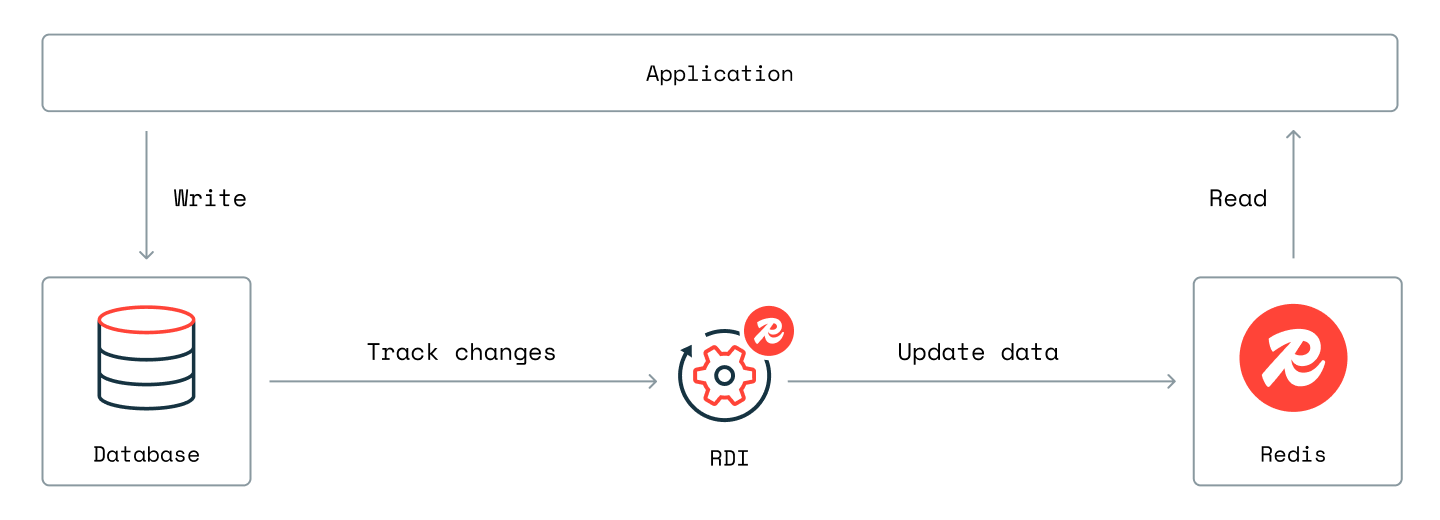
Here, the RDI collector tracks changes in PostgreSQL and writes them to streams in the RDI database in Redis. The stream processor then reads data records from the RDI database streams, processes them, and writes them to the target.
Install PostgreSQL
We provide a Docker image for an example PostgreSQL
database that we will use for the tutorial. Follow the
instructions on our Github page
to download the image and start serving the database. The database, which is
called chinook, has the schema and data for an imaginary online music store
and is already set up for the RDI collector to use.
Install RDI
Install RDI using the instructions in the VM installation guide.
RDI will create the pipeline template for your chosen source database type at
/opt/rdi/config. You will need this pathname later when you prepare the pipeline for deployment
(see Prepare the pipeline below).
At the end of the installation, RDI CLI will prompt you to set the access secrets for both the source PostgreSQL database and the target Redis database. RDI needs these to run the pipeline.
Use the Redis Enterprise Cluster Manager UI to create the RDI database with the following requirements:
-
Redis Enterprise v6.4 or greater for the cluster.
-
For production, 250MB RAM with one primary and one replica is recommended, but for the quickstart or for development, 125MB and a single shard is sufficient.
-
If you are deploying RDI for a production environment then secure this database with a password and TLS.
-
Set the database's eviction policy to
noeviction. Note that you can't set this usingrladmin, so you must either do it using the admin UI or with the following REST API command:curl -v -k -d '{"eviction_policy": "noeviction"}' \ -u '<USERNAME>:<PASSWORD>' \ -H "Content-Type: application/json" \ -X PUT https://<CLUSTER_FQDN>:9443/v1/bdbs/<BDB_UID> -
Set the database's data persistence to AOF - fsync every 1 sec. Note that you can't set this using
rladmin, so you must either do it using the admin UI or with the following REST API commands:curl -v -k -d '{"data_persistence":"aof"}' \ -u '<USERNAME>:<PASSWORD>' \ -H "Content-Type: application/json" -X PUT https://<CLUSTER_FQDN>:9443/v1/bdbs/<BDB_UID> curl -v -k -d '{"aof_policy":"appendfsync-every-sec"}' \ -u '<USERNAME>:<PASSWORD>' \ -H "Content-Type: application/json" \ -X PUT https://<CLUSTER_FQDN>:9443/v1/bdbs/<BDB_UID> -
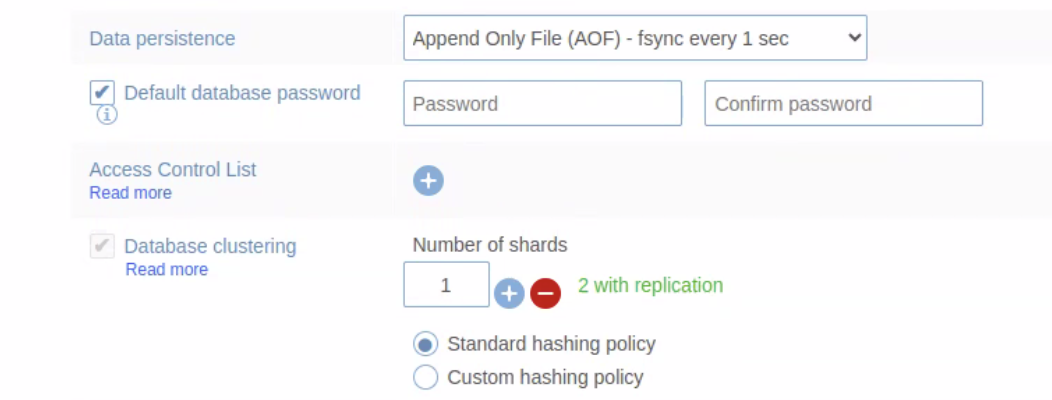
Ensure that the RDI database is not clustered. RDI will not work correctly if the RDI database is clustered (but note that the target database can be clustered without any problems).
If the Database clustering option is checked when you create the RDI database (as shown below), you must uncheck it before proceeding.
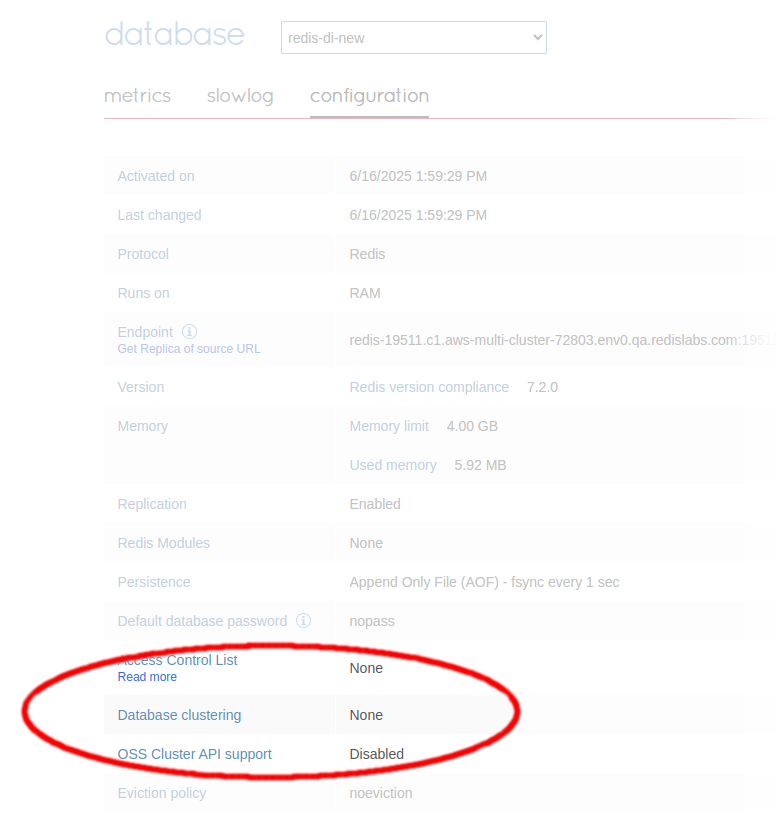
You can check if your RDI database is clustered from its Configuration tab in the Redis Enterprise console. The Database clustering option should be set to None, as shown in the following screenshot:
If you find the database has been clustered by mistake, you must create a new database with clustering disabled before continuing with the RDI installation.
Prepare the pipeline
During the installation, RDI placed the pipeline templates at /opt/rdi/config.
If you go to that folder and run the ll command, you will see the pipeline
configuration file, config.yaml, and the jobs folder (see the page about
Pipelines for more information). Use Redis Insight to open
the config.yaml file and then edit the following settings:
- Set the
hosttolocalhostand theportto 5432. - Under
tables, specify theTracktable from the source database. - Add the details of your target database to the
targetsection.
At this point, the pipeline is ready to deploy.
Create a context (optional)
To manage and inspect RDI, you can use the
redis-di
CLI command, which has several subcommands for different purposes. Most of these commands require you
to pass at least two options, --rdi-host and --rdi-port, to specify the host and port of your
RDI installation. You can avoid typing these options repeatedly by saving the
information in a context.
When you activate a context, the saved values of
--rdi-host, --rdi-port, and a few other options are passed automatically whenever
you use redis-di. If you have more than one RDI installation, you can create a context
for each of them and select the one you want to be active using its unique name.
To create a context, use the
redis-di add-context
command:
redis-di add-context --rdi-host <host> --rdi-port <port> <unique-context-name>
These options are required but there are also a few others you can save, such as TLS credentials, if
you are using them (see the
reference page
for details). When you have created a context, use
redis-di set-context
to activate it:
redis-di set-context <context name>
There are also subcommands to list and delete contexts.
Deploy the pipeline
You can use Redis Insight to deploy the pipeline by adding a connection to the RDI API endpoint (which has the same hostname or IP address as your RDI VM and uses the default HTTPS port 443) and then clicking the Deploy button. You can also deploy it with the following command:
redis-di deploy --dir <path to pipeline folder>
where the path is the one you supplied earlier during the installation. (You may also need
to supply --rdi-host and --rdi-port options if you are not using a
context as described above.) RDI first
validates your pipeline and then deploys it if the configuration is correct.
Once the pipeline is running, you can use Redis Insight to view the data flow using the pipeline metrics. You can also connect to your target database to see the keys that RDI has written there.
See Deploy a pipeline for more information about deployment settings.
View RDI's response to data changes
Once the pipeline has loaded a snapshot of all the existing data from the source, it enters change data capture (CDC) mode (see the architecture overview and the ingest pipeline lifecycle for more information ).
To see the RDI pipeline working in CDC mode:
- Create a simulated load on the source database (see Generating load on the database to learn how to do this).
- Run
redis-di status --liveto see the flow of records. - Use Redis Insight to look at the data in the target database.