
#Getting Started with Redis Iris
TL;DR: Redis Iris is a purpose-built context and memory platform designed to bridge the gap between AI agents and fragmented enterprise data. It acts as a foundational layer in the AI stack, providing AI agents with live, accurate, and navigable data so they can operate reliably in production.This tutorial walks through three of its tools using free Redis Cloud and Google Colab notebooks. For each tool you create the service in the Redis Cloud console, set Colab secrets, run a notebook walkthrough, inspect data in Redis Insight, then clean up.
Redis Iris consists of five core tools that work together:
| Tool | Description |
|---|---|
| Redis Context Retriever | Defines a semantic model of your business entities (e.g., customers, tickets, policies) and automatically generates Model Context Protocol (MCP) tools. Instead of querying databases blindly, agents can dynamically discover and execute these tools with scoped keys and row-level security. |
| Redis Agent Memory | Manages both short-term session state and long-term durable memory across multiple interactions. |
| Redis Data Integration (RDI) | Continuously ingests and synchronizes data from external systems (such as relational databases and data warehouses) into Redis so agents always act on fresh context. |
| Redis LangCache | A semantic caching service that stores and reuses LLM responses for similar queries, drastically reducing API costs and latency. |
| Redis Search | The core data layer powering the platform, enabling fast retrieval across structured, unstructured, and vector data. |
This tutorial will cover LangCache, Agent Memory, and Context Retriever.
NOTE: This tutorial uses the code from the following Google Colab notebooks:
#Prerequisites
- Redis Cloud account
- Redis Insight (optional, for inspecting data)
- Google Colab
#Setup
#1. Create a database
From the Redis Cloud console, select New Database. Then click Try 30 MB for free to create a free Redis database in the cloud.
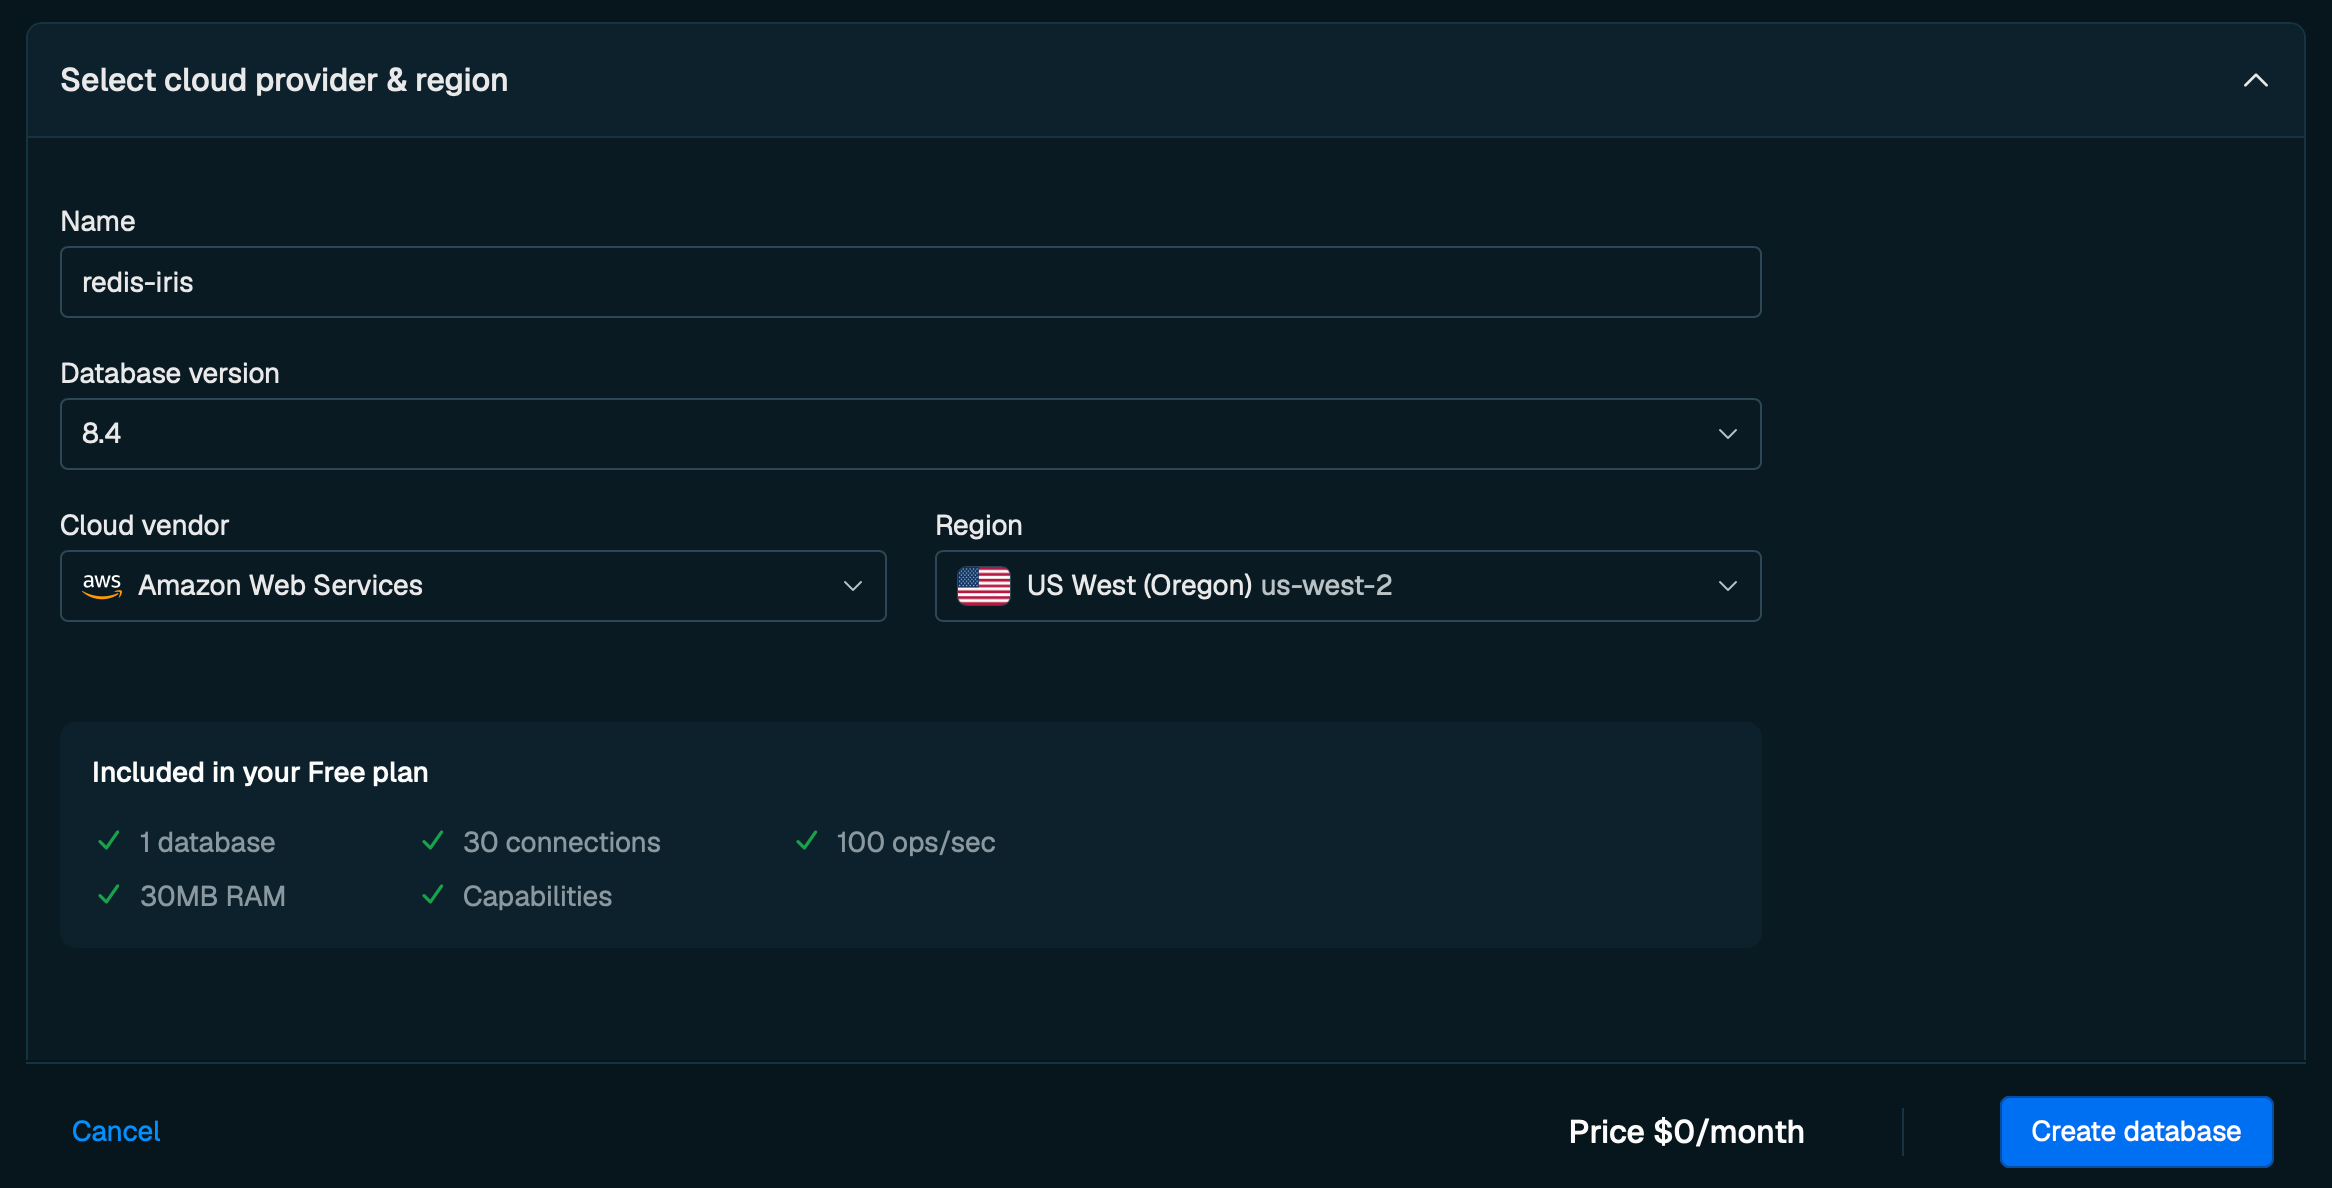
#Cloud settings
| Setting | Description |
|---|---|
| Name | Name of your database. |
| Database version | Version of your cloud database, leave as default. |
| Cloud vendor | The cloud infrastructure service provider. |
| Region | The region where your database will be hosted. |
Name your database and click Create database.
#2. Redis Insight
You can use the web version of Redis Insight or optionally download the desktop app. The Redis Insight desktop app will allow for faster bulk loading of data, but this tutorial will cover how to load data with both.
In the Redis Cloud console in your database's Configuration page, click Connect.
Choose either Open in desktop or Launch Redis Insight web.

#Redis LangCache
#1. Create a LangCache Service
From the Redis Cloud console, select LangCache from the left-hand menu. This takes you to the Create LangCache service page.
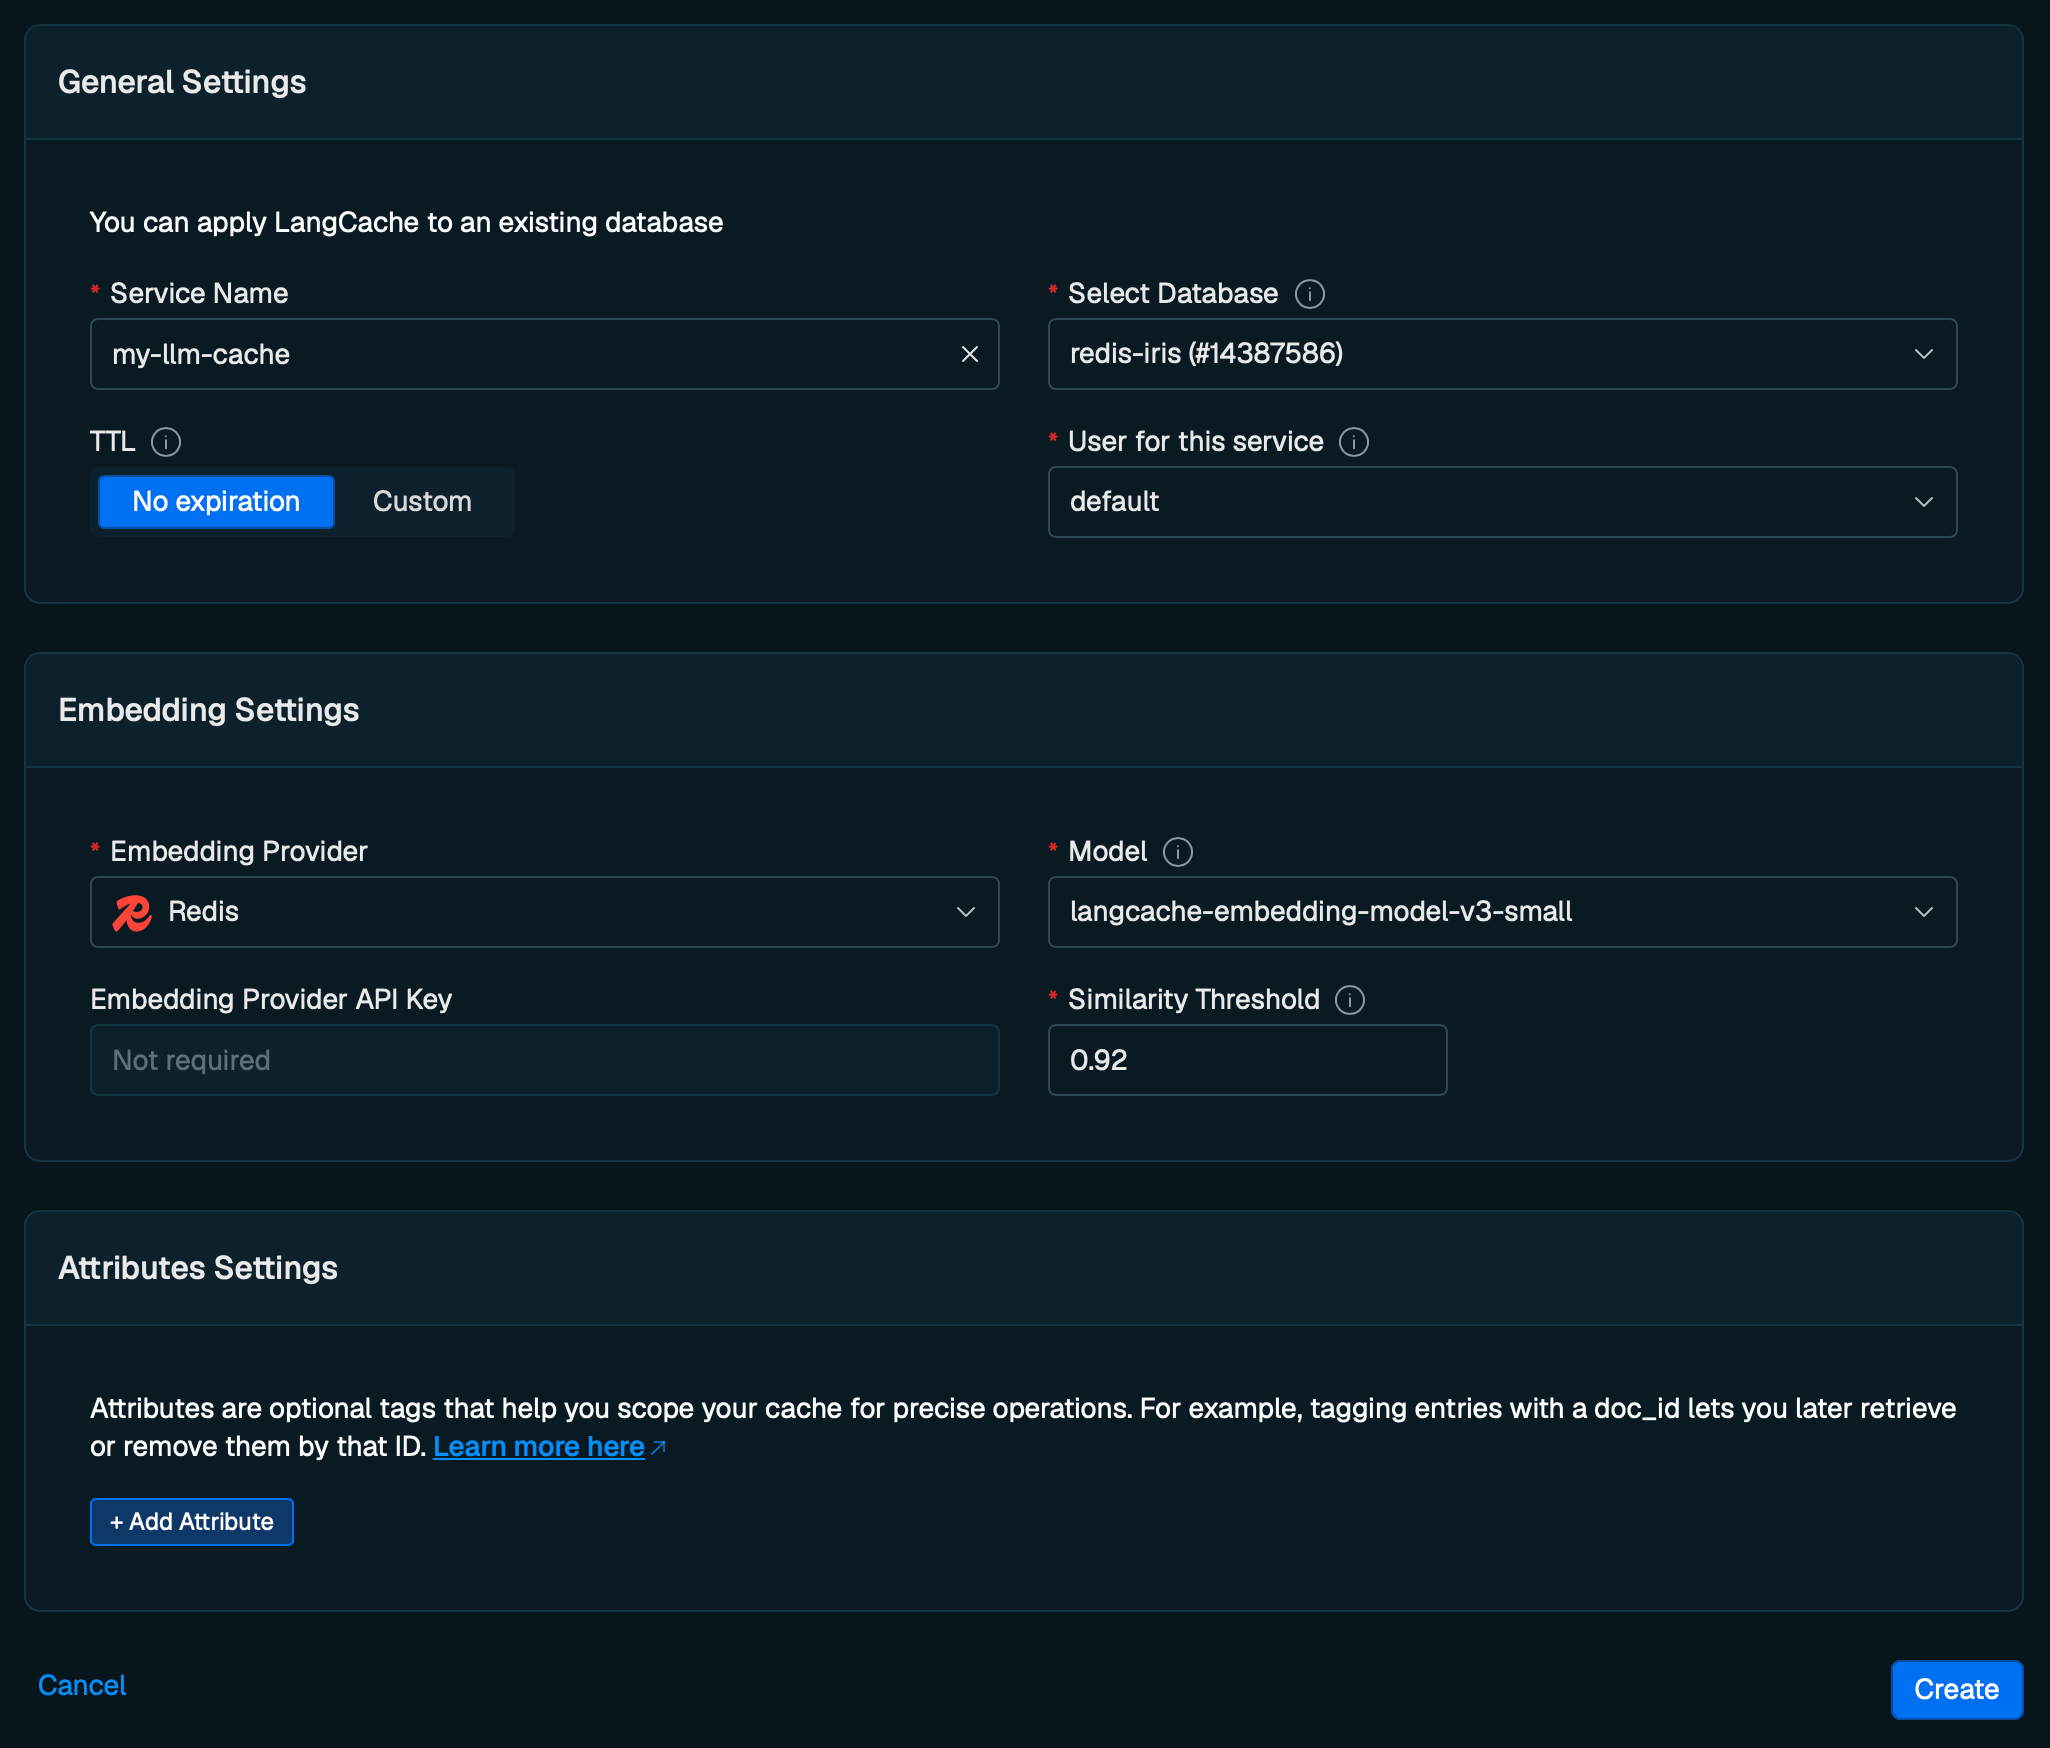
#General settings
| Setting | Description |
|---|---|
| Service name | A name that describes your service's purpose. |
| Select database | The Redis Cloud database to use for this service. |
| TTL | Time to live for cache entries, in milliseconds. Default: no expiration. |
| User for this service | Database access user. Only the default user is supported during public preview. |
#Embedding settings
| Setting | Description |
|---|---|
| Embedding Provider | Choose between Redis, OpenAI, or Bring your own. Any provider must support the OpenAI embeddings API. |
| Embedding provider API key | Your provider's API key (OpenAI and Bring your own only). |
| Embedding provider URL | Your provider's API URL (Bring your own only). |
| Model | The embedding model to use. |
| Similarity threshold | Minimum similarity score to consider a cached response a match. Range: 0.5–1.0. Default: 0.92. |
NOTE: Higher values mean more precise matches; lower values increase match rate but may include less relevant results.
#Attributes settings (optional)
Attributes provide scoping capabilities for your cache operations — think of them as tags that help organize cached data.
You can define up to 5 custom attributes:
- Select Add attribute.
- Enter a descriptive name and select the checkmark to save.
- Repeat to add additional attributes (up to 5).
#Create the service
When you have finished configuring your service, select Create.
A window will display your LangCache service key. Select Copy to save it.
WARNING: This is the only time the service key is shown. Save it to a secure location before closing the dialog. If you lose it, you will need to generate a new key.
#2. Configure your environment
This notebook runs in Google Colab and reads its configuration from Colab secrets.
Open LangCache Colab notebook.
In the Colab sidebar, select the Secrets tab and add the following secrets, making sure Notebook access is enabled for each:
| Secret name | Value |
|---|---|
LANGCACHE_ENDPOINT | Your LangCache endpoint URL. For LANGCACHE_ENDPOINT, copy the URL of the region closest to you. |
LANGCACHE_ID | Your LangCache ID. |
LANGCACHE_KEY | The service key you copied when creating the service. |
Find
LANGCACHE_ENDPOINT and LANGCACHE_ID on your service's Configuration page in the Redis Cloud console under Connectivity.
#3. Notebook Walkthrough
#Install dependencies
#Import libraries
#Load secrets and initialize the client
#Save a cache entry
#Search for a cached entry
Even though the search prompt differs slightly from the saved prompt, the semantic similarity is high enough that LangCache returns the cached response — no LLM call required.
#View data in Redis Insight
Open Redis Insight and connect to your database to browse the cached entries stored by LangCache.

#4. Clean up
Go to the LangCache configuration page in the Redis Cloud console. Scroll down to Actions, click Delete next to Delete service.
#Redis Agent Memory
#1. Create an Agent Memory Service
From the Redis Cloud console, select Agent Memory from the left-hand menu. Select Create custom and configure the service settings.
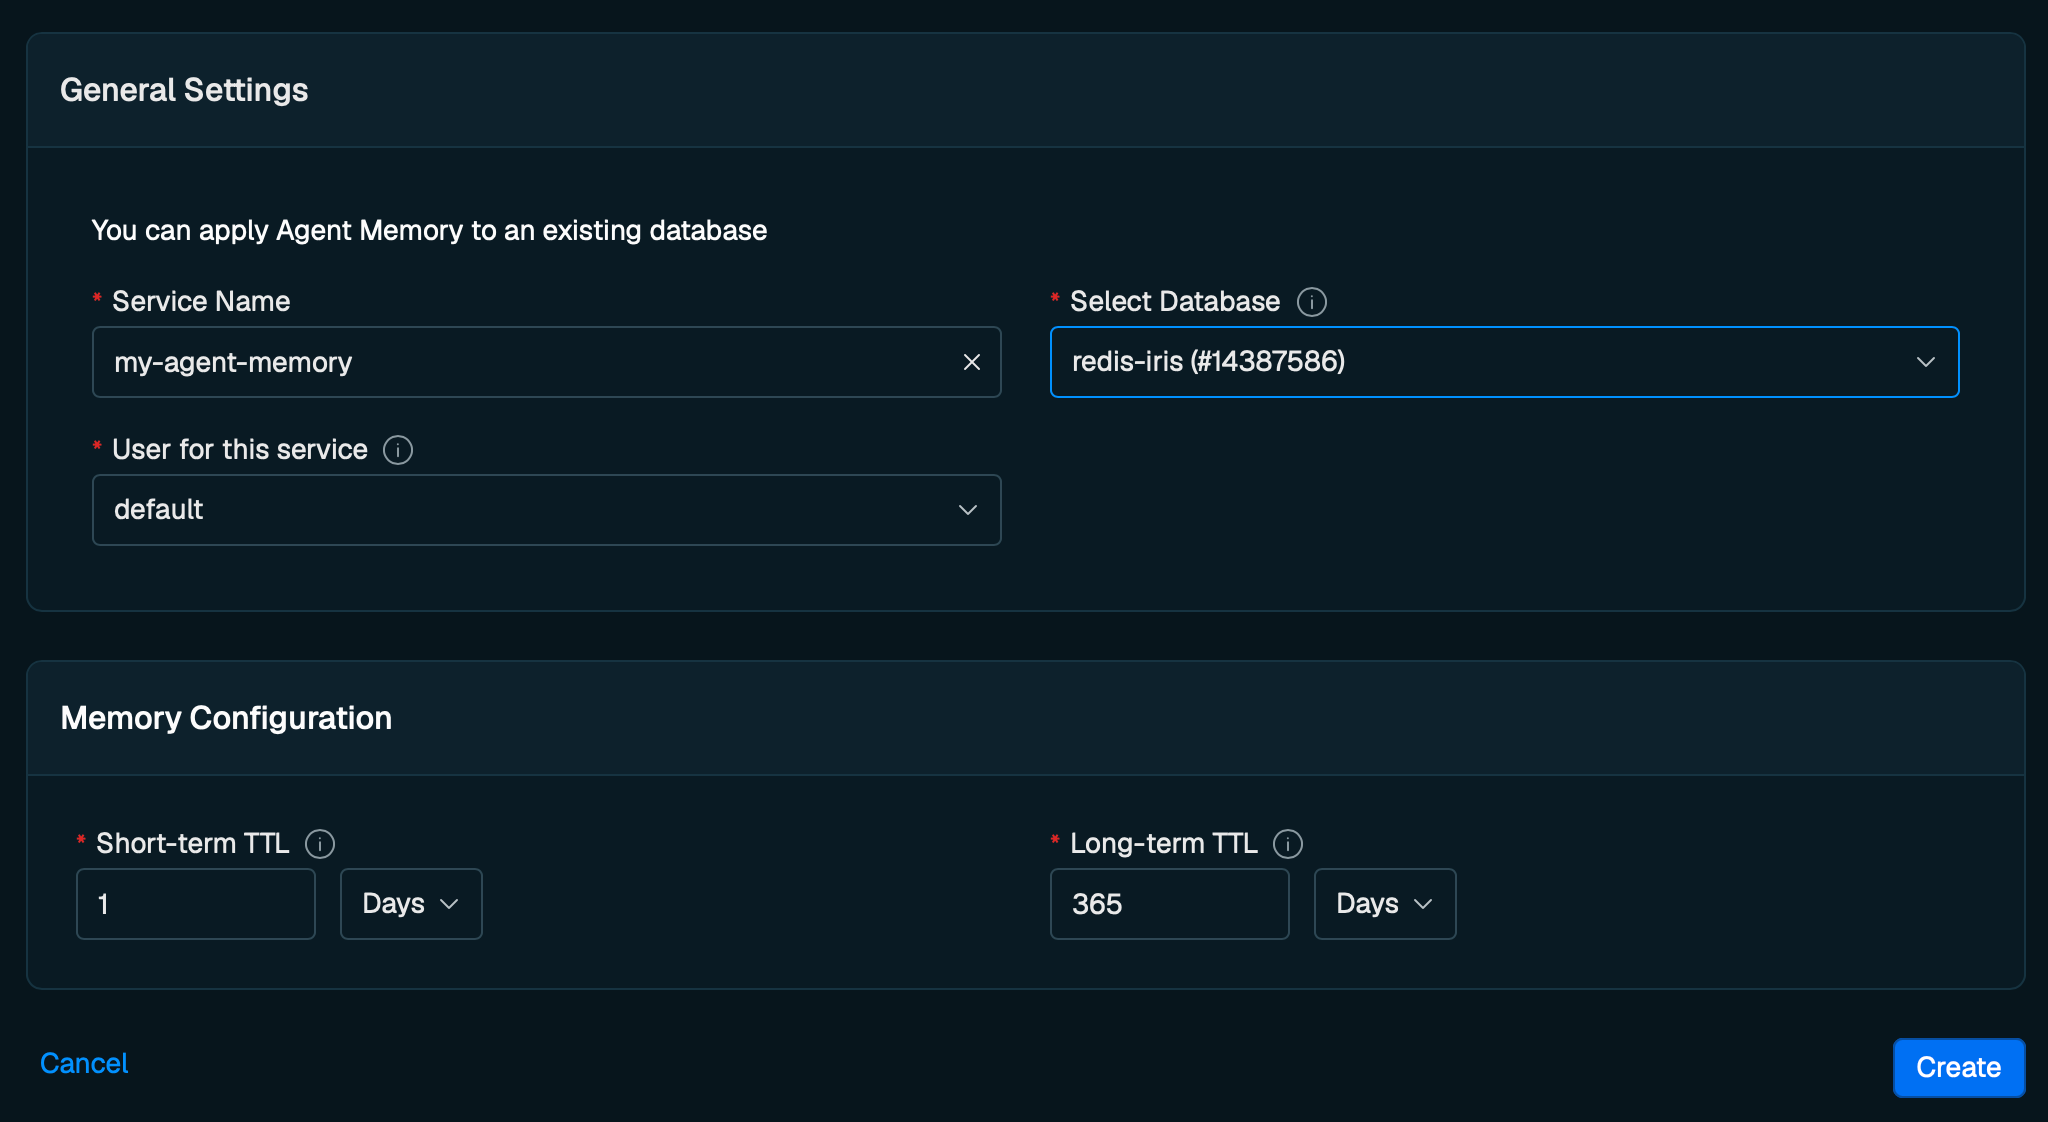
#General settings
| Setting | Description |
|---|---|
| Service name | A name that describes your service's purpose. |
| Select database | The Redis Cloud database to use for this service. |
| User for this service | Database access user. Only the default user is supported during public preview. |
#Memory configuration
| Setting | Description |
|---|---|
| Short-term TTL | Time to live for session (short-term) memory. Can be set in seconds, minutes, hours, or days. Default: 1 hour. |
| Long-term TTL | Time to live for long-term memory. Default: 365 days. |
#Create the service
When you have finished configuring your service, select Create.
A window will display your Agent Memory service key. Select Copy to save it.
WARNING: This is the only time the service key is shown. Save it to a secure location before closing the dialog. If you lose it, you will need to generate a new key.
#2. Configure your environment
This notebook runs in Google Colab and reads its configuration from Colab secrets.
In the Colab sidebar, select the Secrets tab and add the following secrets, making sure Notebook access is enabled for each:
| Secret name | Value |
|---|---|
AGENT_MEMORY_ENDPOINT | Your Agent Memory endpoint. |
AGENT_MEMORY_STORE_ID | Your Agent Memory store ID. |
AGENT_MEMORY_KEY | The service key you just copied in the last step. |
Find
AGENT_MEMORY_ENDPOINT and AGENT_MEMORY_STORE_ID on your service's Configuration page in the Redis Cloud console.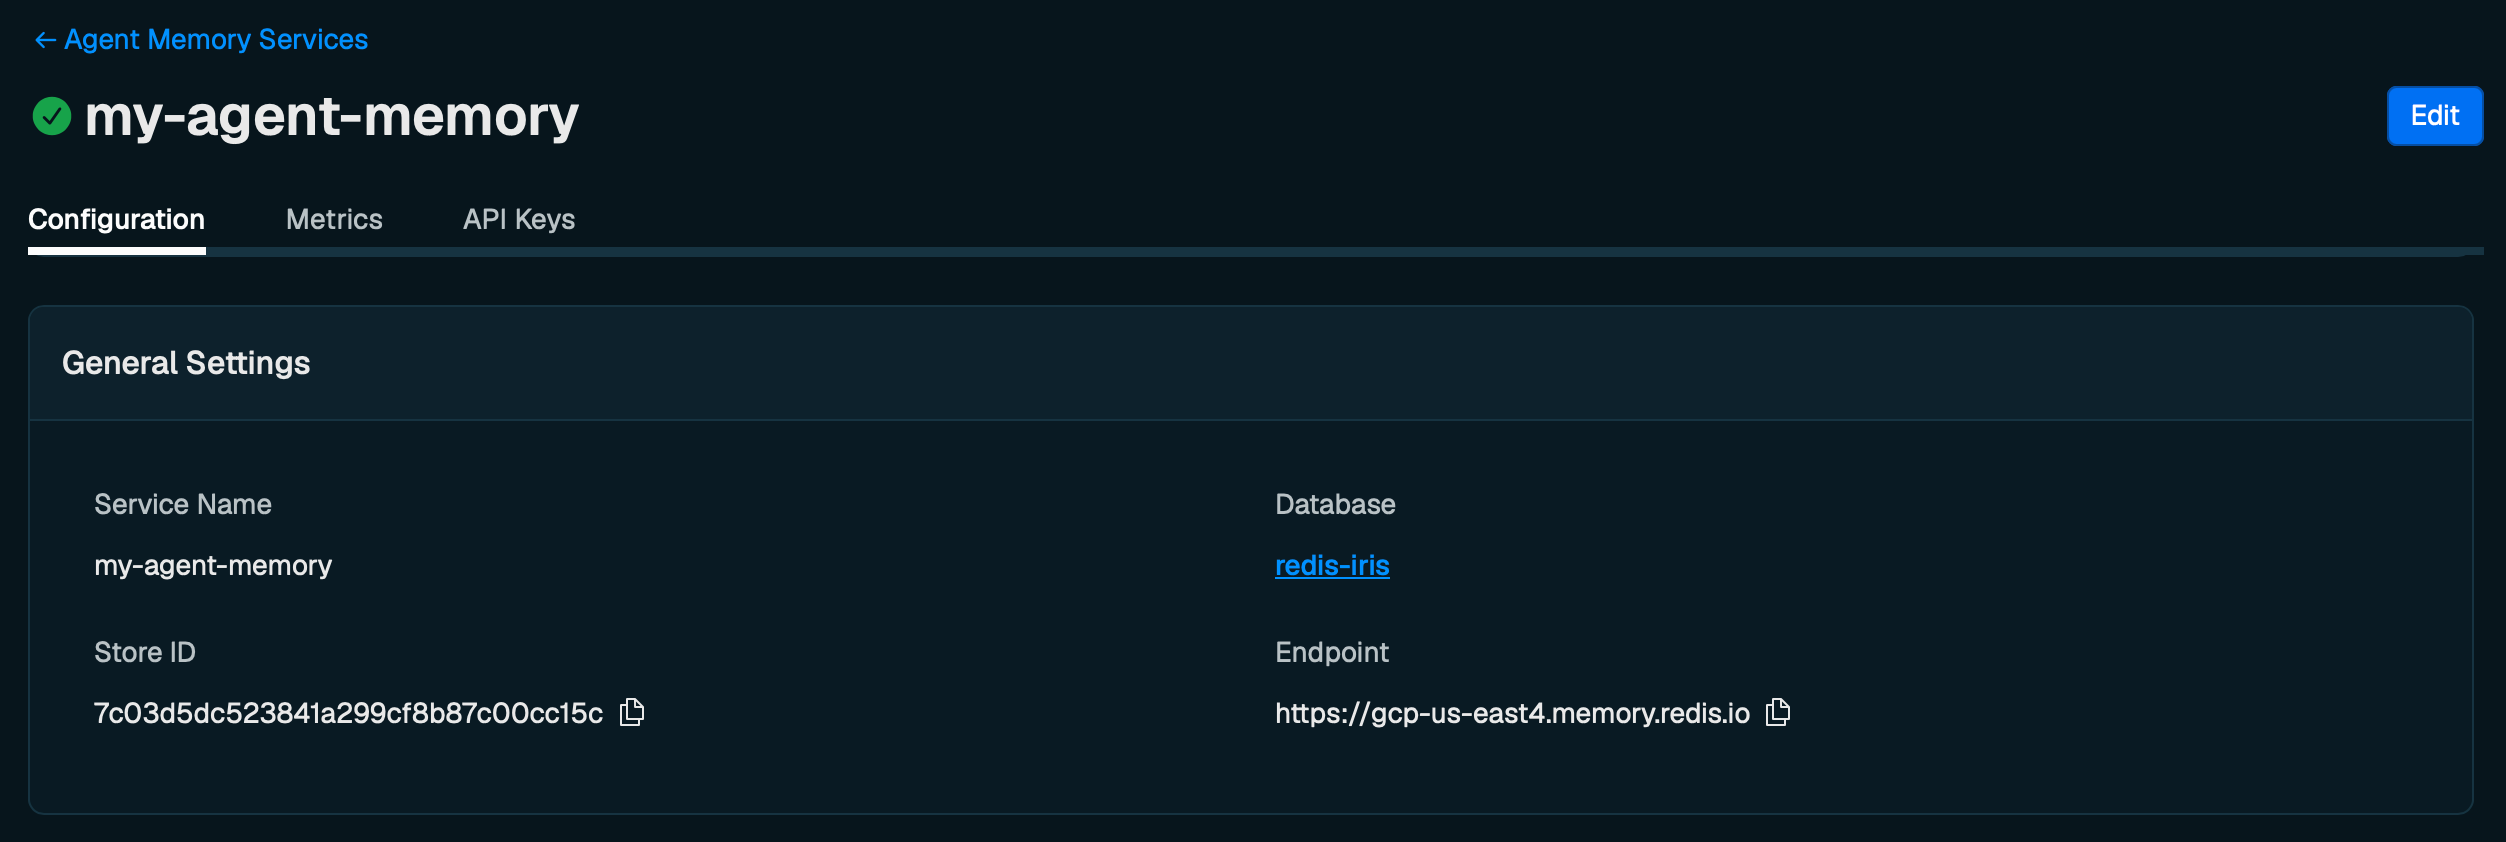
#3. Notebook Walkthrough
#Install dependencies
#Import libraries
#Load secrets and initialize the client
#Add a session (short-term) memory event
#Retrieve session memory
#Add a long-term memory
#Get long-term memory by memory_id
#Search all long-term memories by owner_id
NOTE: Agent Memory automatically creates long-term memories from session memory (e.g. "User prefers non-stop flights"). You might have to wait a few minutes and re-run the search query see the auto-created long-term memories.
#View data in Redis Insight
Open Redis Insight and connect to your database to browse the session and long-term memory entries stored by Agent Memory.

#4. Clean up
Go to the Agent Memory configuration page in the Redis Cloud console. Scroll down to Actions, click Delete next Delete service.
#Redis Context Retriever
#1. Load data into Redis
In the Redis Cloud console, open your
redis-iris database confiuration page create during the Setup step and click Connect.Choose either Open in desktop for the desktop app or Launch Redis Insight web.
#If using Redis Insight Desktop
Click Bulk Actions then Upload Data tab.
Drag and drop the
data.redis file from this repo into Redis Insight and click Upload to load in the hospital management dataset.
#If using Redis Insight Web
Click on the Workbench tab and paste in the contents of
data.redis. Then click Run to load in the hospital management dataset.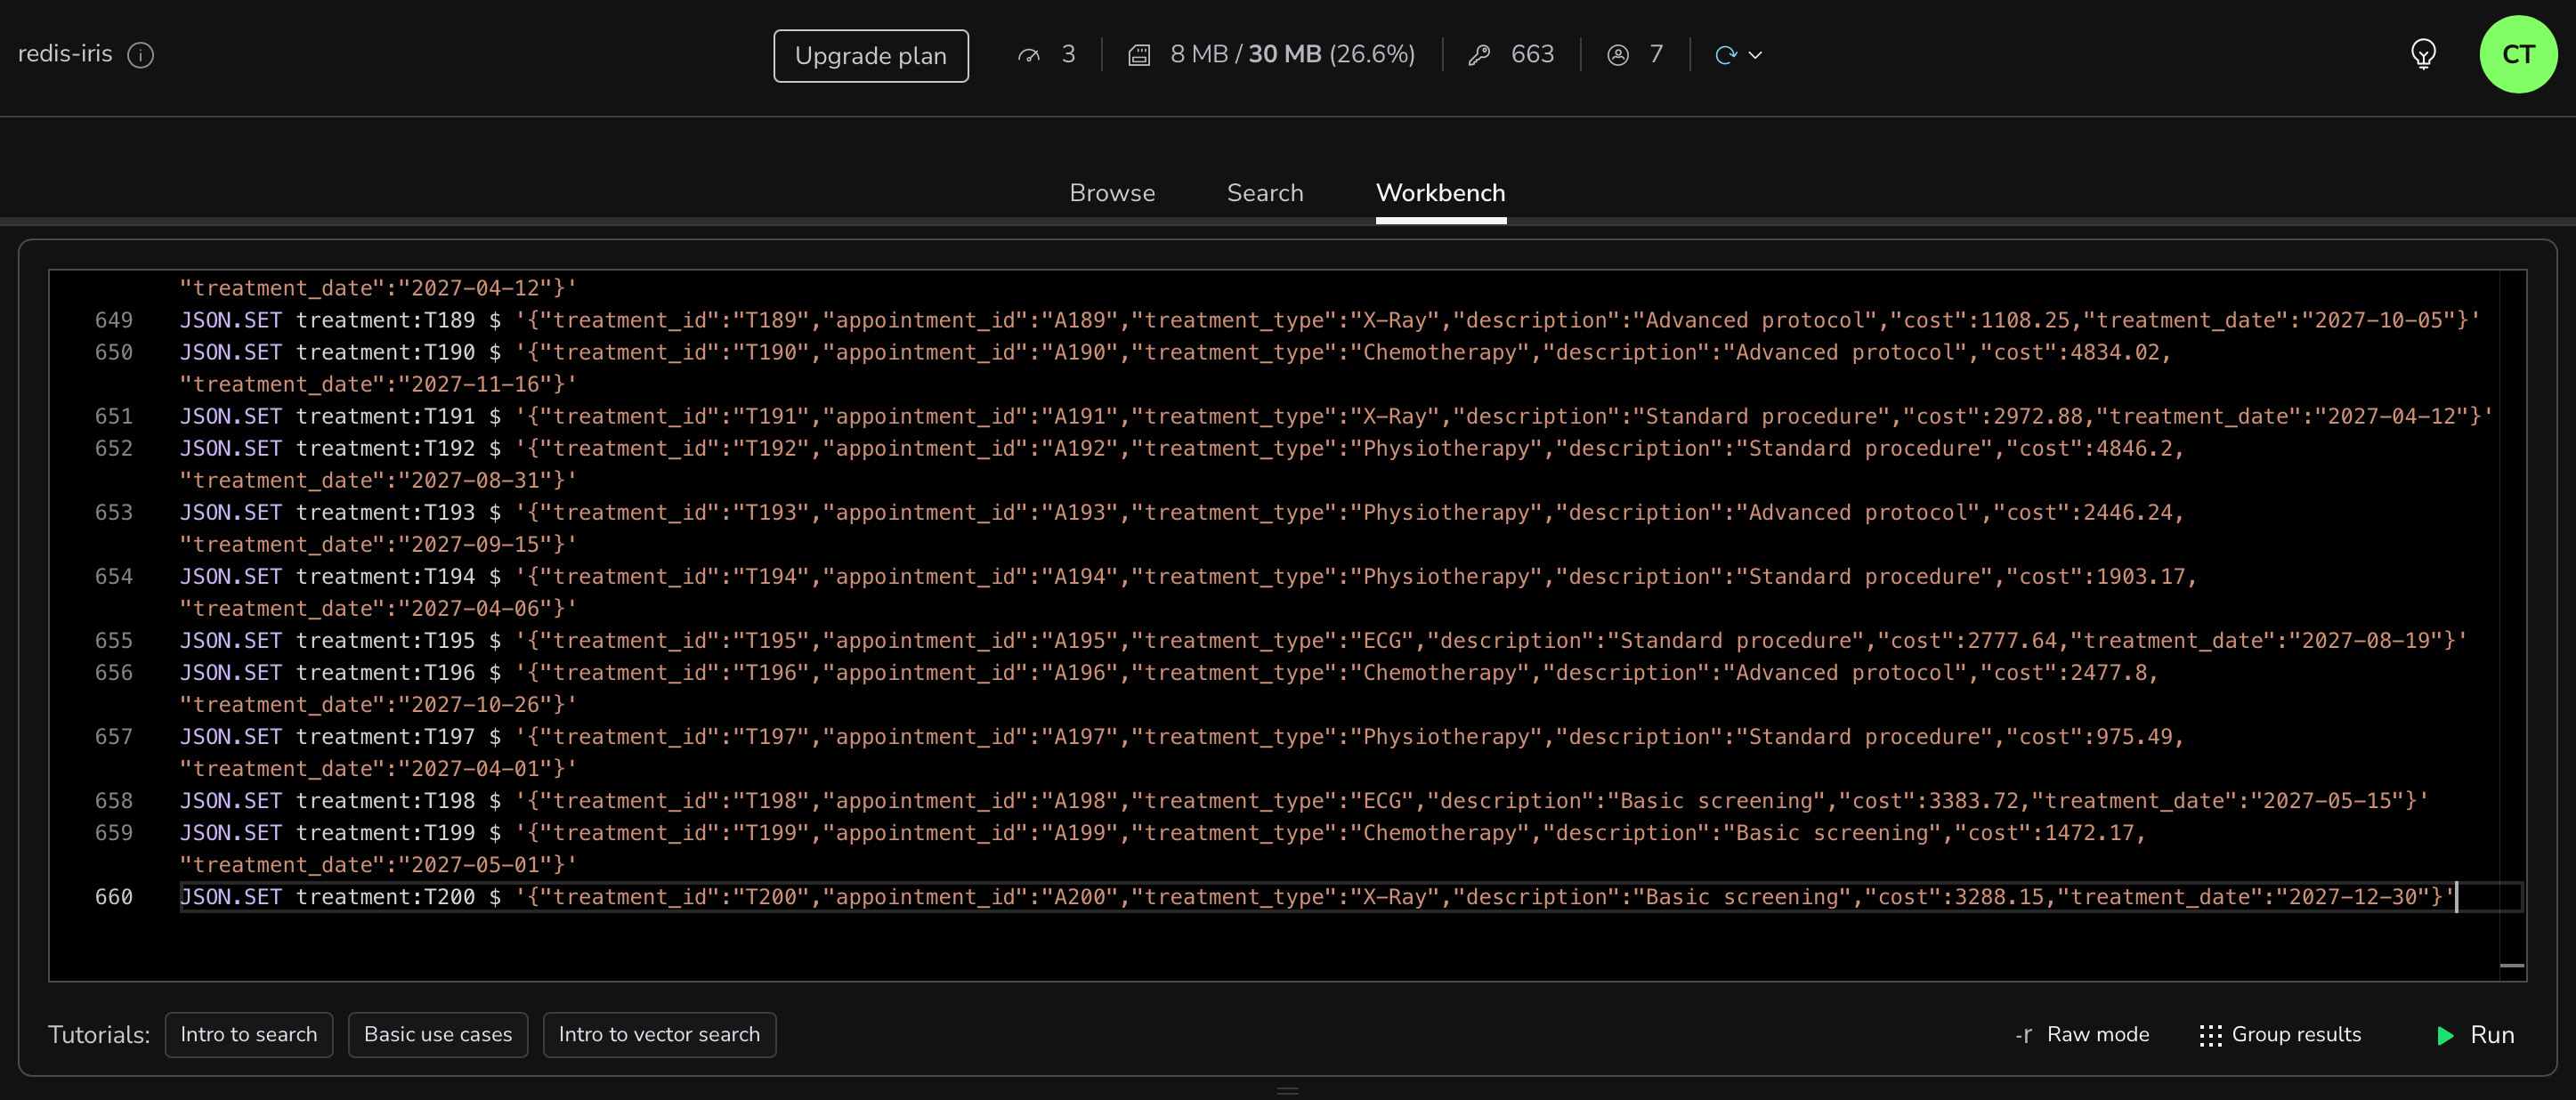
#2. Create a Context Retriever Service
From the Redis Cloud console, select Context Retriever from the left-hand menu.
If this is your first service, you'll see an introduction page. Otherwise, select New service. From the introduction page, select Create custom service to manually configure your settings.

#General settings
| Setting | Description |
|---|---|
| Service name | A name that describes your service's purpose. |
| Select database | The Redis Cloud database to use for this service. |
| Description | A description of your context retriever. |
Select Entities to continue.
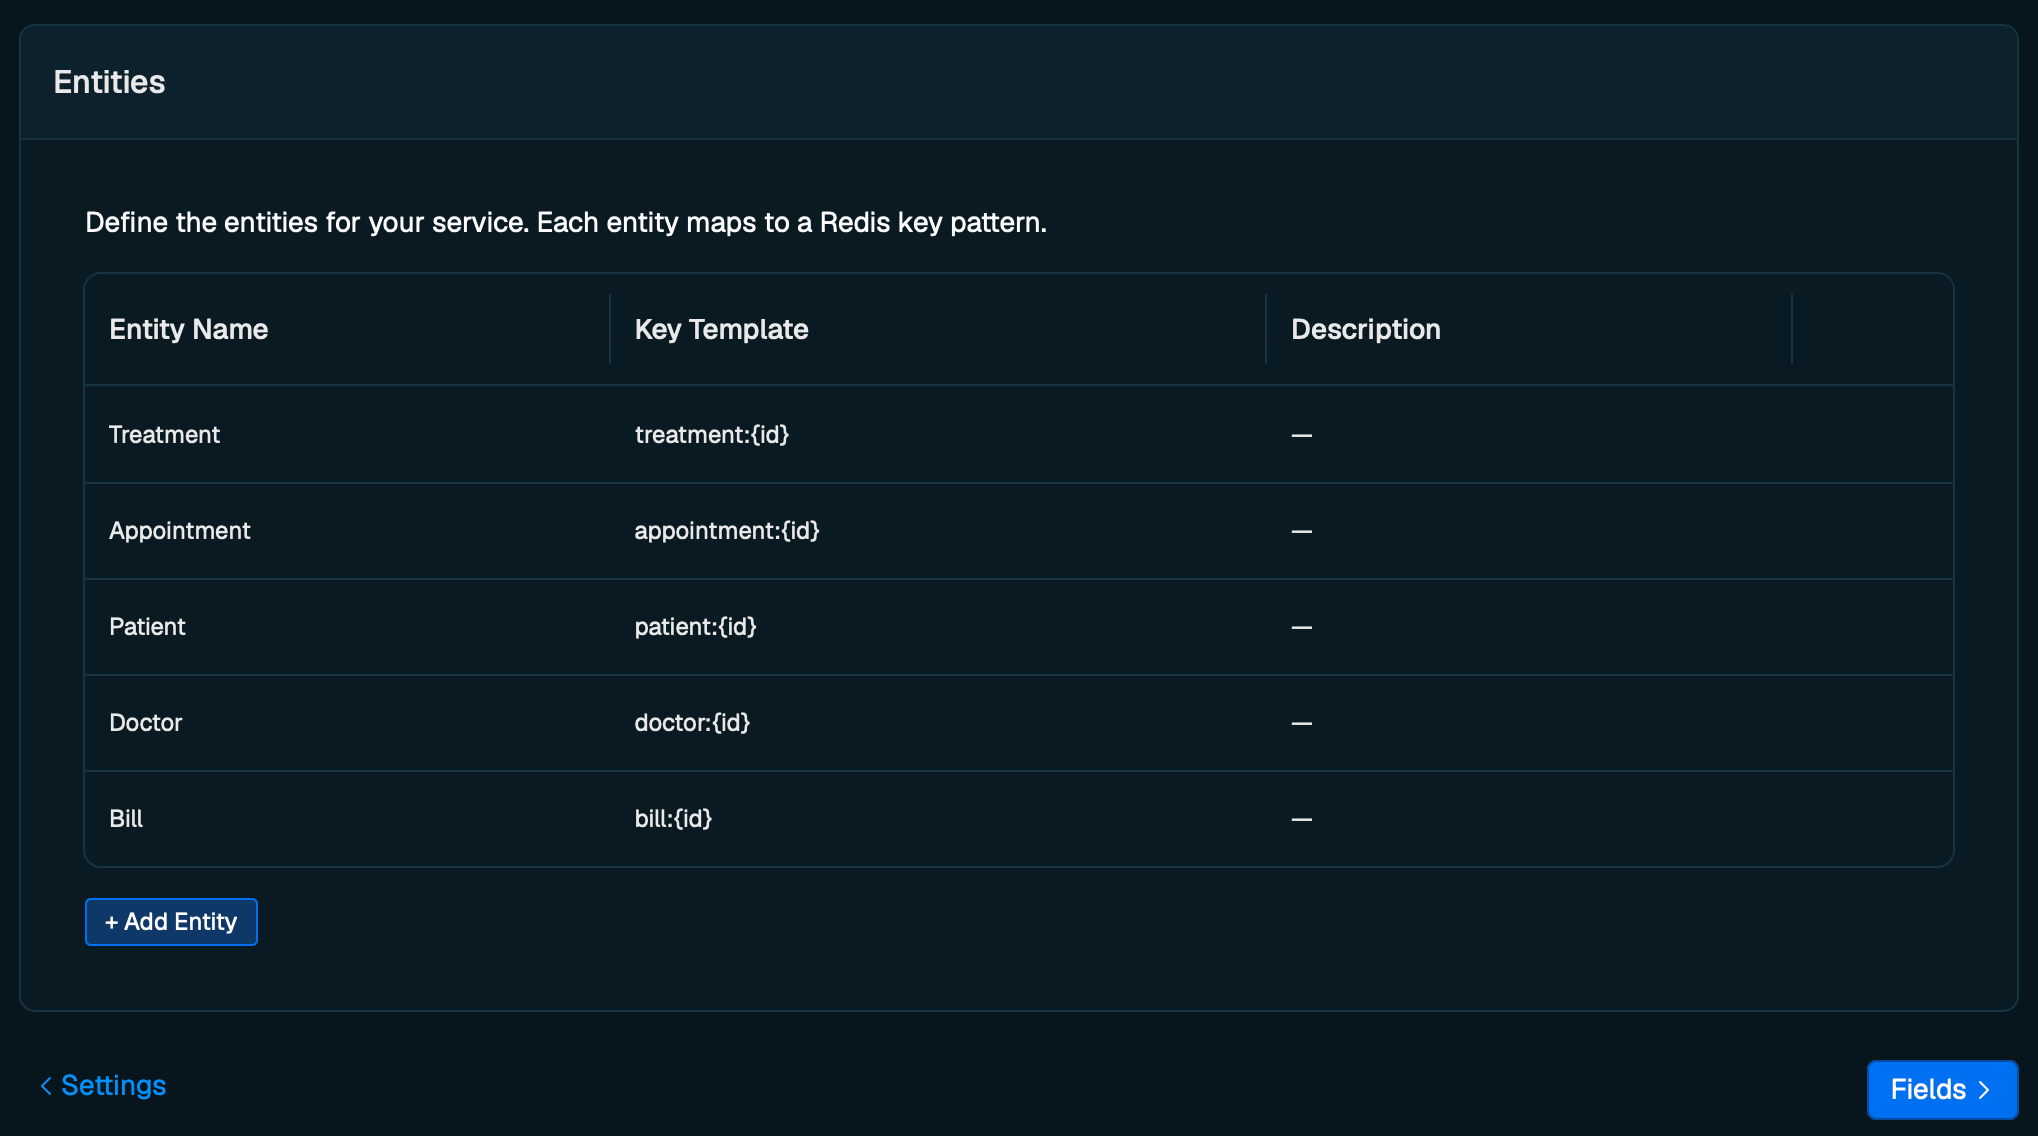
#Define entities
Entities map to the business objects stored in your Redis database.
- Select Add Entity.
- In the Entity name field, enter the name of a business object (e.g.,
Treatment). - In the Key Template field, enter the Redis key pattern, using
{id}to denote the ID location (e.g.,treatment:{id}). - Optionally add a description.
- Select the checkmark to confirm the entity.
- Repeat for all 5 entities, then select Fields to continue.
NOTE: I recommend creating all 5 entities but for this tutorial you will only need a minimum of theTreatementandAppointmententities mapped.
| Entity Name | Key Template |
|---|---|
| Treatment | treatment:{id} |
| Appointment | appointment:{id} |
| Patient | patient:{id} |
| Doctor | doctor:{id} |
| Bill | bill:{id} |
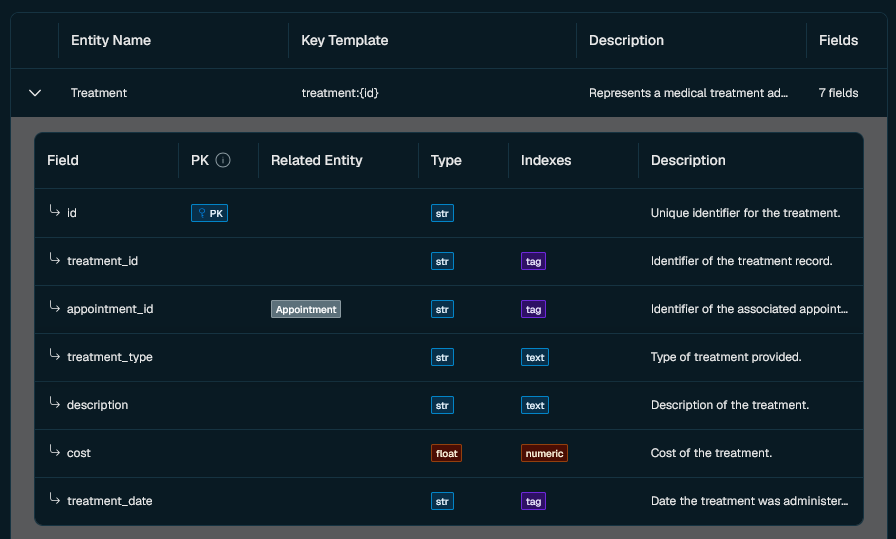
#Configure fields
In this step, you define the fields of each entity and the relationships between them. You have two options:
- Auto-detect fields — scans your database automatically using a model to detect fields. You will need to agree to let the model scan your key names and schemas.
- Manual configuration — define each field yourself, marking them as
NUMERICorTEXTto generate additionalfindandsearchMCP tools.
We'll use a combination of both. We'll first use Auto-detect to define the fields and relationshships then manually configure certain fields to be
NUMERIC or TEXT.- Click Auto-detect fields, this will scan your database and infer entity fields. This will also automatically map the relationships between your entities based on the entity's field key names.
- Consent to auto-detect scand and click Scan Database.
- Configure the field indexes. At a minimum, you'll need to configure 3 fields in the
Treatemententity. Click on the entity's pencil icon then the Configure button to configure indexes of the entities:
Treatmententity:treatment_typeto beTEXTdescritptionto beTEXTcostto beNUMERIC
NOTE: Each field can only be a part of 1 index. You might encounter errors if you try to include fields in both theTAGandTEXTindexes.
- Make sure to click the checkmark to confirm the changes.
- Optionally, go through the other entites and configure the field indexes as
TEXTorNUMERICas needed.
- After configuring all fields, select Create to create the service.
#3. Configure your environment
You will access your Context Retriever via an agent key. To create a Context Retriever agent key, go to the Redis Cloud console and open your Context Retriever service page.
-
Navigate to the Agent key tab in your service configuration page and select New Agent Key. Name and generate your agent key.

-
Copy and save the agent key
-
This notebook runs in Google Colab and reads its configuration from Colab secrets.In the Colab sidebar, select the Secrets tab and add the following secrets, making sure Notebook access is enabled for each:
Secret name Value CONTEXT_RETRIEVER_AGENT_KEYThe agent key you just copied.
#4. Notebook Walkthrough
#Install dependencies
#Import libraries
#Load secrets
#Initialize the client and list available tools
Context Retriever automatically generates MCP tools from your entity definitions. List them to see what's available:
#Call the tools
Use
query_tool to call any of the generated MCP tools directly:#Context Retriever tool names
The tool names (e.g.
filter_appointment_by_patient_id, get_doctor_by_id, etc.) reflect the entities defined in a sample healthcare dataset. Your tool names will match the entities you defined in your own Context Retriever service.| Index | MCP tool generated |
|---|---|
PK | get_<entity>_by_id |
TAG | filter_<entity>_by_<field> |
TEXT | search_<entity>_by_text |
NUMERIC | find_<entity>_by_<field>_range |
#5. Clean up
Go to the Context Retriever configuration page in the Redis Cloud console. Scroll down to Actions, next to Delete service click Delete.
#Next Steps
For more in-depth guidance, explore the following:
#Tutorials
- Semantic caching with Redis LangCache
- Redis Agent Memory and LangGraph
- Real-time AI agent with Redis Iris