Tutorial
Build a Conversational Agent with Redis Using Flowise
February 26, 202614 minute read


TL;DR:Use Flowise's drag-and-drop visual builder to create a no-code conversational AI agent. Wire up ChatOpenAI for language understanding, SearchAPI for real-time web results, and Redis-backed chat memory for persistent conversation history — all without writing a single line of code.
In this tutorial, we will learn how to build a conversational agent with Redis using Flowise. Flowise is a powerful, open-source, and user-friendly AI platform that allows you to build and deploy conversational agents (and many other LLM flows) quickly using a simple and intuitive interface.
#What you'll learn
- What Flowise is and why it's useful for building AI agents visually
- How to set up Flowise locally with Docker
- How to create a conversational agent chatflow with tool integration
- How to use Redis as persistent chat memory for your agent
- How to extend your agent with a Redis vector store for RAG-based retrieval
- How to export and import chatflows for sharing and backup
#What is Flowise?
Flowise is an open-source, low-code platform for building LLM-powered applications through a visual drag-and-drop interface. Instead of writing code to chain together language models, tools, and memory, you connect pre-built nodes in a browser-based canvas. Flowise supports a wide range of integrations — including OpenAI models, vector stores like Redis, and external APIs — making it a popular choice for prototyping and deploying conversational AI agents without deep programming expertise.
#What is a conversational agent?
Normal LLMs (Large Language Models) like GPT-4 are general-purpose models trained on diverse datasets to perform a wide range of language-related tasks, such as text generation, translation, summarization, and more.
Conversational agents, however are more sophisticated and designed specifically for managing conversations effectively. They often integrate multiple specialized agents or modules to handle specific tasks, providing a comprehensive and interactive experience.
#How does a conversational agent differ from a normal LLM?
ExampleUser question:Normal LLM (GPT-4) response:Conversational agent response:
-
A normal LLM cannot answer questions about the latest news, projects, etc., as it is not trained on real-time data.
-
In contrast, a conversational agent can handle such queries because it integrates an LLM at its core along with other specialized agents to manage specific tasks. In our conversational agent example, we will use ChatOpenAI combined with a SearchAPI agent to answer questions about the latest news, weather, and other real-time information. For a code-based approach to building a similar chatbot, see How to Build a RAG GenAI Chatbot Using Vector Search with LangChain and Redis.
-
The SearchAPI agent is a specialized module capable of fetching data from Google search results, enabling our conversational agent to provide up-to-date and relevant answers.
-
We can use multiple specialized agents like SearchAPI, Calculator, Python Interpreter, Custom Tool, Custom Function/ API, etc., to enhance the capabilities of our conversational agent. LLM will pick the right tool to handle specific types of queries.
#How do you set up Flowise?
There are different ways to install Flowise. For this tutorial, we'll use the docker compose method to install Flowise.
#1> Clone the Flowise repository from GitHub
#2> Navigate to the docker folder
#3> Copy the .env file
Copy the example environment file and rename it to .env. This file contains configuration settings for your docker containers.
#4> Start the docker application
Use the following command to start the docker application in detached mode. This command will download the necessary docker images and start the Flowise application.
#5> Access Flowise in your browser
Open your browser and navigate to http://localhost:3000 to access the Flowise application.
#6> Stop the docker containers
If you need to stop the docker containers, you can do so with the following command:
By following these steps, you will have Flowise up and running on your local machine, ready for you to start building and testing your conversational agents.
#How do you create a new chatflow?
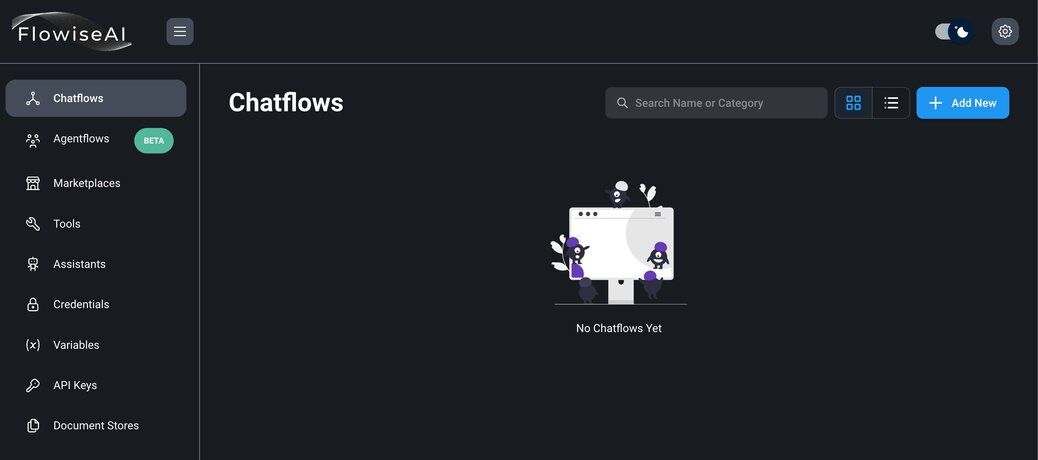
#1> Navigate to the Chatflows menu
Open your browser and go to http://localhost:3000. In the Flowise application, navigate to the Chatflows menu.
#2> Create a new chatflow
Click on the + Add new button to create a new chatflow.
#3> Save and name your chatflow
Click on the save icon. A prompt will appear asking you to name your chatflow. Enter a meaningful name that describes the purpose of your chatflow.
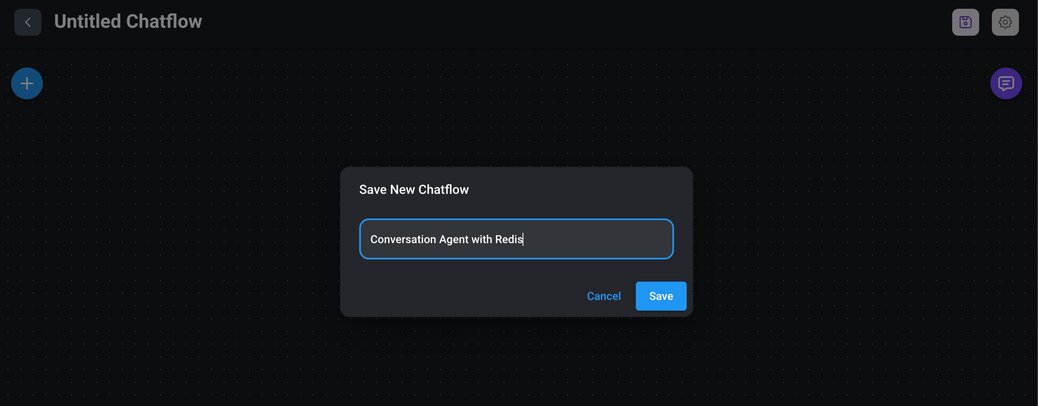
By following these steps, you will create an empty chatflow in Flowise, setting the foundation for building your conversational agent.
#How do you add a conversational agent node?
#1> Drag the conversational agent node
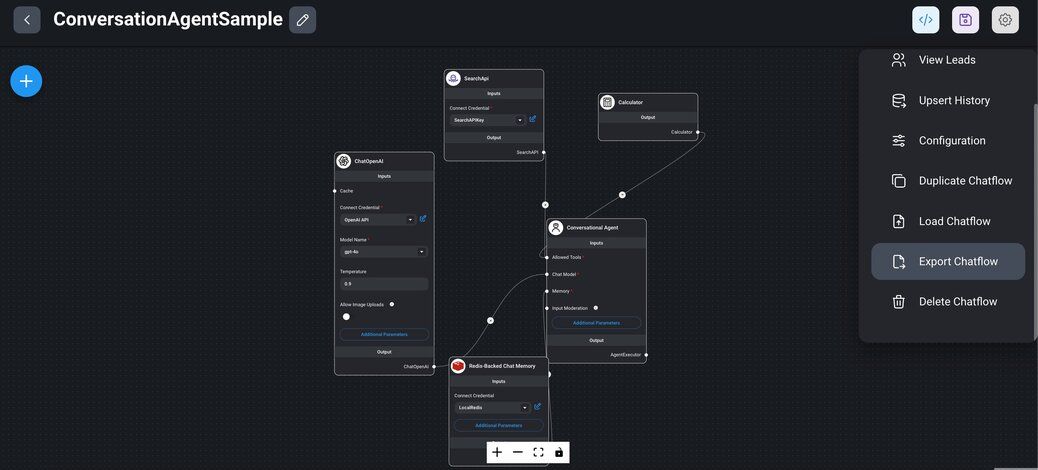
From the Agents section in the Flowise interface, drag the Conversational Agent node into your chatflow workspace.
#2> Modify additional parameters
In the node's interface, you have the option to modify the system message prompt. This prompt is used to set the context for the chatbot, ensuring it understands the specific domain or behavior you want it to exhibit. Also, click on the save icon to ensure your modifications are not lost.
By following these steps, you will have successfully added a conversational agent node to your chatflow and set the initial context for your chatbot. In subsequent sections, we will integrate additional nodes and configure the chatbot to interact with Redis and other specialized agents.
#How do you add a SearchAPI node?
#1> Drag the SearchAPI node
From the Tools section in the Flowise interface, drag the SearchAPI node into your chatflow workspace. The SearchAPI node acts as an agent capable of fetching data from Google search results.
#2> Connect to conversational agent node
Connect the SearchAPI node to the Conversational Agent node by drawing a line from the output of the
Conversational Agent node to the input of the SearchAPI node. This connection allows the conversational agent to utilize the search capabilities provided by the SearchAPI.#3> Set the SearchAPI key
In the interface of the SearchAPI node, enter your SearchAPI key. This key is necessary for the node to authenticate and perform search queries.
#4> Combine multiple tools
You can enhance the capabilities of your Conversational Agent by adding multiple tools. For example, you can integrate SearchAPI, Calculator, Python Interpreter or Custom Tool node. The Conversational Agent will automatically select the appropriate tool to handle specific types of queries. For this demo, we will be just adding SearchAPI node. Also, click on the save icon to ensure all configurations and connections are stored.
By following these steps, you will have successfully integrated a SearchAPI node into your chatflow, let's add other nodes in next steps.
#How do you add a ChatOpenAI node?
#1> Drag the ChatOpenAI node
From the Chat Models section in the Flowise interface, drag the ChatOpenAI node into your chatflow workspace.
#2> Create an OpenAI key
If you haven't already created an OpenAI key, do so by clicking on the Create New menu within the node's interface. This key is essential for authenticating requests to the OpenAI API.
#3> Choose a model
Select a model like GPT-3, GPT-4 ..etc from the available options. The model determines the behavior and capabilities of your conversational agent.
#4> Set the temperature
The temperature parameter controls the randomness of the model's responses. It ranges from 0 to 1:
-
Low temperature (e.g., 0.2): Produces more deterministic and focused responses.
-
High temperature (e.g., 0.8): Produces more creative and varied responses.
#5> Set additional parameters
Configure other parameters such as Max Tokens, which defines the maximum number of tokens (words or parts of words) the model can generate in a single response. Ensure you save your chatflow regularly to preserve all changes.
By following these steps, you will have successfully added and configured a ChatOpenAI node in your chatflow. This node will serve as the core conversational engine, leveraging OpenAI's powerful language models to generate responses. In subsequent sections, we will further enhance your chatflow with additional nodes.
#How do you add Redis-backed chat memory?

#1> Drag the Redis chat memory node
From the Memory section in the Flowise interface, drag the Redis Backed Chat Memory node into your chatflow workspace.
#2> Choose Redis connection key
In the node's interface, choose or create a connection key for the Redis instance. This connection key will be used to store and retrieve chat memory data.
#3> Set chat key prefix
In the additional parameters section, you can set a chat key prefix. This prefix helps in organizing and identifying the chat memory records stored in Redis. Finally, save your chatflow to ensure all configurations and connections are persisted.
RedisWhy Use Redis for chat memory?Speed: Redis is an in-memory data store, which means it can quickly read and write data, providing low-latency access to chat history. This speed is crucial for maintaining a seamless and responsive conversational experience.Persistence: Redis also supports persistence, allowing chat data to be stored permanently. This means even if the application restarts or crashes, the chat history can be recovered, ensuring continuity in conversations.
By following these steps, you will have successfully added a Redis chat memory node to your chatflow. This integration ensures that your conversational agent can remember and utilize past interactions, enhancing the overall user experience. To learn more about using Redis for vector-based semantic search in your AI applications, see the Vector Semantic Text Search tutorial. In the next section, we will test the chatflow setup.
#How do you test the chatflow?
#1> Start the chat
Click on the chat icon to interact with your newly created conversational agent.
#2> Ask questions
Test the functionality by asking any questions on latest news/ events.
#3> Check the response
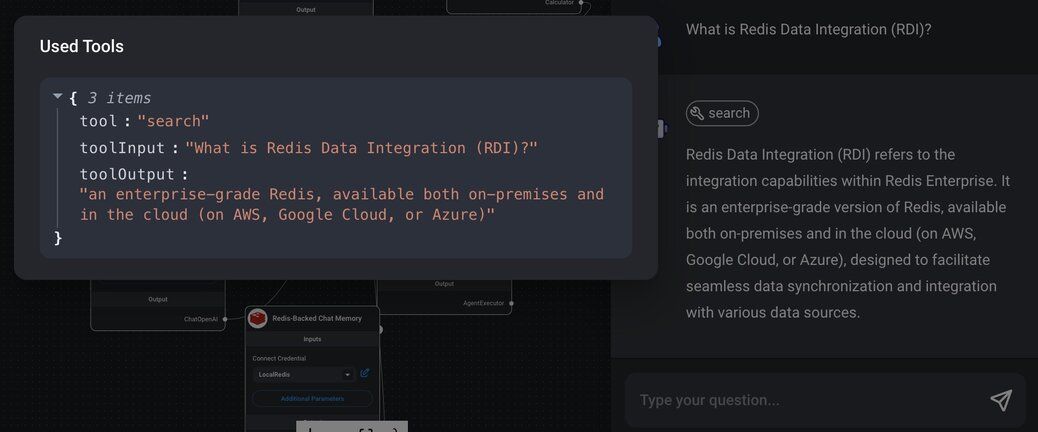
Evaluate the response provided by the chatflow. Ensure that it correctly fetches and presents information based on the connected tools (e.g., SearchAPI). Click on the tool button above the chatflow response message to view details of the tools used.
By following these steps, you will be able to test and validate the functionality of your chatflow, ensuring that your conversational agent is working as expected and providing accurate and relevant responses.
#How do you verify chatflow data with Redis Insight?
Redis Insight is a powerful GUI tool that allows you to interact with Redis data visually. It provides an easy way to verify and manage the persisted data in your Redis instance.
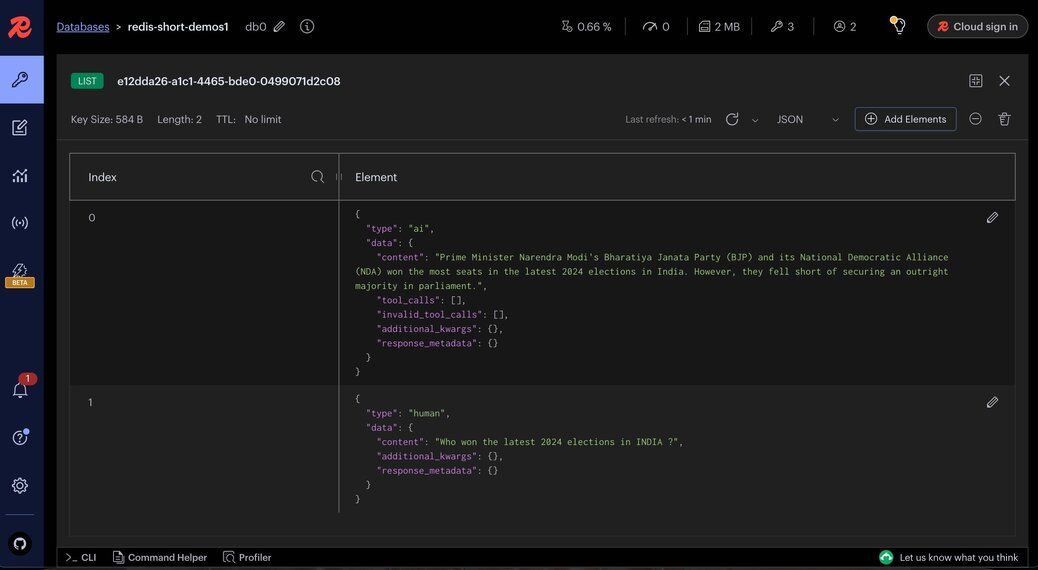
#Example of stored chat data
In our example, Redis stores the chat data in a list with each entry representing a message in the conversation. Here are samples of how these entries might look:
- Type: Indicates the origin of the message. It can be either ai (response generated by the AI) or human (message input by the user).
- Data:
- Content: The main text of the message. For AI responses, this is the generated answer. For human messages, this is the user's input.
- Tool calls: A list of calls made to external tools or APIs during the generation of the response.
- Invalid tool calls: A list of tool calls that failed or were invalid.
- Additional kwargs: Additional keyword arguments that might have been used during the message processing.
- Response metadata: Metadata associated with the response, such as timestamps or processing details.
By using Redis Insight, you can easily monitor and manage the data generated by your conversational agent, ensuring that all interactions are correctly logged and stored in Redis. This can be invaluable for debugging, improving the agent's performance, and maintaining a high-quality user experience.
#How do you export and import chatflows?
Flowise allows you to easily export and import chatflows, enabling you to save your work for future use or share it with others. Below are the steps to export and import chatflows.
#Exporting a chatflow
#1> **Select an existing chatflow
Go to the Chatflows menu in the Flowise interface. Choose the chatflow you want to export from the list of existing chatflows.
#2> Export the chatflow
Click on the settings icon and select the Export Chatflow menu item. The chatflow will be exported as a JSON file, which you can download and save for future use.
#Importing a chatflow
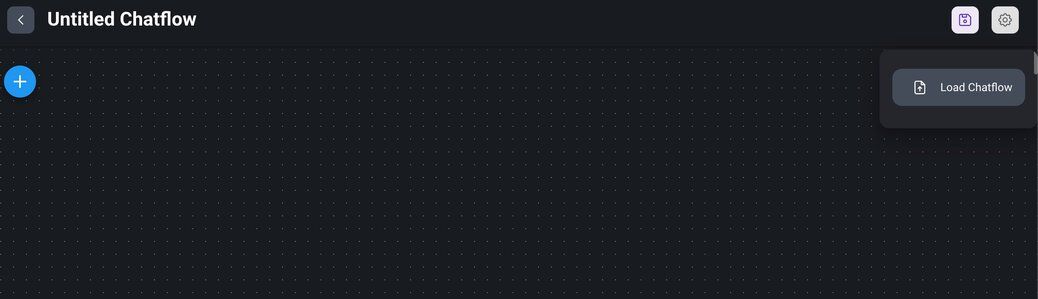
#1> Create a new chatflow
Go to the Chatflows menu in the Flowise interface. Click on the + Add new button to create a new chatflow.
#2> Import the chatflow
Click on the settings icon and select the Load chatflow menu item. Upload the previously exported JSON file.
#3> Configure the imported chatflow
The imported chatflow will appear without credentials. Ensure you provide the necessary credentials for any nodes requiring authentication (e.g., OpenAI key, SearchAPI key and Redis key) and save the chatflow to persist the changes. Once the chatflow is imported and configured, initiate a chat session to ensure it works as expected.
By following these steps, you can efficiently export and import chatflow in Flowise, facilitating easy backup, sharing, and reuse of your conversational agent.
#How can you use Redis as a vector store with Flowise?
In addition to using chat memory in Flowise, you can also leverage Redis as a vector store to store and retrieve embeddings for your conversational agent. This functionality is beneficial for tasks such as semantic search, recommendation systems, and more.
Below sample chatflow demonstrates how to use Redis as a vector store to perform semantic search using the RAG (Retrieval-Augmented Generation) concept.
#Quick steps to use the advanced example
#1> Import the Chatflow
Download and import the provided chatflow JSON file into Flowise and save it.
#2> Configure Nodes
- Redis Node: Set up the Redis nodes with your connection key.
- OpenAI Node: Configure the OpenAI nodes with your API key and necessary parameters.
#3> Upload Sample Data
Unzip and upload the provided sample products or any other text files into the Text File node of this chat flow. The uploaded data will be used for semantic search and recommendations.
#4> Test the Chatflow
Initiate the chatflow and perform searches or queries to see how the system retrieves and utilizes the embeddings stored in Redis to generate meaningful responses.
#Conclusion
By following this tutorial, you have successfully built a sophisticated conversational agent using Flowise and Redis. Flowise's intuitive interface and powerful integration capabilities, combined with Redis's speed and persistence, provide a robust platform for creating and deploying highly interactive and responsive AI chatbots. With these tools, you can handle complex queries, fetch real-time data, and maintain seamless user interactions.
#Next steps
- Build a code-based RAG chatbot: Follow the RAG GenAI Chatbot with LangChain and Redis tutorial to build a similar chatbot using Python and LangChain instead of a visual builder.
- Add video Q&A capabilities: Learn how to build an AI-Powered Video Q&A Application that uses Redis vector search to answer questions about video content.
- Explore semantic search: Dive into Vector Semantic Text Search to understand how Redis handles embedding storage and similarity queries under the hood.
- Try Redis Cloud: Deploy your Redis instance on Redis Cloud for a fully managed production environment with built-in vector search support.