Tutorial
Build 5 Rate Limiters with Redis: Fixed Window, Sliding Window, Token Bucket, and Leaky Bucket
March 20, 202631 minute read

TL;DR: What is the best rate limiting algorithm for Redis?There's no single best algorithm. For most APIs, the sliding window counter offers the best balance of accuracy, simplicity, and low memory usage. Use the token bucket if you need to allow controlled bursts, or the leaky bucket (policingorshaping) if you need strict no-burst behavior. The comparison table below can help you decide.
Note: This tutorial uses the code from the following git repository:https://github.com/redis-developer/redis-ratelimiting-js
Rate limiting controls how many requests a client can make in a given time period. It protects APIs from abuse, ensures fair usage across consumers, and prevents a single bad actor from overwhelming your infrastructure. Redis is a natural fit for this job — it's fast, supports atomic operations like
INCR, and has built-in key expiration via TTL.In this tutorial you'll build five different rate limiters, each using a different Redis data structure and algorithm. By the end you'll understand the trade-offs between them and know which one to reach for in your own apps.
#Algorithm comparison
| Algorithm | Redis type | Memory per client | Accuracy | Burst behavior | Best for |
|---|---|---|---|---|---|
| Fixed window | STRING + Lua | 1 key | Approximate | Allows 2x burst at boundaries | Simple API limits, login throttling |
| Sliding window log | SORTED SET + Lua | O(n) entries | Exact | No bursts | High-value APIs, audit trails |
| Sliding window counter | STRING x2 + Lua | 2 keys | Near-exact | Smoothed boundaries | General-purpose API rate limiting |
| Token bucket | HASH + Lua | 1 key (2 fields) | Exact | Allows controlled bursts | Bursty traffic with average rate caps |
| Leaky bucket | HASH + Lua | 1 key (1-2 fields) | Exact | No bursts (steady drain) | Policing (drop) or shaping (delay) |
#Prerequisites
- bun (v1.2+)
- Docker (optional, for running Redis locally)
- A Redis instance — either local via Docker or a free Redis Cloud database
- Basic familiarity with JavaScript/TypeScript and Lua
#Setup
Clone the repo and install dependencies:
Copy the example env file and set your Redis connection string:
Your
.env should contain:Note: If you use Redis Cloud, replace the URL in your .env and .env.docker with your Redis Cloud connection string. See the Connecting to a Redis Cloud database doc for details.
Start the app with Docker:
#How the demo works
Each rate limiter exposes an
attempt(key, config) function that returns a consistent result:The demo app serves a UI at
http://localhost:8080 where you can click Send Request or Burst 10 for each algorithm and see the results in real time.#Why Lua scripts?
Every rate limiter in this tutorial uses a Lua script executed via
EVAL. Rate limiting algorithms share a common pattern: read state, make a decision, and write the updated state. If these steps run as separate Redis commands, concurrent requests can read the same state, both decide they're allowed, and both write back — bypassing the limit. This is a TOCTOU (time-of-check-time-of-use) race condition, and it matters most under exactly the high-concurrency conditions where rate limiting is critical.Redis offers three approaches to atomicity:
#MULTI/EXEC
MULTI/EXEC queues commands and executes them as an atomic batch — no other client's commands can interleave. However, all commands are queued before execution. You can't read a value inside the batch and then branch on it. For rate limiting, you need to read a counter, decide whether to allow the request, and conditionally write — logic that MULTI/EXEC can't express.#WATCH + MULTI/EXEC
WATCH adds optimistic concurrency control. You WATCH a key, read its value, build a MULTI/EXEC batch based on what you read, and execute. If another client modified the watched key between WATCH and EXEC, the transaction aborts and you retry. This works, but under high concurrency, frequent aborts mean frequent retries — each one an extra round trip. The more contention on a key, the more retries you burn. This is the worst possible behavior for a rate limiter.#Lua scripts via EVAL
Redis executes Lua scripts atomically on the server. No other command runs between the script's reads and writes. Unlike
MULTI/EXEC, you can use if/then logic to branch on values you just read. Unlike WATCH, there's no retry loop — the script always completes on the first attempt in a single round trip.Trade-offs to keep in mind:
- Blocking. Lua scripts block the Redis event loop while they run. Keep scripts short and avoid expensive operations like
KEYS. All scripts in this tutorial use a handful of fast Redis calls each, so blocking time is negligible. - Cluster constraints. In Redis Cluster, all keys accessed by a script must hash to the same slot. Single-key algorithms (fixed window, sliding window log, token bucket, and leaky bucket) aren't affected. The sliding window counter uses two keys and handles this with hash tags.
- Debugging. Lua errors surface as Redis error responses, which can be harder to diagnose than client-side logic. Test scripts against a local Redis instance before deploying.
#1. Fixed window counter
#How it works
A fixed window rate limiter counts requests within discrete, non-overlapping time intervals. It is the simplest Redis rate limiting algorithm.
Divide time into fixed-length windows (e.g. 10-second blocks). Each window gets a counter. Every request increments the counter, and once it exceeds the limit the request is denied. The counter key includes the window number, so a new window automatically starts a fresh count.
Below is an animation that shows how it works with a window size of four requests. Requests start filling the window, then some get rejected. Once the window resets more requests are allowed.
#Redis data structure
STRING — one key per window, using
INCR to bump the count and EXPIRE to auto-clean the key. A Lua script wraps both commands into a single atomic EVAL call.#Use cases
- Simple API rate limiting (e.g. 100 requests per minute)
- Login attempt throttling
- Any scenario where simplicity and low memory matter more than boundary precision
#Code walkthrough
The full implementation lives in
server/components/rate-limiting/fixed-window.ts. The Lua script handles the increment and expiry atomically:The TypeScript caller passes the script to Redis and interprets the result:
Here's what's happening step by step:
- Atomic script. The entire increment-and-expire sequence runs inside a single
EVALcall. Redis executes Lua scripts atomically, so no other command can interleave between theINCRand theEXPIRE. Without this, a crash between the two commands could leave a key with no expiry, permanently blocking that client. AMULTI/EXECtransaction can't conditionally setEXPIREonly whencount == 1since it can't branch on intermediate results (see why Lua scripts?). INCRcreates or increments. If the key doesn't exist,INCRcreates it at 1. Otherwise it increments. Each concurrent caller gets a unique, sequential count.- Expiry on first request. When
count == 1this is the first request in a new window. The script setsEXPIREso the key auto-deletes after the window passes. PTTLfor retry-after. The script also fetches the key's remaining TTL in milliseconds. The TypeScript caller converts this to seconds for theretryAfterfield.
#Trade-offs
- Pros: Minimal memory (one key per window), simple logic, fast (one
EVALround trip). - Cons: Susceptible to boundary bursts. A client could send 10 requests at second 9 and another 10 at second 11 — 20 requests in 2 seconds while technically staying within a "10 per 10 seconds" limit, because the requests straddle two windows.
#2. Sliding window log
#How it works
A sliding window log rate limiter records the exact timestamp of every request and uses that log to enforce a true rolling window. It eliminates the boundary-burst problem of fixed windows at the cost of higher memory usage.
Instead of counting requests in fixed buckets, log the exact timestamp of every request in a sorted set. On each new attempt, remove entries older than the window, then count what's left. If the count is below the limit, add the new entry. This gives you a true sliding window — no boundary bursts.
Below is an animation showing a sliding window log with a 5 entry window. A timestamp of each request is logged, and when the log fills to 5 more requests get rejected. Then the oldest entries start expiring as the window slides and more requests are accepted.
#Redis data structure
SORTED SET — the score is the request timestamp (milliseconds), and the value is a unique string (
timestamp:random). A Lua script wraps the prune-count-add sequence into a single atomic EVAL call. Redis commands used inside the script: ZREMRANGEBYSCORE, ZCARD, ZADD, ZRANGE, EXPIRE.#Use cases
- High-value APIs where boundary accuracy matters (payment processing, authentication)
- Scenarios where you need to know the exact request timestamps for auditing
- Low-to-medium request volume per client
#Code walkthrough
The full implementation lives in
server/components/rate-limiting/sliding-window-log.ts. The Lua script atomically prunes, counts, and conditionally adds:The TypeScript caller generates a unique member and passes everything to the script:
Key details:
- Atomic script. The prune-count-add sequence runs inside a single
EVALcall. Without atomicity, two concurrent requests could both read the sameZCARDcount, both pass the check, and bothZADD— exceeding the limit.WATCH/MULTI/EXECwould technically work here, but every concurrent write to the sorted set triggers aWATCHabort and retry — exactly the high-concurrency scenario where retries are most expensive (see why Lua scripts?). - Pruning.
ZREMRANGEBYSCOREremoves all entries with a score (timestamp) older than the window start. This keeps the set trimmed to only relevant requests. - Counting.
ZCARDreturns the number of remaining entries — the request count within the sliding window. - Unique members. The member value
${now}:${Math.random()}is generated in TypeScript and passed to the script asARGV[4]. Sorted sets require unique members, so appending a random suffix prevents two requests at the same millisecond from colliding. - Retry-after. When denied, the script fetches the oldest entry's score via
ZRANGE ... WITHSCORESand calculates when it will fall outside the window. That's the earliest moment a new request would be allowed.
#Trade-offs
- Pros: True sliding window with no boundary bursts. Precise retry-after calculations. Single
EVALround trip. - Cons: Memory grows linearly with request volume (O(n) per client). For a limit of 10,000 requests per hour, each client's sorted set holds up to 10,000 entries. Not ideal for high-volume, high-cardinality rate limiting.
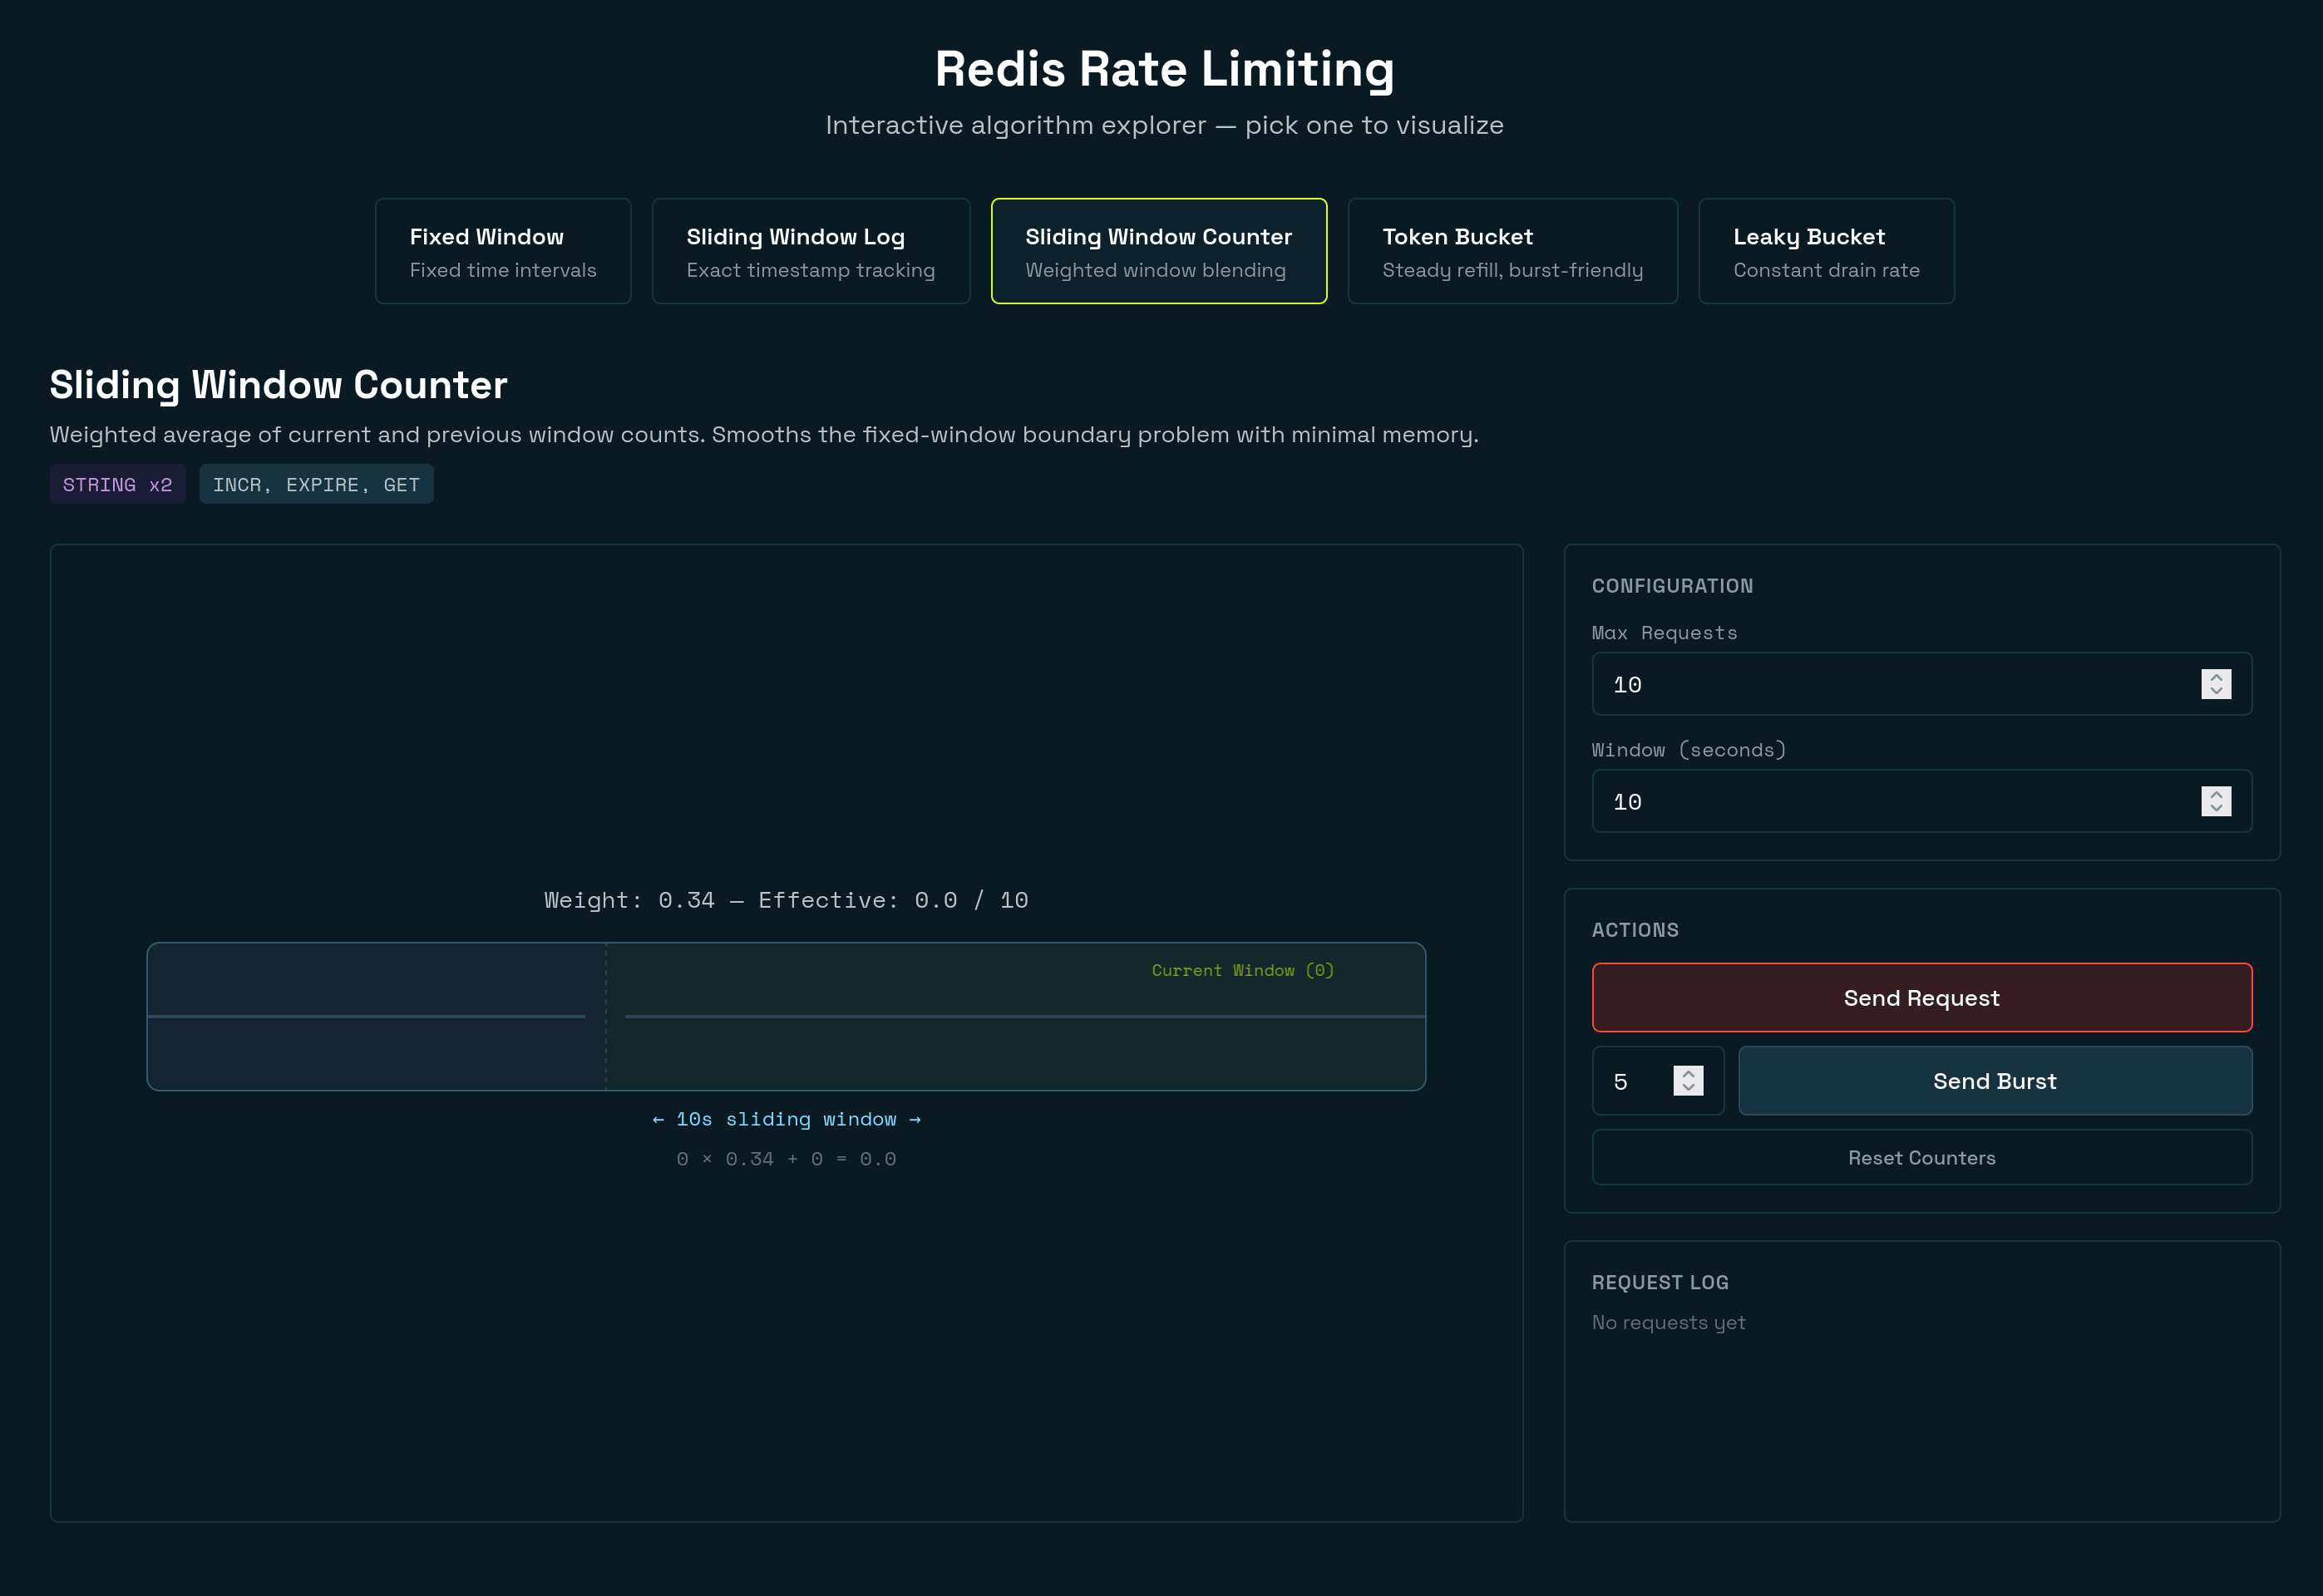
#3. Sliding window counter
#How it works
A sliding window counter rate limiter blends two fixed-window counters using a weighted average to approximate a true sliding window. It offers near-exact accuracy with the same low memory footprint as a fixed window.
This is a hybrid approach. It keeps two fixed-window counters (current and previous, often called a floating window) and computes a weighted average based on how far into the current window you are. The weight of the previous window decreases linearly as you move through the current window.
The animation below shows a sliding window counter that demonstrates how the algorithm smooths traffic across window boundaries. The rejections occur when the weighted estimate (
prev * weight + curr) hits the limit of 10.#Redis data structure
STRING x2 — one key for the current window counter, one for the previous. A Lua script atomically reads both counters, computes the weighted estimate, and conditionally increments — all in a single
EVAL call. The two keys use hash tags ({base}:windowNum) so they map to the same slot in Redis Cluster.#Use cases
- Best middle ground for most apps — smoother than fixed window, far cheaper than the log
- API gateways and middleware where you want good accuracy without per-request storage
- High-volume rate limiting where memory matters
#Code walkthrough
The full implementation lives in
server/components/rate-limiting/sliding-window-counter.ts. The Lua script atomically reads both counters and conditionally increments:The TypeScript caller computes the window numbers, builds hash-tagged keys, and passes them to the script:
Key details:
- Atomic script. The read-compute-increment sequence runs inside a single
EVALcall. Without atomicity, concurrent requests could both read the same stale counts, both pass the limit check, and both increment — exceeding the limit.WATCH/MULTI/EXECwould require watching two keys, doubling the chance of aborts under contention, and the weighted formula must run between the reads and the conditional write — logic that can't live inside aMULTIblock (see why Lua scripts?). - Dual keys with hash tags. Two STRING keys — one for the current window, one for the previous. The keys use the format
{base}:windowNum(e.g.{ratelimit:user123:sliding-window-counter}:5). In Redis Cluster, only the substring inside{...}determines the hash slot, so both keys always land on the same node — a requirement for multi-key Lua scripts. - The weighted formula.
prev_count * (1 - elapsed) + current_countblends the two windows. At the start of a new window (elapsed = 0), the previous window counts fully. At the end (elapsed ≈ 1), the previous window counts almost nothing. This smooths the boundary spike that plagues fixed windows. - TTL of
windowSeconds * 2. The previous window's key must survive into the next window so it can be read for the weighted calculation. A TTL of twice the window size guarantees this. - Estimate-then-increment. The script checks the estimated count before incrementing. If the estimate already exceeds the limit, it returns immediately without writing anything. This avoids inflating the counter on denied requests.
#Trade-offs
- Pros: Low memory (two keys per client), smooths boundary bursts, fast (one
EVALround trip), cluster-safe via hash tags. - Cons: The count is an approximation. In rare edge cases, the weighted estimate could let slightly more or fewer requests through than the exact limit. For most apps, this margin is negligible.
#4. Token bucket
#How it works
A token bucket rate limiter allows controlled bursts of traffic while enforcing a steady average rate. Tokens accumulate over time up to a maximum capacity, and each request consumes one token. When the bucket is empty, requests are denied until more tokens refill.
Imagine a bucket that holds tokens. Tokens refill at a steady rate (e.g. 1 per second). Each request removes one token. If the bucket is empty, the request is denied. The bucket has a maximum capacity, so tokens can't accumulate beyond a set limit. This allows short bursts (up to the bucket capacity) while enforcing a steady average rate.
The animation below demonstrates a token bucket that holds tokens. Incoming requests start to empty the bucket and reject when it is empty. Tokens replenish the bucket based on the refill rate.
#Redis data structure
HASH with two fields:
tokens (current token count) and last_refill (timestamp of the last refill). The entire refill-check-consume cycle runs inside a Lua script.#Use cases
- API rate limiting where you want to allow short bursts (e.g. a mobile app that batches requests on launch)
- Payment or messaging APIs with a sustained average rate but tolerance for bursty traffic
- Per-user or per-API-key throttling
#Code walkthrough
The Lua script in
server/components/rate-limiting/token-bucket.ts:The TypeScript caller passes the script and parameters to Redis:
Key details:
- Atomic script. The refill-check-consume sequence runs inside a single
EVALcall. The script reads the hash, computes new tokens based on elapsed time, and conditionally decrements — all atomically.WATCH/MULTI/EXECwould require reading the hash before the transaction, computing the refill outside, then executing — and any concurrent write triggers a retry (see why Lua scripts?). HGETALLto load state. On the first request, the hash doesn't exist, sotokensdefaults tomax_tokens(a full bucket). On subsequent requests it reads the stored values.- Elapsed-time refill.
elapsed * refill_ratecalculates how many tokens accumulated since the last request.math.min(max_tokens, ...)caps it at the bucket capacity so tokens don't grow unbounded. - Consume one token. If at least one token is available, decrement and set
allowed = 1. - Persist and auto-clean.
HSETsaves the updated state.EXPIREsets a TTL so the key auto-deletes if the client goes idle. The TTL ismax_tokens / refill_rate + 1— the time it takes to fully refill, plus a buffer. - Caller passes
now. The timestamp comes from the app, not from Redis's clock. This makes the behavior deterministic and testable.
#Trade-offs
- Pros: Allows controlled bursts up to bucket capacity. Smooth long-term average rate. Single round trip (one
EVALcall). - Cons: More complex than counter-based approaches. The refill calculation uses floating-point math, which needs care to avoid drift.
#5. Leaky bucket
#How it works
A leaky bucket rate limiter uses the metaphor of a bucket with a hole in the bottom: traffic enters the bucket, and the bucket drains at a fixed rate. The key implementation choice is what to do when requests arrive faster than the drain rate.
-
Leaky bucket as a queue (shaping). Incoming requests are placed into a FIFO queue (the bucket). A scheduler drains the queue at a fixed rate, forwarding one request per interval to the downstream service. If the queue is full, new requests are dropped. This variant delays accepted requests — a burst of 5 requests would be spaced out and forwarded one at a time. It guarantees a perfectly smooth output rate, which is useful for network traffic shaping where the output link has a fixed bandwidth.
-
Leaky bucket as a meter (policing). A counter tracks the current "fill level" of a virtual bucket. Each request adds to the level, and the level drains at a constant rate based on elapsed time. If the level plus the new request would exceed the bucket's capacity, the request is rejected immediately. Accepted requests are not delayed — they pass through instantly. This variant polices the input rate rather than shaping the output.
This tutorial implements both modes behind
mode: "policing" | "shaping":policingmode is best for synchronous APIs where each request must get an immediate allow/deny decision.shapingmode is best when callers can tolerate delay (for example, workers or gateways that can schedule requests before forwarding).
The animation below demonstrates the leaky bucket algorithm with the shaping method. The bucket stacks requests from bottom to top. Based on the drain rate, requests fall out of the bottom of the bucket. The bucket fills during a burst, rejects requests when full, and steadily drains to recover. Notice that requests are immediately "queued" as soon as they come in.
#Redis data structure
Both modes use a HASH, but they store different state:
- Policing:
level(current fill level) +last_leak(timestamp of last drain calculation) - Shaping:
next_free(the next timestamp when an item can leave the bucket)
Like all algorithms in this tutorial, both variants use Lua for atomicity (see why Lua scripts?). The policing and shaping flows both read state, compute a decision, and write back — a
WATCH/MULTI/EXEC approach would need retries on every concurrent access, while a Lua script completes in a single round trip with no contention.#Use cases
- Policing mode: request/response APIs, login throttling, webhook endpoints — any path where immediate allow/deny is required
- Shaping mode: async workers, outbound API clients, and proxy/gateway flows where delayed forwarding is acceptable
- Either mode: protecting downstream services that cannot handle bursty traffic, even when long-term averages are fine
#Code walkthrough
The Lua script in
server/components/rate-limiting/leaky-bucket.ts includes both variants. First, the policing script:Then the shaping script:
The TypeScript caller follows the same pattern as the token bucket:
Key details:
#Policing mode details
- Drain calculation.
elapsed * leak_ratecomputes how much the bucket leaked since the last request.math.max(0, level - leaked)ensures the level never goes negative. - Capacity guard. The check is
level + 1 <= capacity, notlevel < capacity. This avoids floating-point overflow edge cases after partial draining. - Immediate decision. If capacity exists, allow now; otherwise reject now. No delay queue is involved.
#Shaping mode details
- Virtual schedule via
next_free. The script tracks when the next queued request can be forwarded. - Queue depth from time.
queue_depth = delay * leak_rateconverts waiting time into "items currently in bucket." - Delay signaling. On allow, the script returns
delay_msso callers can wait before forwarding. - Same capacity rule.
queue_depth + 1 <= capacityenforces bounded queue length.
Caveat:Determining how to actually queue requests is up to you. APIs often choose to respond immediately and include aRetry-Afterheader in the response. This avoids queuing server-side, but leads to effectively the same result as the policing method. Implementing a request queue is beyond the scope of this tutorial and adds additional complexity to your application. This tutorial simply mimics how the shaping method works rather than providing the full implementation details.
#Shared details
- Auto-clean TTL.
capacity / leak_rate + 1expires idle keys after the bucket would fully drain. - Mode switch in caller. The TypeScript code chooses
LUA_SHAPINGorLUA_POLICINGfromconfig.mode.
#Trade-offs
- Policing pros: immediate allow/deny decisions, no extra latency, and minimal operational complexity.
- Policing cons: overflow traffic is dropped immediately, so clients must retry and handle backoff.
- Shaping pros: smooth outbound rate by delaying accepted requests, reducing burst impact on downstream systems.
- Shaping cons: adds latency and queueing behavior; callers must honor
delay, and queue capacity still causes drops under sustained overload.
#When to use which algorithm
Choosing a rate limiting algorithm depends on your specific requirements. Here's a decision guide:
Start with a sliding window counter if you're unsure. It handles most API rate limiting scenarios well — low memory, near-exact accuracy, and no boundary bursts. It's the best default choice for distributed rate limiting with Redis.
Use a fixed window counter when simplicity matters most and you can tolerate occasional boundary bursts. Good for login throttling, basic API limits, or internal services where approximate enforcement is acceptable.
Use a sliding window log when you need exact request counts and can afford the memory cost. Payment processing, authentication endpoints, and any API where you need an audit trail of exact request timestamps.
Use a token bucket when you want to allow short bursts of traffic while still enforcing an average rate over time. Mobile apps that batch requests on launch, APIs with naturally bursty traffic patterns, or any scenario where brief spikes are expected and acceptable.
Use a leaky bucket when you need strict no-burst behavior. Choose policing for immediate API decisions, and choose shaping when the caller can delay work to smooth outbound traffic.
#Token bucket vs leaky bucket
The token bucket and leaky bucket are often confused. A token bucket allows bursts up to capacity and then enforces an average rate. A leaky bucket enforces a strict drain rate: in policing, overflow is rejected immediately; in shaping, overflow is delayed (until queue capacity is reached). Both algorithms are mathematical duals — the token bucket starts full and spends tokens, while the leaky bucket starts empty and fills with incoming requests. If your downstream service can handle occasional spikes, use a token bucket. If it cannot, use a leaky bucket (policing or shaping based on whether delay is acceptable).
#Running the demo
Start Docker
This spins up Redis and the server. Alternatively you can spin up Redis and run the dev server:
Open
http://localhost:8080 in your browser. You'll see five cards — one for each algorithm. Each card has:- Send Request — fires a single request through the rate limiter and shows whether it was allowed or denied, along with remaining capacity.
- Burst 10 — sends 10 rapid requests in sequence. This is the fastest way to see an algorithm hit its limit.
- Reset All Counters — flushes all rate-limit keys from Redis so you can start fresh.
Try clicking Burst 10 on the fixed window card, then immediately clicking it again. You'll see the boundary burst problem in action. Then try the same thing on the sliding window log — no boundary burst.
#HTTP response codes and headers
When you use these limiters in an API, map the result to standard HTTP behavior:
- Allowed request: return your normal success code (
200 OK,201 Created,204 No Content, etc.). - Rate-limited request: return
429 Too Many Requests. Retry-Afterheader: includeretryAfter(in seconds) so clients know when to try again.
You can also return rate limit headers such as:
X-RateLimit-LimitX-RateLimit-RemainingX-RateLimit-Reset
NOTE:The headers above are only common patterns. There is no single standard.
#Next steps
Now that you've built and compared all five rate limiting algorithms, here are some ways to go further:
- Try a different language. See how the same patterns apply in Rate Limiting in Java with Redis or Rate Limiting in .NET with Redis.
- Add rate limiting middleware. Wrap your chosen algorithm into Express, Hono, or Fastify middleware to protect your API endpoints in production.
- Combine algorithms. Use a token bucket for per-user limits and a fixed window for global limits. Layering algorithms gives you fine-grained control over different types of traffic.
- Monitor your rate limiters. Use Redis Insight to watch key creation, TTL expiration, and memory usage in real time.
- Move to production. Sign up for a free Redis Cloud database and deploy your rate limiter with a managed, highly available Redis instance.
#References
- Redis
INCRcommand — atomic counter increment used inside the fixed window and sliding window counter Lua scripts - Redis sorted set commands —
ZADD,ZCARD,ZREMRANGEBYSCOREused by the sliding window log - Redis
EVALand Lua scripting — server-side scripting used by all five algorithms for atomic read-modify-write - Redis
EXPIREcommand — automatic key expiration used by all five algorithms - Redis Cloud free tier — get a free Redis database to try this tutorial
- Redis docs — comprehensive Redis documentation
- Rate Limiting in Java with Redis — implement fixed window rate limiting in Java Spring
- Rate Limiting in .NET with Redis — rate limiting patterns for .NET applications