Tutorial
ElastiCache to Redis Cloud
February 27, 20268 minute read
TL;DR:You can migrate from AWS ElastiCache to Redis Cloud using either an offline approach (export an RDB snapshot to S3 and import it) or a live approach (replicate data in real time using RIOT). The offline method is simpler but requires downtime; live replication minimizes downtime but does not guarantee full consistency.
#What you'll learn
- How to export an ElastiCache backup to S3 and import it into Redis Cloud
- How to set up live replication from ElastiCache to Redis Cloud using RIOT
- How to configure AWS permissions, parameter groups, and networking for migration
- How to validate your data after migration
#Prerequisites
- An AWS account with access to your ElastiCache instance and the S3 console
- A Redis Cloud account with a target database already provisioned (sign up free)
- For live migration: an EC2 instance in the same VPC as your ElastiCache cluster
#Why migrate from ElastiCache to Redis Cloud?
Redis Cloud offers several advantages over AWS ElastiCache, including access to the full Redis stack (Search, JSON, Time Series, and more), Active-Active geo-replication, predictable pricing without per-node fees, and a fully managed experience across any cloud provider. If you are looking for an AWS ElastiCache alternative with more flexibility and lower operational overhead, Redis Cloud is a strong option.
#What are my migration options?
You have two primary migration strategies:
- Offline migration (S3 export/import): Create a manual backup of your ElastiCache cluster, export the RDB file to an S3 bucket, and import it into Redis Cloud. This is the simplest path but requires a maintenance window.
- Live migration (RIOT replication): Use the RIOT-X tool to replicate data from ElastiCache to Redis Cloud in real time. This minimizes downtime but requires additional setup and is not supported by ElastiCache Serverless.
Before migrating to Redis Cloud, you should evaluate the migration and consider the best option. Read the Redis Cloud Migration Guide to determine which migration strategy is right for you.
#Offline data migration
#Create S3 bucket with proper permissions
- Open the Amazon S3 console.
- Create a new S3 bucket to store Elasticache backups.
- Choose Permissions.
- Under Access control list (ACL), choose Edit.
- Click Add grantee, and then enter the following Elasticache canonical ID (this allows the Elasticache service to write backups to this S3 bucket):
6. For Objects, select List and Write.
7. For Bucket ACL, select Read and Write.
8. Click Save changes.
9. Add the following JSON to the Bucket policy. Replace UNIQUE-BUCKET-NAME with the name of your bucket:
10. Disable “block all public access” at the account level and at the bucket level.
11. While still in the Permissions tab, edit Block public access (bucket settings).
12. Uncheck Block all public access.
13. Disable “block all public access” at the account level.
14. In the S3 navigation pane, click on Block Public Access settings for this account.
15. Uncheck Block all public access.
#Create manual Elasticache backup and export to S3
- Open the ElastiCache console.
- From the navigation pane, choose Redis OSS caches.
- Select your Redis database
- In the Actions dropdown button, select Backup.
- Input a name for your backup and click Create Backup.
- In the navigation pane, under Resources, choose Backups.
- From the list of backups, select your backup.
- From the Actions dropdown menu, choose Export.
- In Target S3 location dropdown list, select the S3 bucket that you created.
- Click Export.
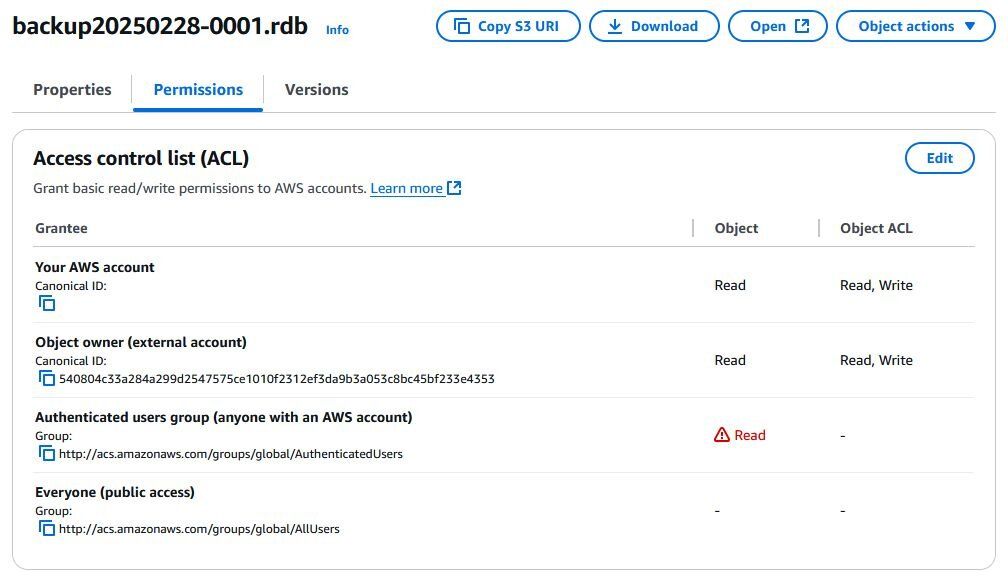
- Locate your backup RDB file in S3 and edit the permissions.
- In the Permissions tab click Edit
- For Authenticated users group (anyone with an AWS account), under Object check Read.
#Import RDB file into Redis Cloud
- In the Redis Cloud console, select the target database from the database list.
- Select Import.
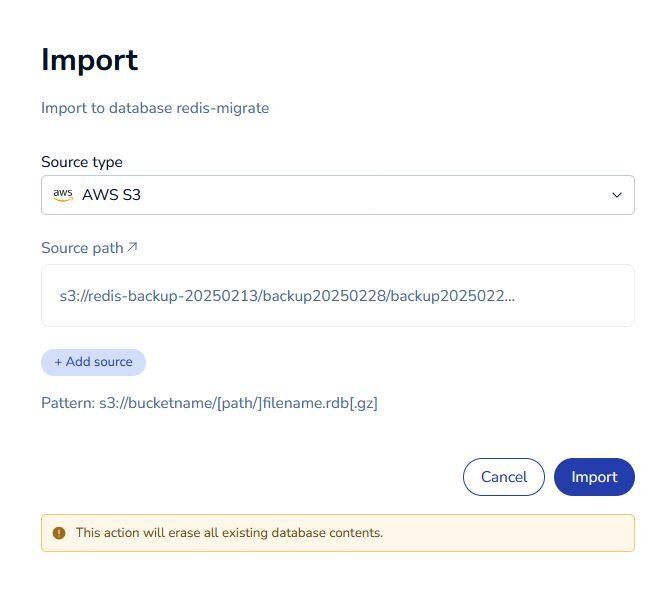
- Enter the details for the RDB file:
- Source type - Select AWS S3.
- Source path - Enter the S3 URI for the RDB file from the previous step: s3://bucketname/[path/]filename.rdb
- For sharded databases with multiple RDB files, select Add source to add another RDB file.
- Select Import.
- Validate your migration and redirect your app's traffic to the new Redis Cloud endpoint.
#Live data migration
AWS does not allow direct access to ElastiCache instances. Your ElastiCache instance must be accessed from an EC2 instance with proper permissions. The following guide assumes that your ElastiCache instance is reachable from the internet via an EC2 instance.
Note: Live data migration is not supported by ElastiCache serverless.
#Modify your ElastiCache parameter group
By default, ElastiCache has keyspace notifications disabled. This feature is required for RIOT live mode. You will need to create a custom parameter group in order to modify configuration values for your ElastiCache. If your ElastiCache already has a custom parameter group, you can skip to step 5 to edit the notify-keyspace-events parameter.
- Open the ElastiCache console and select Parameter groups.
- Click Create parameter group.
- Name your parameter group, give it a description, and select the Redis version under Family.
- Click Create.
- From the Parameter groups page, click on the parameter group you just created, click Edit parameter values.
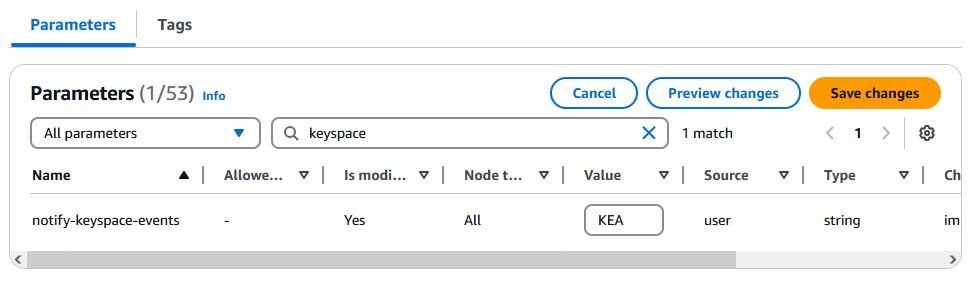
- Type in keyspace in Find parameters to filter for the notify-keyspace-events parameter.
- For Value, enter KEA.
- If your ElastiCache has cluster mode enabled, you will also need to modify the cluster-enabled parameter.
- Click Save changes.
10. In the left navigation pane, click on Redis OSS caches and select your ElastiCache instance.
11. Click Modify, under Parameter groups select your new parameter group.
12. Click Preview changes, then click Modify to confirm changes.
#Set up compute connection to ElastiCache
- Open the ElastiCache console and select your open source Redis cache.
- From the Actions dropdown button, select Set up compute connection.
- Create a new EC2 instance or select an existing one in the same VPC.
- Ubuntu is preferred, additional steps might be required if using Amazon Linux.
- Click Setup, this will create a new ENI and security groups to allow your instance access to ElastiCache.
#Install redis-tools, Java, and RIOT
1. Use Instance Connect or SSH to connect to the new EC2 instance:
2. Install the redis-cli tool:
3. Verify the connectivity with the ElastiCache instance, replace ELASTICACHE_ENDPOINT with your ElastiCache endpoint. Remove the --tls option if TLS is not enabled.
4. Install Java, we recommended using OpenJDK 21 or later:
5. Install RIOT. Download the desired release. Then, unzip the package and make sure the RIOT binaries are in place, as shown here:
6. You can check the version of RIOT by running the command below:
#Replicate ElastiCache to Redis Cloud
Once Java and RIOT are installed, you are all set to begin the migration process which replicates data directly from the source (ElastiCache) to the target (Redis Cloud).
- Log into the Redis Cloud console.
- Click on your migration target and take note of the: public endpoint, username, and password
- Back in your EC2 instance run the command below:
sudo ./riot replicate rediss://ELASTICACHE_ENDPOINT:port redis://username:password@REDIS_CLOUD_ENDPOINT:port --mode live- If you are migrating from an ElastiCache cluster, you must include the --source-cluster option
- If you are migrating to a Redis Cloud cluster, you must include the --target-cluster option.
- If TLS is not enabled in your ElastiCache cluster, replace rediss:// with redis://
- Validate your migration and redirect your application's traffic to the new Redis Cloud endpoint.
The live replication mechanism does not guarantee data consistency. Redis sends keyspace notifications over pub/sub which does not provide guaranteed delivery. It is possible that RIOT can miss some notifications in case of network failures for example.
Also, depending on the type, size, and rate of change of data structures on the source it is possible that RIOT cannot keep up with the change stream. For example if a big set is repeatedly updated, RIOT will need to read the whole set on each update and transfer it over to the target database. With a big-enough set, RIOT could fall behind and the internal queue could fill up leading up to updates being dropped.
For those potentially problematic migrations it is recommended to perform some preliminary sizing using Redis statistics and bigkeys/memkeys in tandem with --mem-limit. If you need assistance please contact your Redis account team.
For more information, see:
#Next steps
Now that you've migrated from ElastiCache to Redis Cloud, consider exploring these resources:
- Redis Cloud Migration Guide — Compare migration strategies and plan your next move.
- Migrate Memorystore to Redis Cloud — Follow a similar process to migrate from Google Cloud Memorystore.
- Migrate ElastiCache to Azure Managed Redis — Learn how to migrate from ElastiCache to Azure Managed Redis instead.
- Migrate Redis Open Source to Redis Cloud — Move your self-hosted Redis instance to Redis Cloud.